Its taken a lot of motivation to start writing this, and I hope its okay, I have a mental block that I need to write this and the second post about magstripes before moving on to some new things with my plants I want to try.
Eye Candy:
My friend Roelof Temmingh (@Roeloftemmingh) made this cool video for my talk, check it out below or at http://vimeo.com/51228567. Please note we had permission to test out the door at Senseposts’ old office :)
Mission Plausible from RT on Vimeo.
:)
Intro:
So It started with me wanting to get into a building that has RFID tags for my talk on the basics of bypassing physical security. The first things I had to do was to find out about how RFID actually works and what types there are and so on. Essentially there are two very common flavours:
* 125Khz / 134Khz – LF (Low Frequency) tags — NB. these are most commonly used for access control.
* 13.56 Mhz – HF (High Frequency) tags — these seem to be used more for payment and other public infrastructure such as train systems
The other big differentiators that I saw were between battery powered (active) and non-battery powered (passive) tags. In smaller sealed form factors such as the mini key FOBs and so on it seems to me that most if not all are passive. These tags are powered by the EM field of the reader (which is pretty small and why you need to put your tag almost on the reader before it is read).
Essentially the LF Passive tags get powered on and scream out a code until they are powered off (moved away). Active tags seem more common with high end security devices and those used outside of access control on this like Ultra High Frequency (UHF) tags for monitoring vehicles.
LF got your nose?
So after identifying the common types I had to figure out what kind of tags I was dealing with, one way of doing it is by looking at the tags under a light or opening them up and taking a look at the antenna, basics are: lots of coils (longer piece of wire) its most likely HF, less wire (less coils) its most likely LF tags.
Naturally my DIY skills tend to turn into me using multiple plasters and crying so taking apart the FOBs that I received seemed like a bad idea. Google, however, is one of my best friends and most systems have something online that give away the type of tag as well as the encoding (I’ll get to this next). The tags I had turned out to be GSC System Proximity tags connected to a “Proxlock”, the information on the tags was available at http://www.gscsystems.com/gsc_site_files1/proximity_cards_and_tags1/620-10-proximity-mini-keyring-tag/620-10-proximity-mini-keyring-tag.htm , the interesting parts being:

This naturally gave me what I needed to know that it was a 125Khz (LF) tag and even some information on the data. The term “security data” seemed daunting at the time and could have implied some sort of crypto, but it worked out in the end ;)
The last way that you can determine the tags is by using the proxmark3, really a great device and I was lucky enough to get a second hand one from Major Malfunction a few Defcon’s ago for cheap and it hasn’t let me down since. The screenshots of my proxmark are from a windows environment simply because it was easier to get to from here but I really recommend running it on a *nix based system as it seems to be a lot more stable/functional!
Essentially the proxmark comes with a function to tune the antennas which allows you to adjust them to see how well they are tuned. To get it it simply plug in your proxmark and either a HF or LF antenna and type ‘hw tune’ after loading up the proxmark interface:
With LF antenna and no tag present:
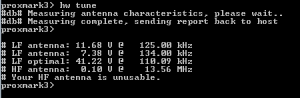
With LF antenna and an LF tag present:

As you can see from the above the voltage picked up by a rather high amount and told us that the tag we presented was indeed a LF tag.
Data Shmata:
Next step of course was trying to read the data, and figure out exactly what was being sent. At this stage I knew the tags were LF (125Khz) and that the data was some sort of Amplitude Shift Keying as well as Manchester encoding (not that I had any idea on the first one just yet). Additionally I knew there was “security data” on the tags, so it might not be sending the same message but might use something like KeeLoq or another cryptographic algorithm to decide what to send.
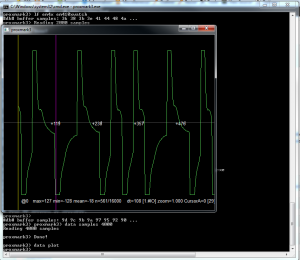
Proxmark is an AMAZING device/toolset for playing with this type of stuff and includes common setups with preconfigured functionality as well as the ability for you to get raw data out and plot it. After doing a bit of reading on the device and going through the forum I decided to tackle it the old fashioned raw way. First step was getting the data and plotting it, from the Proxmark interface I simply do the following:
* lf read – this seems to be a requirement a bunch of the time to get it to use the LF antenna, i am not sure, but do this for good measure it won’t hurt.
* data samples 4000 – This takes 4000 samples and reads them into a buffer so that you can visualise them on the graph
* data plot – Simply plots the data as seen below:
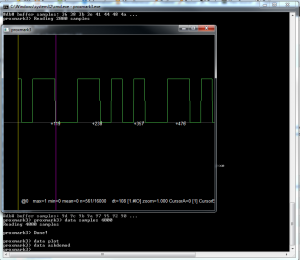
Now I have the data I need to demodulate it, similar to what is done with the radio data (after all this is still radio, just very low freq radio :)). The data is encoded in the amplitude of the carrier wave using a technique known as Amplitude Shift Keying (you can read more at Wikipedia , but you dont really need to know it). As I just said, while its nice to know, the proxmark can do all of the demodulating for you so that you do not even need to worry about what ASK is.
To demodulate your data now you can simply use the function ‘data askdemod‘ and hey presto, square wave:
So now we have the square wave we need to get the raw binary out, these types of LF cards generally use manchester encoding to …encode the data. Again proxmark and its toolkit of awesome has a handy function to demodulate the data for you “data mandemod”. You read more about manchester encoding on the wiki page. The most important aspect to note is that there are two different conventions for representing the data, one where the 1’s are high-to-low and the other the 1’s are a low-to-high. So if the device you are working with uses one you can either use the data directly or simply invert the data to get it into the other format. An example of the output can be seen below:
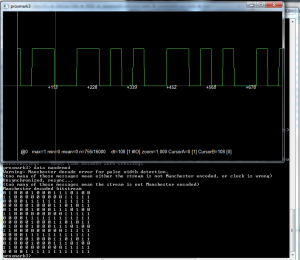
The outputted data is as follows:
0 1 0 0 0 1 0 0 0 1 1 1 0 1 0 0
1 1 0 0 0 0 0 0 0 0 0 1 1 1 1 1
0 0 0 0 1 1 1 1 1 1 1 1 1 1 1 1
0 0 0 0 0 1 0 0 0 1 1 0 1 0 1 1
0 1 0 0 0 1 0 0 0 1 1 1 0 1 0 0
1 1 0 0 0 0 0 0 0 0 0 1 1 1 1 1
0 0 0 0 1 1 1 1 1 1 1 1 1 1 1 1
0 0 0 0 0 1 0 0 0 1 1 0 1 0 1 1
0 1 0 0 0 1 0 0 0 1 1 1 0 1 0 0
1 1 0 0 0 0 0 0 0 0 0 1 1 1 1 1
0 0 0 0 1 1 1 1 1 1 1 1 1 1 1 1
0 0 0 0 0 1 0 0 0 1 1 0 1 0 1 1
0 1 0 0 0 1 0 0 0 1 1 1 0 1 0 0
1 1 0 0 0 0 0 0 0 0 0 1 1 1 1 1
0 0 0 0 1 1 1 1 1 1 1 1 1 1 1 1
Playing with it slightly I can see the following patterns:
010001000111010011
0000000001111100001111111111110000010001101011010001000111010011
0000000001111100001111111111110000010001101011010001000111010011
0000000001111100001111111111110000010001101011010001000111010011
000000000111110000111111111111
After repeating this process a few times, i’m getting the same repeated data the whole time — fantastic!
Decoding Data:
So I started looking around and speaking to a few other people and after a bit of reading I found out that the format of the data was in EM41x tag. Essentially you can spot it by the 7 leading 1’s (or 0’s in our case due to the Manchester Encoding issue I described earlier). Even better the format is really well described (even with pictures for me!):
http://www.priority1design.com.au/em4100_protocol.html
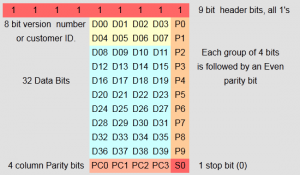
Throwing our data into that format (and I have a webapp for that — in the next section) the data bits for the fob i was testing were ‘11110110010001011011000’ which in hex was ‘FB22D8’ and most importantly was 8069848 in decimal, the EXACT number written on my FOB.
Webapping the Decoding:
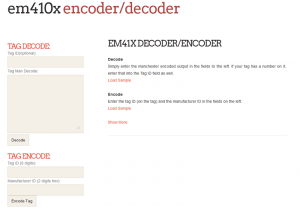
So at this stage I had found a few interesting things, namely, the FOBs were sending out EXACTLY what was written on them, prefixed with 0f as the manufacturer code. Additionally the binary would also need to sometimes be inverted depending on which Manchester encoding standard was used. Later on I found out I needed to have the full binary as well as other to transmit and spoof the data. Lastly because the tags were sending out exactly what was written on them I also wanted to have a way to be able to generate tag data from just the number so I built an encoder as well.
You can use the webapp at http://andrewmohawk.com/EM41X/ and get the tarball for it at http://andrewmohawk.com/EM41X/EM41x.tgz
Spoofing:
So now I have the ability to read the data, I know what it is sending and I can create either a copy of a tag from the text that is written on it or by reading it with my proxmark. Now I want to gain access to whatever it is that the tag is opening (in this case the entrance door as seen in the video).
There are two ways to spoof the tags with the Proxmark, either with the EM41x toolset or manually. I prefer to have a bit more control over the data when testing, so mostly I am doing it manually, but the functions in the EM410x set seem to work well.
*NB* If you have a wire/movable antenna the shape it of seems to GREATLY impact how well you transmit. I found a square shape worked the best for TX. (I also know nothing about antenna design – use salt).
Manually:
The most common way to transmit the data is to manually set the clock speed and data, the command is the ‘LF simman’ and has 3 params:
* The Clock speed (generally 64)
* The actual data
* The Microsecond gap that is to be used between transmits (nice if you want to test reliability)
So for the example I have been using I put the data into the webapp and then use the following on the proxmark:
lf simman 64 1111111110000011110000000000001111101110010100101110111000101100 10
EM41x Toolset
The proxmark has a number of tools for the EM41x format and they can be find by typing ‘lf em4x’ into the proxmark console. Essentially to simulate the tag all you need is the hex value that the key is sending out (in this case – 0f007b22d8) and to use the ‘lf em4x em410xsim <key>‘ command.
The toolset also has additional functionality to watch for a tag and then record it as well as try and decode the data in the buffer and so on.
What you should be concerned about:
Photobomb Much?
Naturally seeing the data is pretty neat, but seeing the data transmitting something that is WRITTEN on the card is terrifying. We did some basics tests at the office and Roelof could stand relatively far away and take a photo of my keys on the table where my tag was to get a clear enough image for us to read the numbers. Additionally it seems easily possible to take a photo of someone standing in front of your target (say at a coffee shop or elsewhere) and zoom past them to get a snap of the keys from quite the distance.
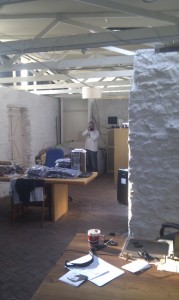

HIGH RES IMAGE (aka, see for yourself) : http://andrewmohawk.com/BackgroundShotOfTable.JPG (5mb)
Raw data? Sequential numbers? Root?
Besides for the fact that someone could read your cards data I also noticed that a lot of the data is NOT being used. When testing I found that I could put anything in for the version or customer id. This means that the only data that is being used is the 32 bits, which is a rather large space ( 2^32 = 4294967296 ). However because of the problem of this data being human readible in the real world it also means that someone could have a sequential batch of tags (I got one when I ordered 10 tags) which means that I merely need to go up and down numerically from your cards number. The additional impact of this means that I could see a junior employee’s tag and by brute forcing the tags around it gain access to places where that previous tag wouldn’t have had access to.
Apart from that it also means someone could stumble upon the ‘root’ card, which allows other cards to be added to the system or removed or even to reset the system.
Denial of Service?
The readers I tested with were only capable of reading a single tag at a time and placing two tags next to each other meant the interference was too high for the system to get a good read and essentially nothing happened. However the same situation played up when a tag was placed on the outside as well as on the inside of the door (it was separated by a glass wall), essentially what this meant was that I could go to a building where they had access control in and out of the building and use a sticker-type LF RFID tag and stick it underneath the readers and essentially ‘lock’ the door since no one could get in or out. Alternatively if there was just one reader that was used from both sides (as commonly installed through doors/building entrance and exits) where someone needs to ‘tag’ out and a malicious person tapes an RFID card/sticker to the outside (presumably that the public can get to) and break the ability for anyone inside to ‘tag’ out.
RTE?
Of the three low end systems that I looked at all 3 of them included an RTE or Request To Exit cable. Essentially if you needed an RTE where staff can press a button to open the door you simply shorted the green and white ( for all 3 it was these colours for RTE) the door would open. For 2 of the 3 systems you had to enable it with the master code, but 1 of them had it enabled by default, which means that if you could access the wiring you simply need to short green and white to open the door.
“Security Data”
While the specification mentions security data from the brief analysis I did on the tags there definitely wasn’t any of that on them :( — although it most likely got changed by someone who didn’t understand parity.
Solutions?
The solutions to solving the above problems are relatively simple:
* Remove the numbers from the outside of the cards/fobs
* Make sure you aren’t getting sequential cards/fobs
* Disable RTE on your doors where possible.
Some of the other problems are a bit harder to solve but should be possible:
* Log all access attempts to check for brute forcing
* If a reader has been busy for a long period of time without a break send someone to go look.
-AM
[…] Porabianie kart dostępowych na podstawie zdjęcia […]
[…] Never display RFID card IDs in public (code usually printed on the card) as cloned cards can be produced from this alone – http://andrewmohawk.com/2013/01/27/bypassing-lf-entry-systems/ […]