If you just want to build, there is a build guide here there is also a Slack for a more interactive discussion if you just want to peak the code its on github.
Ambient lighting has always been something I have been interested in, from early days when I was watching *cough* videos that I got from my friends who had bandwidth to download to modern implementations where I’ve seen some TV vendors try and ship the TV with them.
The basic premise is that you can take whatever you are looking at and project it behind the TV so that the image escapes the confines of the television. Think that you have a scene where someone with a flashlight is running in the dark woods but instead of the flashlight ‘light’ ending at the edge of the TV it extends into the room you are in. Fire that lights up the room, water that submerges you, anyway, it is AWESOME.
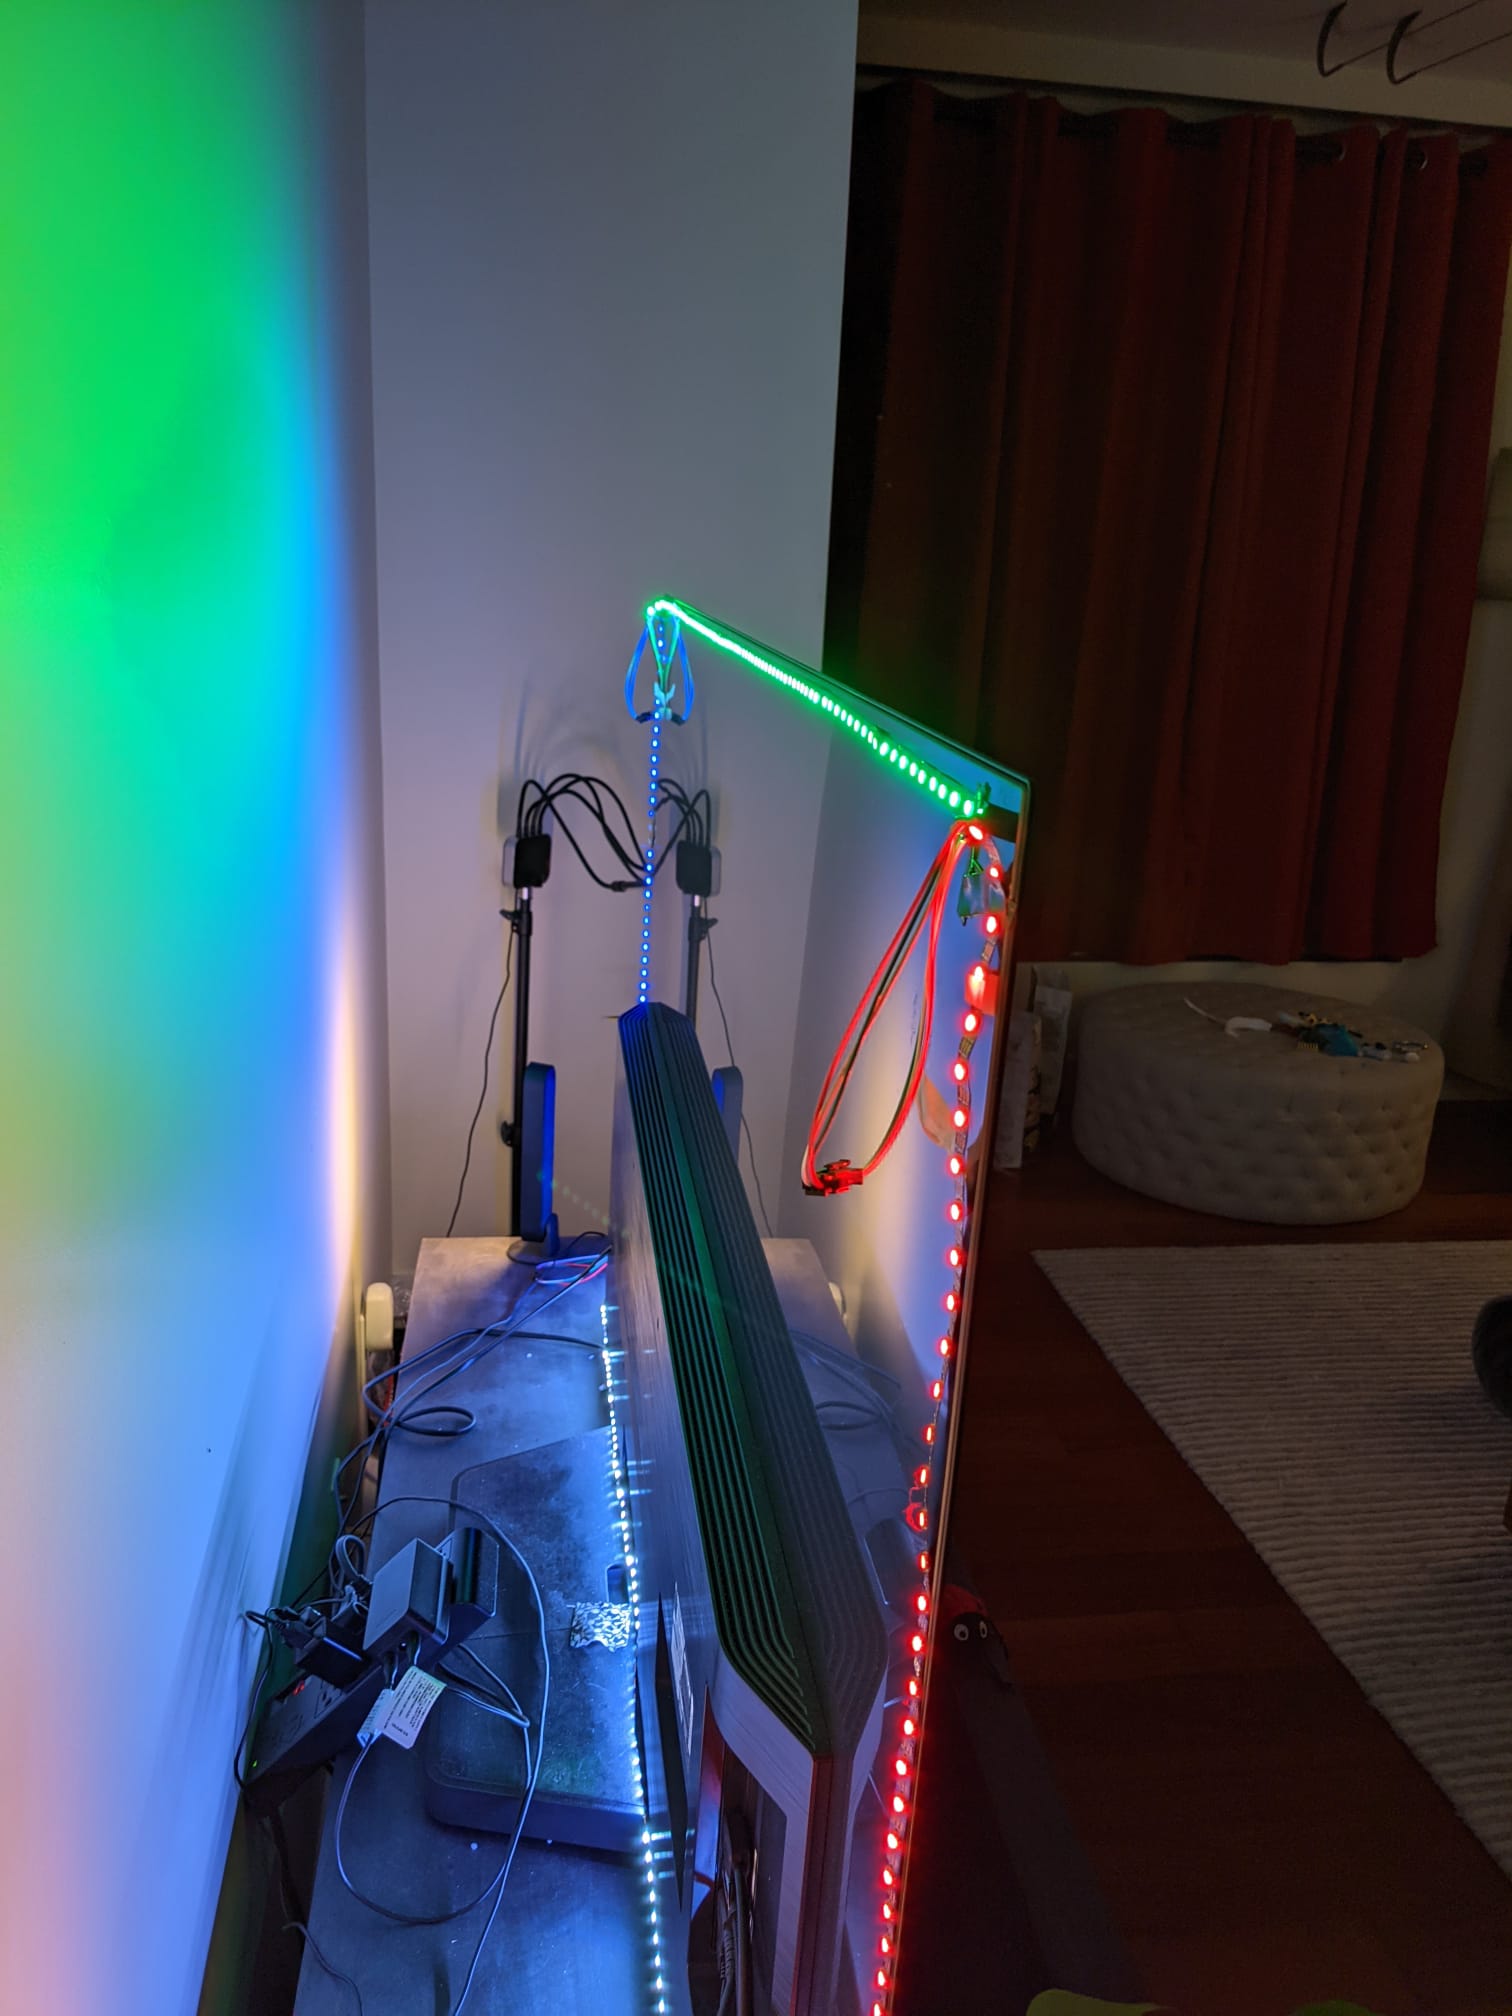
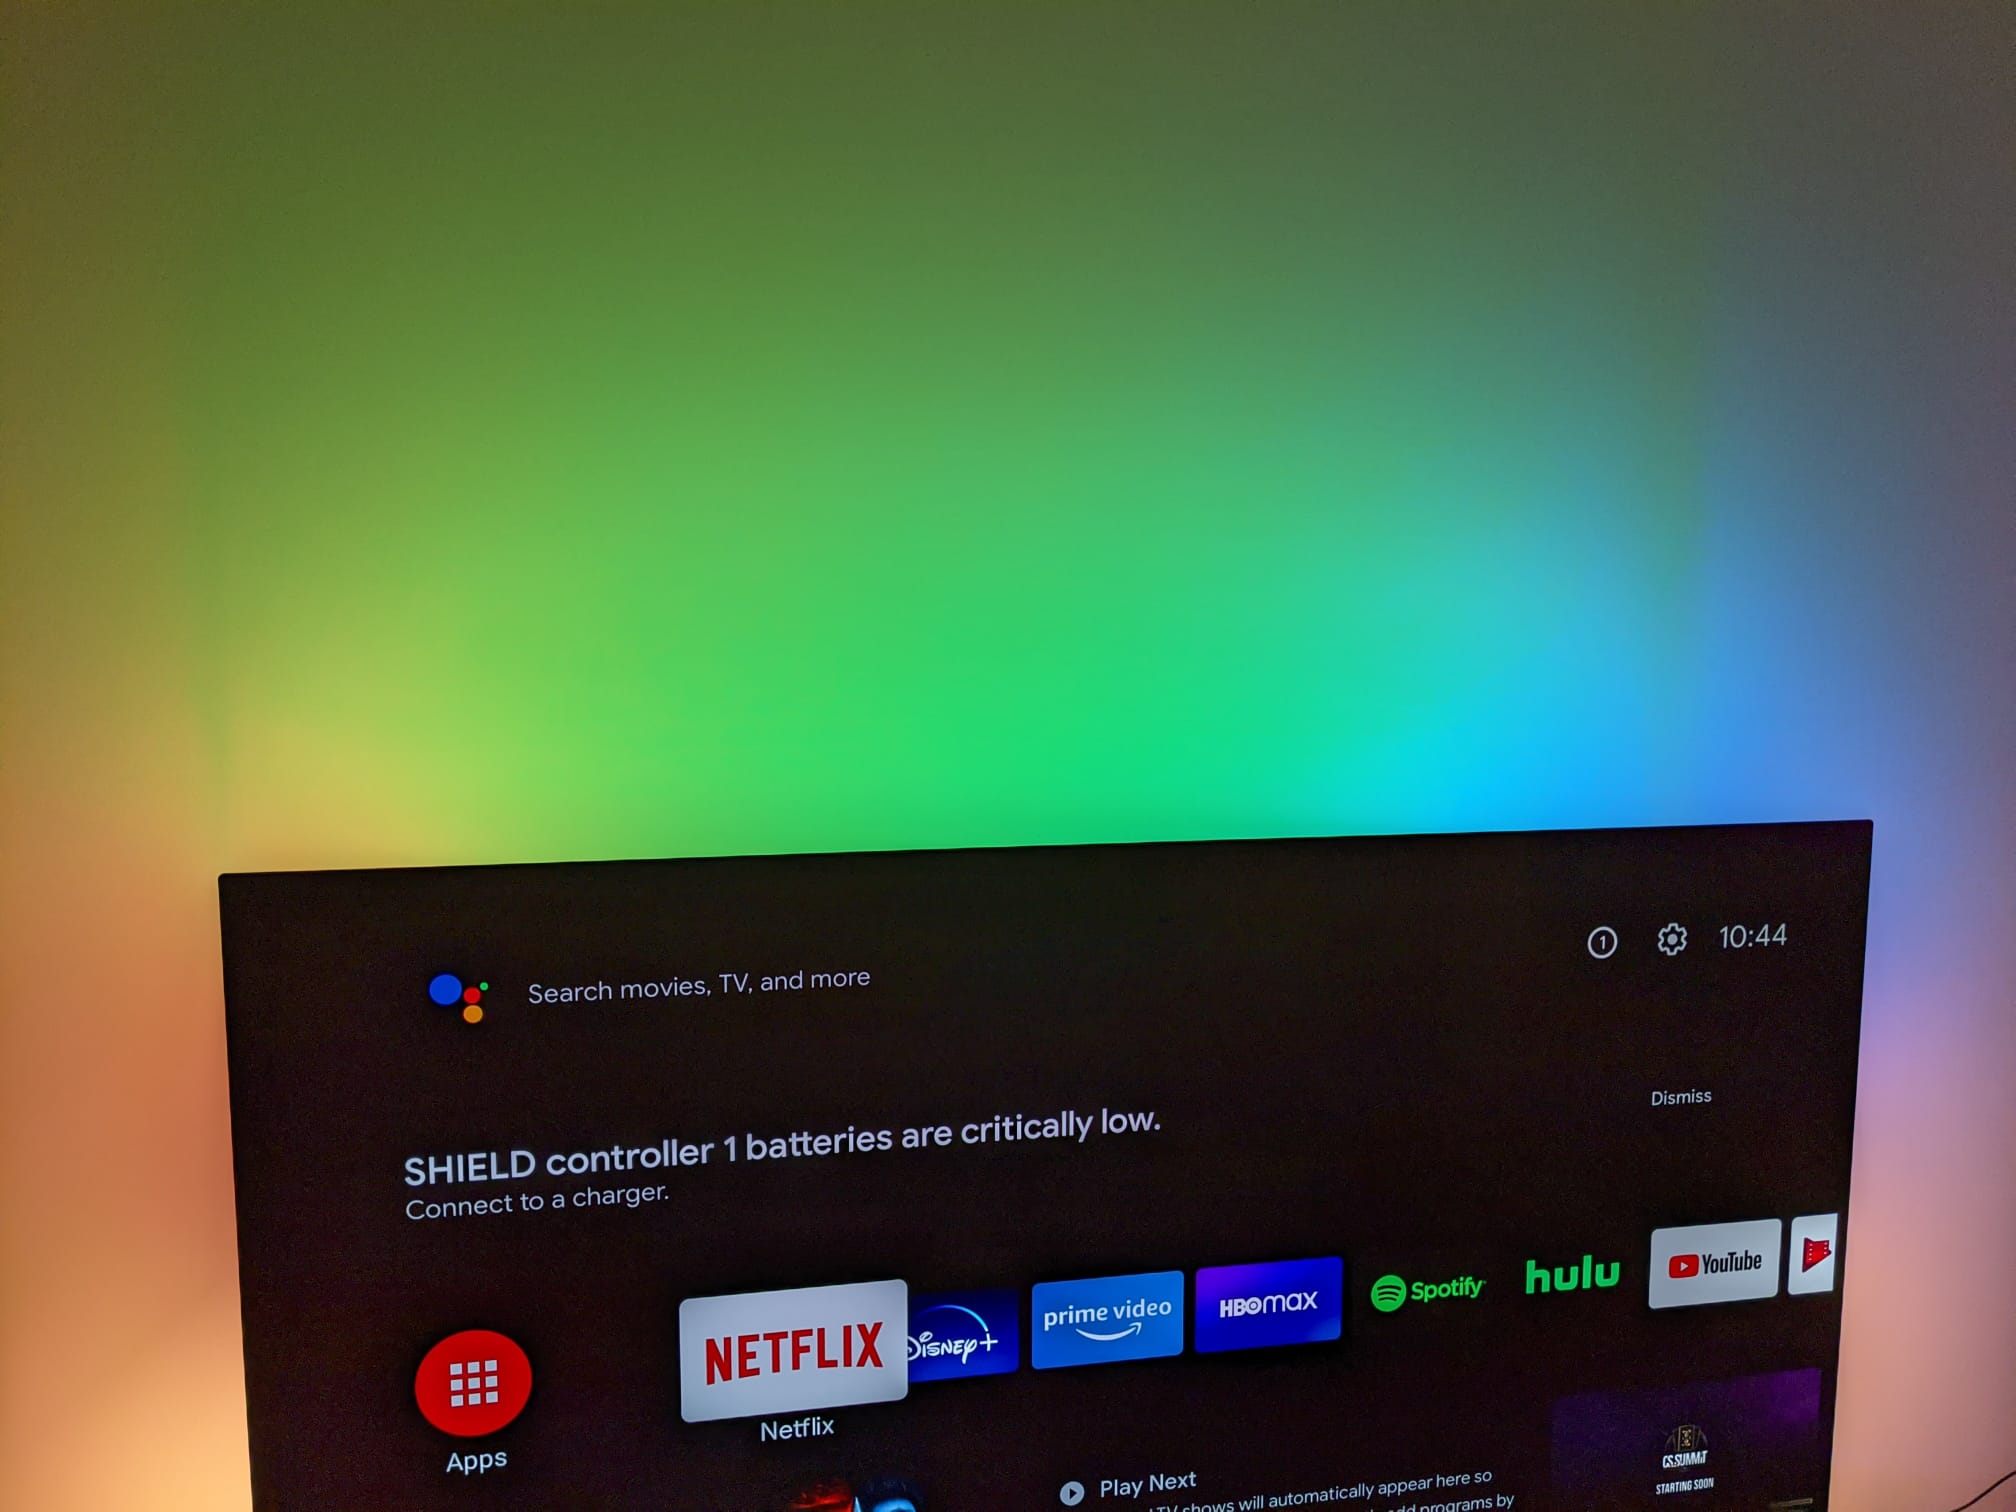
This is my writeup of how I ended up having to build my own and how it came out! I’ve had this project running for over a year in my apartment and I love it. The writeup took a while because its difficult to find motivation to explain something I already finished… and you know, this whole pandemic thing. Here is an example of mine in action:
So How did we get here?
Early on I used a small Arduino and some LED panels behind my television to simply light up the back of the TV in a cool way. This was static and there was no actual interaction between what was happening on the screen and what the lighting was doing. Basically it was background lighting that I could change the colours of, think of it as the dumbest philips hue bulb you’ve ever seen. I’m not even gonna show you this since I am pretty sure you can just imagine it!
Later on a switched to a product called AmbiLED HD on a my windows media pc that ran some software to do it intelligently. If you ran the output of the PC to the TV (at full screen) you could also run an application on the PC that would analyse a section of the screen (or the whole screen) and control an LED strip via an Arduino with a USB serial cable. Technically it worked well, but it had a few problems:
- I had to be using a windows PC, this meant if I switched to any other sources like a console or DVD player (lol – at the time), I lost any lighting
- It was super CPU intensive to constantly be doing the calculations and ended up making some larger media formats lag as it tried to work out the lights! (Kinda defeated the purpose of it)
- The LED strip was dim as all hell, just look at the video I took below from 6 years ago, it was basically taken in the dark to show the effects.
After a few kickstarters (2 which didnt arrive, RIP) I had basically given up on this. And everytime I saw lights behind a TV somewhere I daydreamed of having my own setup that reacted to the input sources. Also I wanted something that was not just reserved for extremely expensive setups or high end entertainment at venues. Early last year Philips hue announced their HDMI Sync box, and phwooooooaaaaaaaar did that look like just what I wanted, take a look at this video of it:
It had (what I assume was) an FPGA analysing the HDMI channels, picking the right colours and displaying it on the lights, you could switch input sources, heck you could also have lights that werent behind the TV included it was even more immersive. Sure it was overpriced, but at this stage I had funded 2 kickstarters that didn’t ever give me products and I *really* wanted it. The pricing however hurts. The parts for this at a minimum that you needed:
- Philips hue bridge ($60)
- Philips hue HDMI Sync ($230 – ouch)
- Philips hue play set (2x light bars, like in the above image – $130) — they recommend at least 4 or 5 lights (so even moar monies)
That means for this entire setup you need to fork out at least $420 (lol) for a very basic setup. YIKES. Obviously being the fool that I am and already having invested in some of the hue tech for my apartment and adhering to the sunken cost falacy I got this. And WOW was I disappointed, the setup was a pain, the app was janky with my Android device (to be fair though on an iPhone it was a lot smoother), but mostly, it just didn’t really work. Again my dreams dashed against the rocks! People on various forums and subreddits went on about how great it is, but it lacked what I was looking for. Here is an example of it in action:
As you can see it does a pretty good job, but its not exactly matching, and when it misses it really misses, that being said theres obviously a lot of hard work put into the FPGA part of it trying to figure out the base colours and not just looking at the extremities of the image. But really for this amount of money and pain of setup I expected it to just work(tm).
Here is Aurora working with the same YouTube video, but it does a much better job at matching the colours at the edges of the screen just due to the fact that I had a full colour lightstrip to work with!
At this stage I’d had enough, I had just moved to the US, I had some free time, I already had most of the components, I had to at least give this a shot.
Time to get building
I realised what I wanted and I’d finally given up on the kickstarters, the hue sync box and the randomly purchased products, in fact the price of the Philips Hue irritated me so much I knew I had to build this myself!
My requirements were pretty simply, I want to do almost no work when using it – no setting it up or configuring after the first time. It needs to also work with whatever is playing directly from the HDMI, I don’t want to have to switch sources or have something pointing at the screen or anything else external to setup. No janky apps to have to start it on, it should just work. Lastly it needs to not impact the quality of the audio or sound (I want 4K picture and Dolby Atmos)
So first I had to figure out what I wanted to do exactly, and my plan was basically this:
- Put an LED strip behind the TV
- Figure out how to get an image from the HDMI to a Raspberry Pi without impacting the quality
- Work out for each frame what the LED strip should be displaying and send it over
- MUST BE CHEAPER AND BETTER THAN THE PHILIPS HDMI SYNC!
- It should ideally run on a Pi because I dont want to fork out for extra hardware and I already had one!
HDMI SHMACHDMI
This turned out to be a little tricky right off the bat, firstly I needed to basically get an HDMI splitter so that I can could have the input go to two separate devices, one the TV and one to a cheap HDMI capture card on the Pi. Seems easy right? This sort of thing must exist, turns out there is a lot to it. Whenever you use HDMI on devices its a bi-directional conversation that happens between each device, *including* those high end splitters and capture cards! I naively just assumed it was spitting out magic and the receiving side was figuring out what do with the magic.
First we have to deal with something called HDCP, its damn DRM for HDMI? What the hell is this madness! If you just plug the HDMI from your device playing something like Netflix (such as my Nvidia Shield) into an HDMI capture card, you will soon be greeted with some terrible message like this (this is not my image):

I cant be stumped before I’ve even started, what am I gonna do with a pi and an HDMI capture card?? I figured this must be something people are getting around already, I started looking around to see what solutions existed and someone pointed me to a device called an HDCP decimator (KILL IT WITH FIRE). As far as I can tell it either strips off the HDCP component of the signal or it fakes being an HDCP compliant device and performs the correct handshake (moar crypto!) before passing on the signal. Either way it gets that pesky HDCP outta there. Cool, so we just need to get one of these….. Wait, they cost How much?!
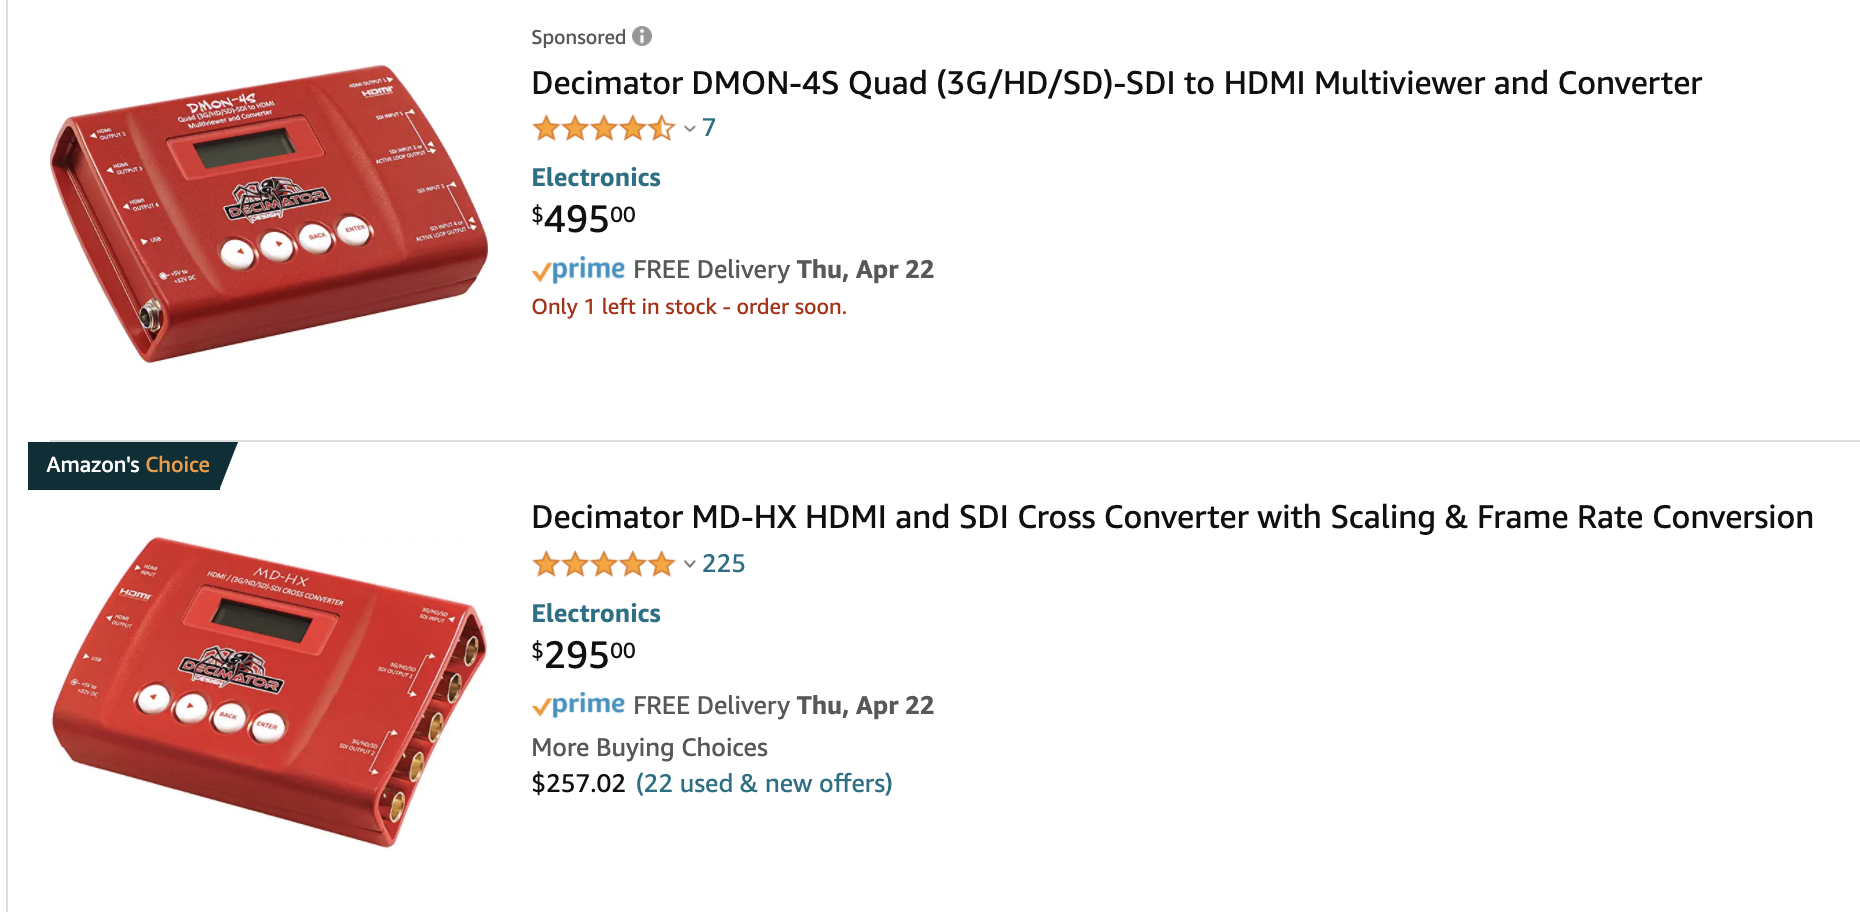
Well thats definitely gonna blow the costs out of the water. I cant really afford this in the project. I considered getting one but figured I need to see if this actually works before hand. I could stream from my laptop to the HDMI capture card without hitting the HDCP problem (but not from my Nvidia Shield). I decided it would be better to try and make sure this works before going down this route! I decided to tackle the HDCP issue later because.. well I’m lazy and it seemed a difficult problem, lets get something working before we get there.
So I could capture the output with my capture card, but actually I needed to have the HDMI output go to the TV and also go to the capture card. I wanted this to be as direct as possible so the Pi doesnt need to resend on what it gets in. This lead to the next problem, EDID. EDID or Extended Display Identification Data (not nearly as cool as decimator) is a metadata format where one device can say “Hi, I am a device that supports these resolutions and this kind of audio” to another device and then that device can send the right formatted audio and video. This is why your 1080P screen isn’t trying to play 4K video and messing up! However if you use a splitter (or something like the Hue HDMI Sync), and it sends the splitters EDID information. So the splitter might say “sure I can play 4K video and stereo audio”, but if your TV could for example play 8K and Dolby Atmos theres no way it would get that high quality signal. Some splitters let you set the EDID to send, but again I dont want to have to be configuring that and I also need it picking the good stuff for the TV and the bad stuff for the Pi (since my $8 -including shipping- could definitely not do 4K video!).
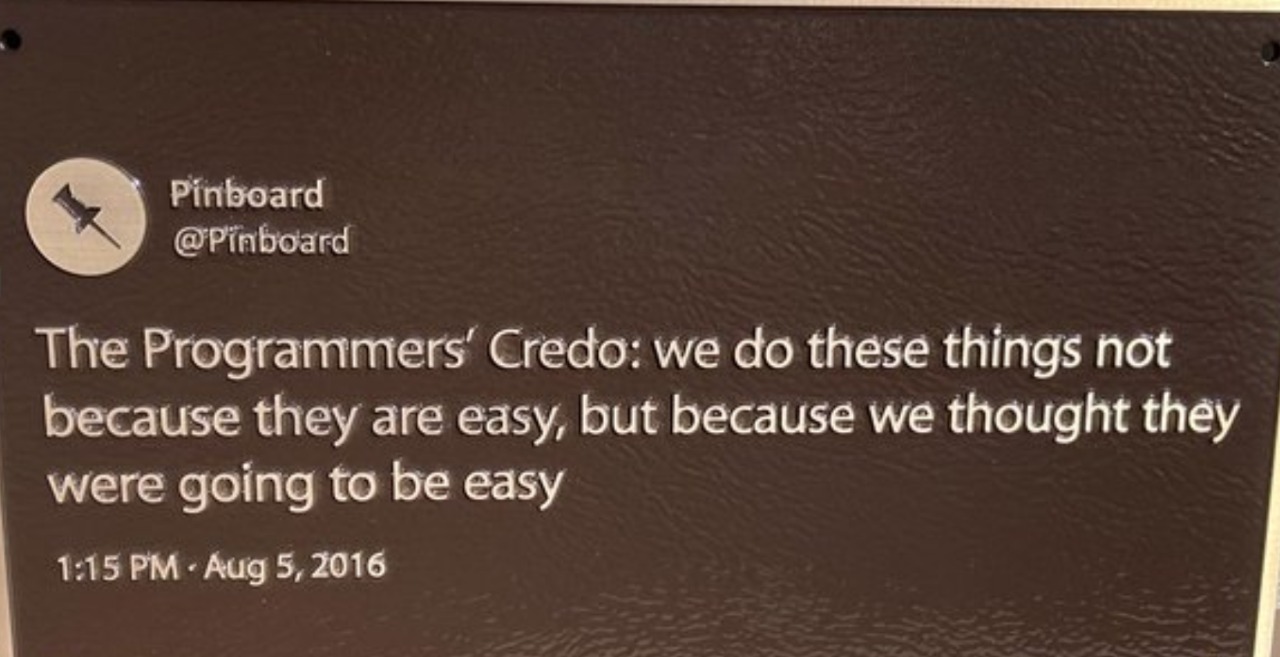
So this was another stumbling block where if I really wanted the good stuff I’d have to get the Pi to accept the same format as my TV which meant a very expensive capture card that could capture at as high a quality as my TV. Bah humbug. This was starting to make me realise why these ambient lighting kits are so damn expensive! I don’t want to compromise on the quality (and already had to using the HDMI sync). I figured it might be time to throw in the towel and call this a fucking day, this was turning into a lot of work expressed nicely by a meme sent to me by my good friend Roelof:
A brave champion enters the ring!
Then I came across a number of people on the AV forums (yes, real old school forums) while boredly browsing hoping for a solution that discussed HDCP decimators and one of the posts was something like “hey, if you dont need the same output quality and are okay at making it lower resolution, you can just use an HDMI splitter like these, it will downscale and strip the HDCP”. I also learnt that some of these devices will do EDID copy mode, which means whatever EDID it gets in it will just send onwards (like a transparent proxy).
What are the chances! There was something solving both my problems (EDID and HDCP) and putting this project back on track, boom, for a mere $30 I could get an HDMI splitter that did everything I needed:
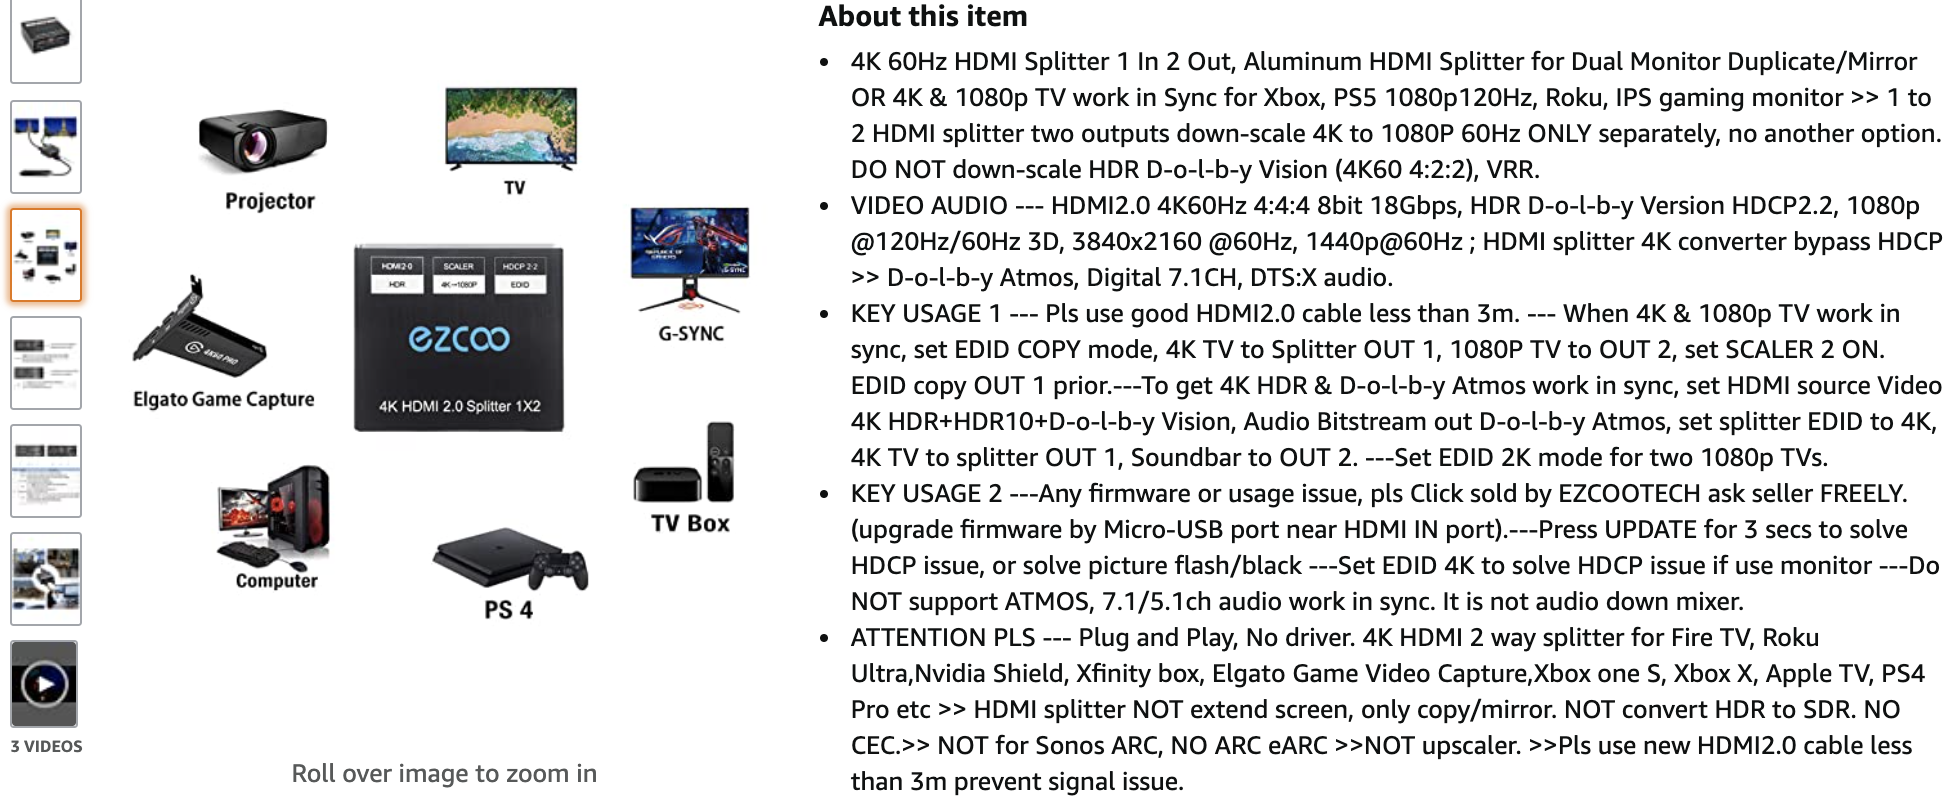
You can just tell from that D-o-l-b-y that this was the sort of device I was looking for. Not only did it do EDID COPY mode, which meant the EDID from my TV was still going through so I could get the highest quality Audio and Video but it also had this little gem here:

Onwards and upwards! We have an HDCP bypass and an EDID passthrough that means we can get all that goodness without losing any Audio or Video. A quick test and everything looked great (actually there are other problems, but they are only waaaaay at the end of this blogpost).
We have an image, but now what?
So now we have an image we can capture on our Pi that isnt impacting what we see on the TV we need to be able to actually make this into our automatic ambient lighting. So how the heck are we gonna do that?
With a little OpenCV magic I basically devised the following plan of attack:
- Capture HDMI from capture card (as cheap as possible, $8!)
- Cut out the borders of the image for a percentage (left, right, top, bottom) and ignore the main center part (we dont need it!)
- Divide each of these block into ‘segments’ so that each segment is one physical LED behind the TV
- Calculate the average colour of each segment
- Set the physical LED to that colour
- Profit. (just kidding its obvs all fr33)
I wont get too much into the code or how it’s done, it’s all in the github repo or you feel free to ask me. Essentially what we were doing is taking a small segment around each image, thats already downscaled (through our HDMI splitter) from our original input and downscaling it even more to single pixel blocks. So we maybe get in an 800×600 image of our 4K movie, we then cut out say a 20% border which means the left most border would be 160 x 600. Then we take that segment and figure out how many physical LEDs we have on the left of the TV, say we have 60 to keep it easy, we then divide that image into 60, 160x10px (600/60) blocks. Next we can take each of these blocks and try figure out the average colour.
I tried to average it out myself by looking at each pixel adding all the reds, blues and greens together and then dividing by the total, but it was slow. It also was slower for how much of a percentage you took which really didn’t work for me. In the end, instead of actually calculating it by hand I used the built in OpenCV resize function with the interpolation set to INTER_AREA to reduce these images to 1px blocks and it did the magic to figure out the colours. The interpolation just took some time to get the one that gave me the best results for the time offset.
A visual example of what was happening can be seen in the following image sets:
In this first one you can see we have taken the HDMI input and I have drawn the segments that have been taken on top of it

In this second one I have then converted those to the base colours to be used for the LEDs
![]()
Taduh! It was fast enough on the Pi that I was convinced we were back to getting something that worked!
So then was just the being able to send that to the LEDs to test! Naturally I created a fake TV with a Pi on the floor of my apartment with tape (tape is the essential ingredient to all projects):
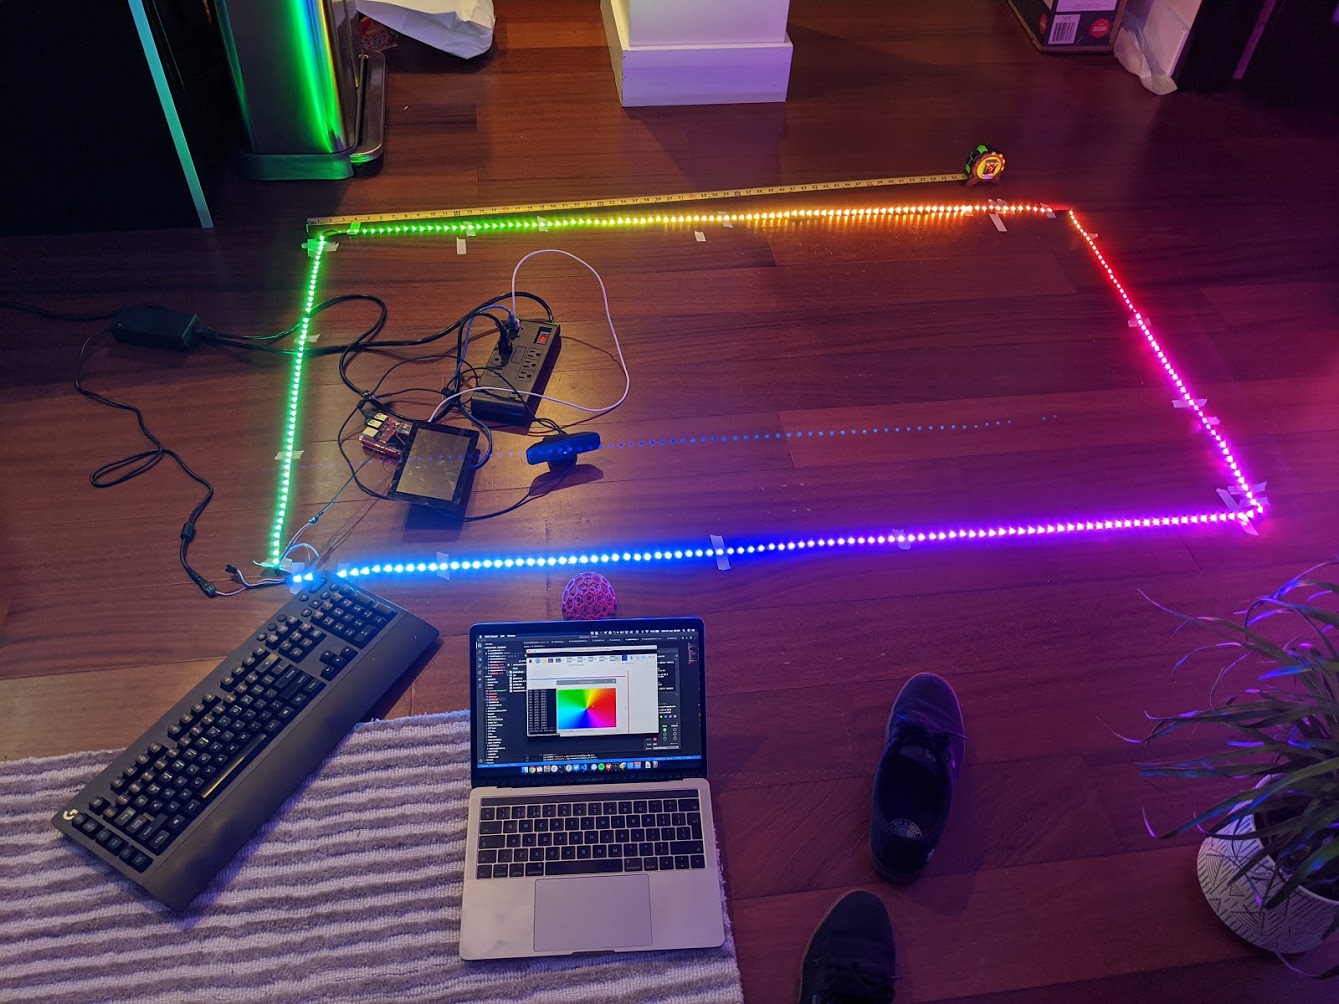
You can see the Rainbow image on the PC being correctly translated into the LEDs on the floor! Yes please.
Push to Prod!
So it looked great on the floor, time for the TV! I got out some velcro tape and taped the strip up to TV. It worked! But of course that really didn’t last long, while watching some TV with a very white background, almost half of the LEDs were yellow, and the power supply was got real hot. Turns out LEDs use a lot more power than I expected. Like ALOT.

So I had 270 LEDs to cover the back of the TV (It wasn’t the 300 that come in a strip, turns out I wasn’t that lucky). So if I was drawing at full brightness, full white, it was 13A. My LEDs from amazon also had a comment that someone said they in fact drew 60mA, so 16.2 A. Thats a Yikes from me! This actually gave me 2 problems, 1, the tiny strips couldn’t handle the current through the thin wires and secondly my power supply definitely couldn’t give 16A and I don’t want to burn down my apartment (moving is a hassle) . These were fairly easy to solve by just getting a beefier power supply and then also plugging in the power supply at both ends of the strip (You could also do it at the end of each segment, but I’m lazy).
Okay, sorted out that and we were back on track, now to watch something that has a lot of vibrant colour, you know whats a good choice? The Matrix, its basically green and explosions everywhere, perfect for testing. So I fired it up, awesome. But wait there is no colour apart from the sides, wth? (The colours look wrong here, its just my phone)
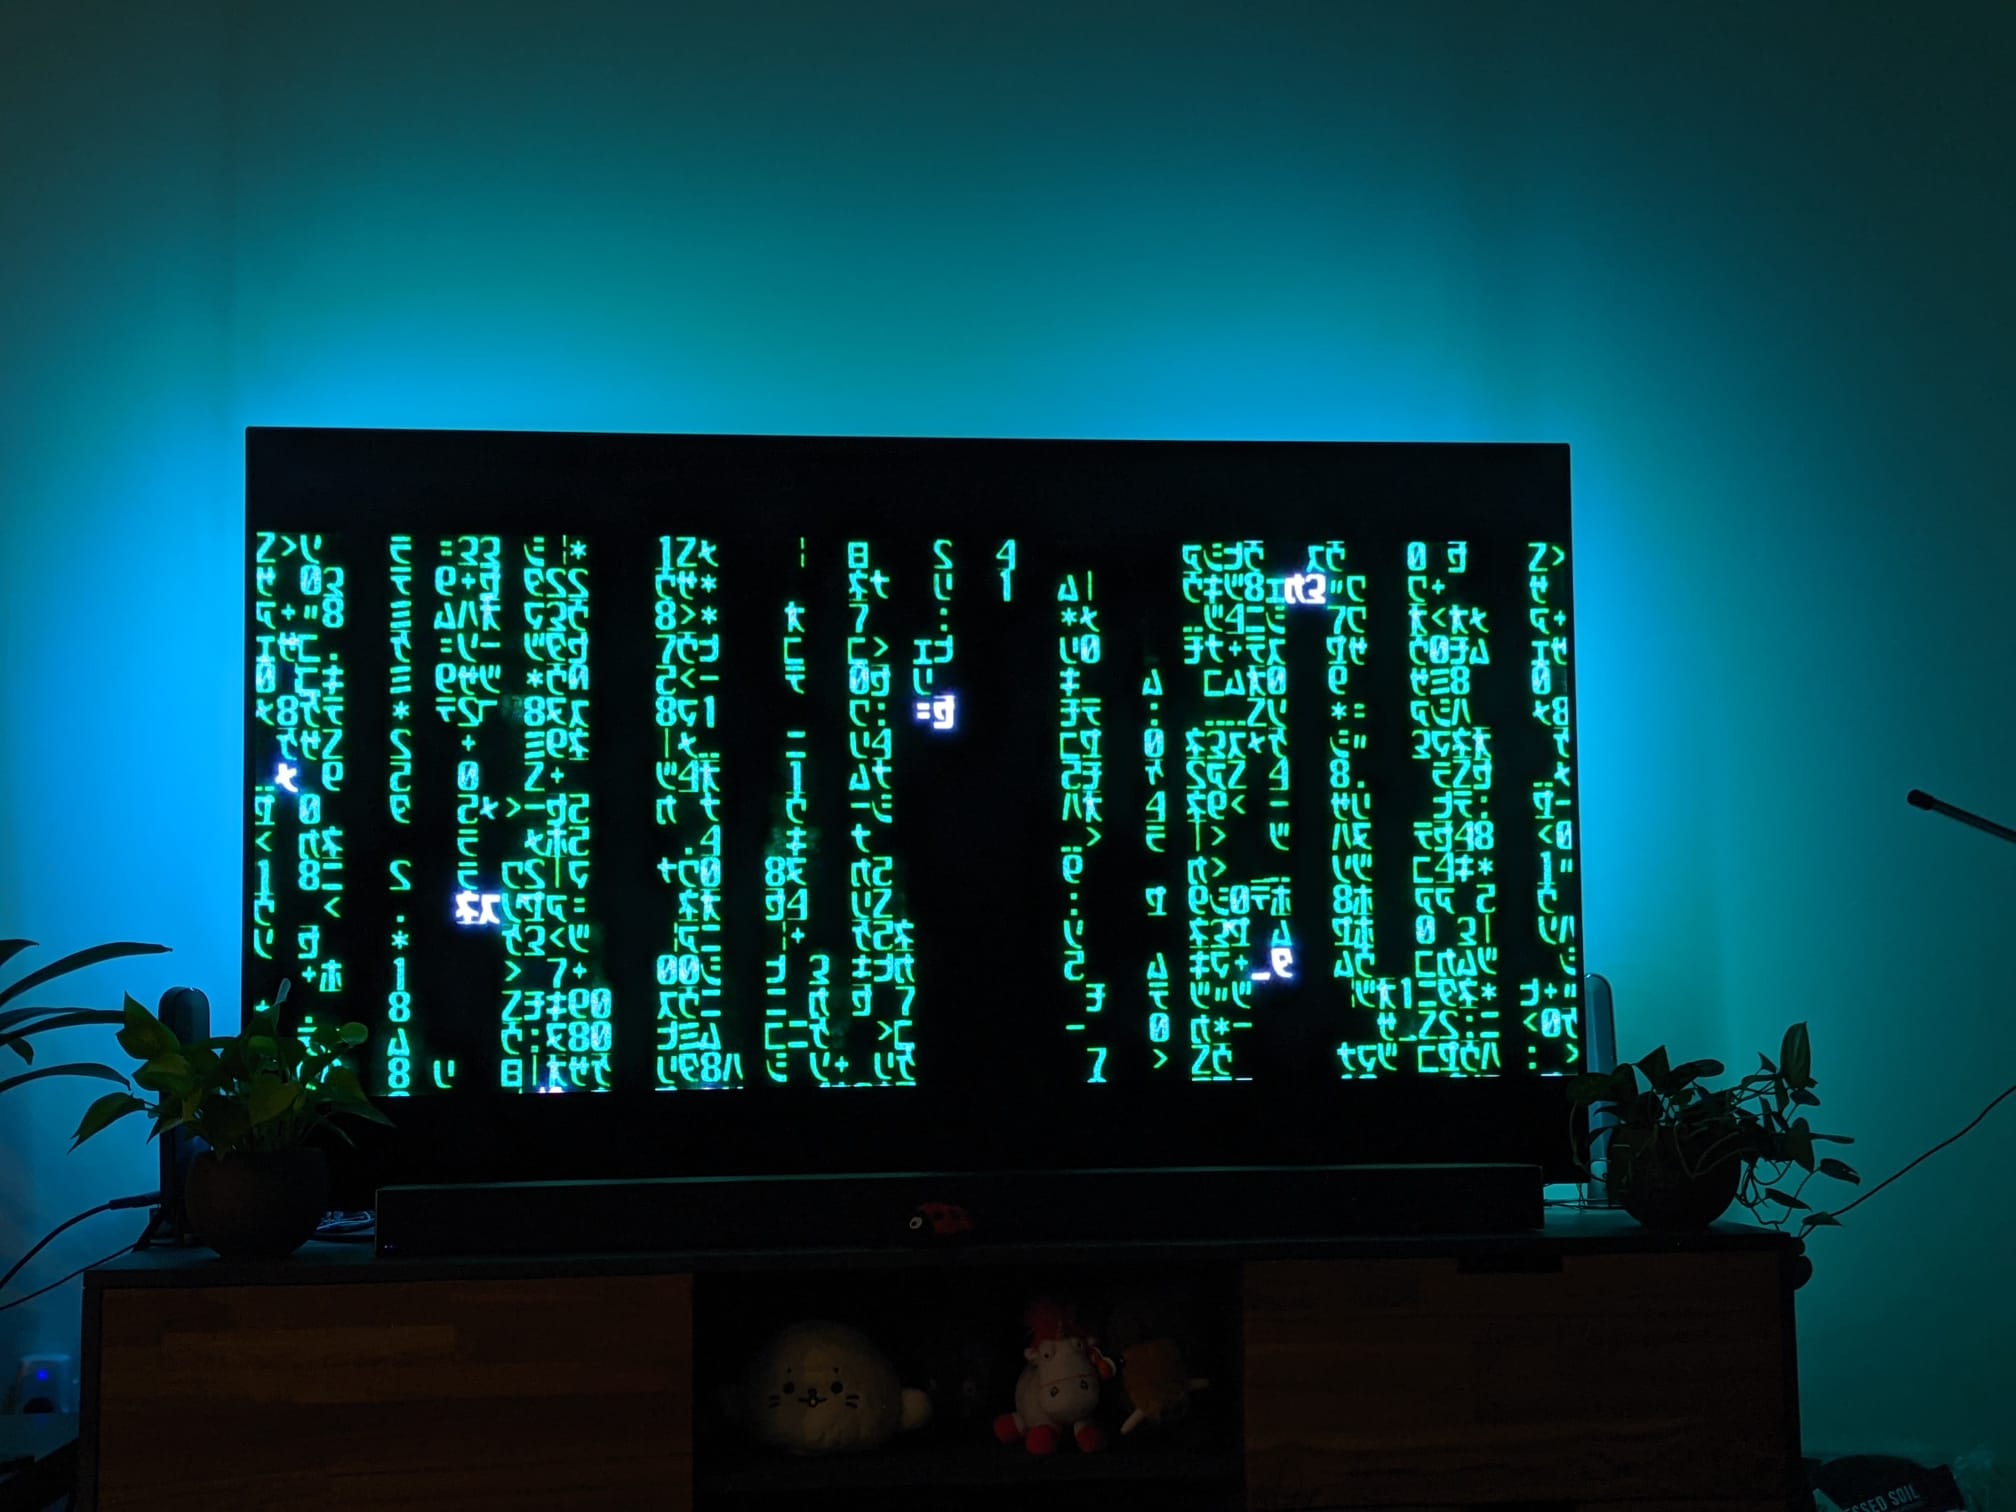
Taking a look at what I was getting out the HDMI it quickly dawned on me what was going on
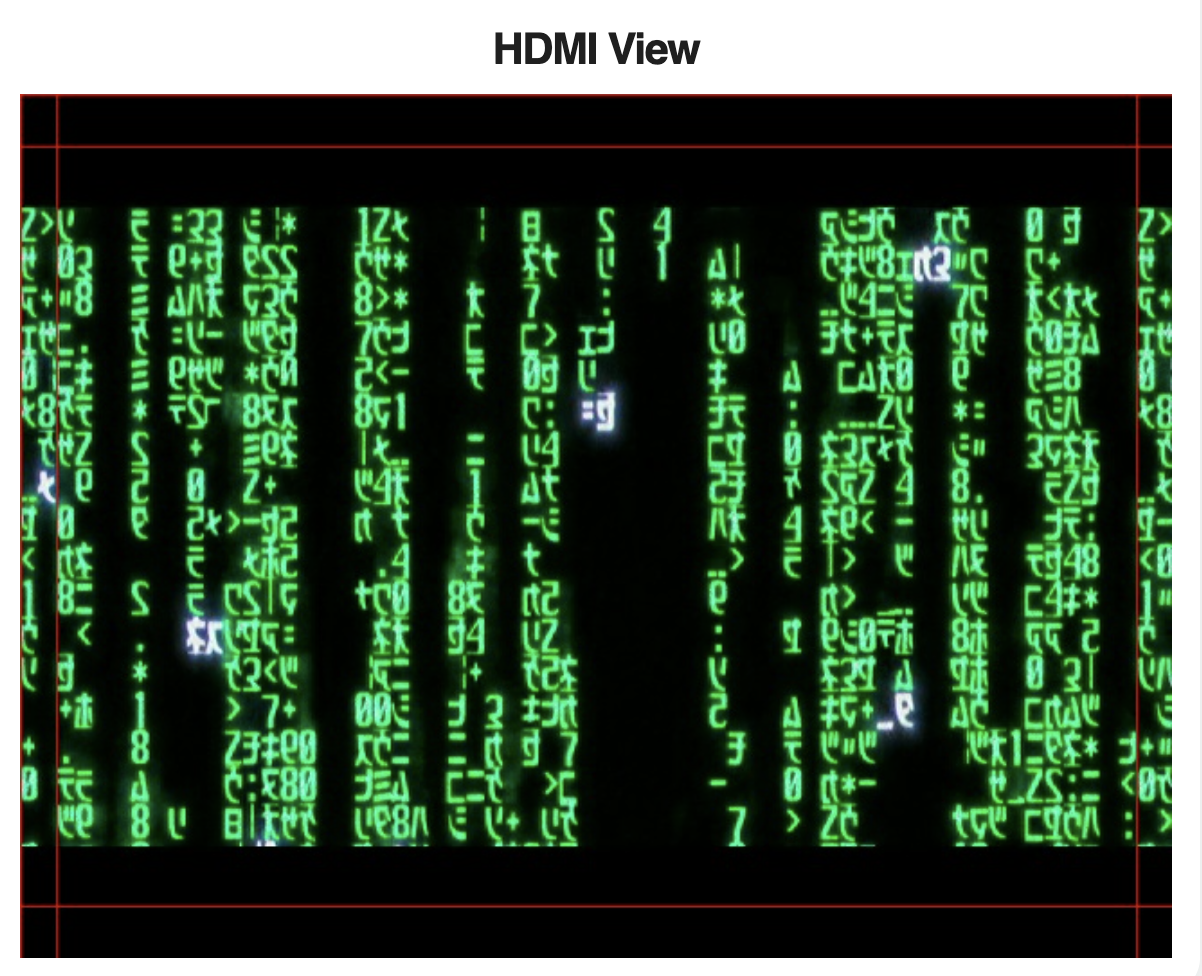
Damn aspect ratio on my TV meant that the image I got was including the black border bars at the top and bottom. You can see from the red lines what I am cutting out and the top and buttoms were just black bars. Ugh, I needed a way to crop this correctly! Stack overflow to the rescue (also how I do all my programming), I found a nice example of cropping an image that I could do on the fly. It ate a bunch of processing time, but I was still hitting above 20fps which is what I was going for :) Back in the action with everything working as expected!
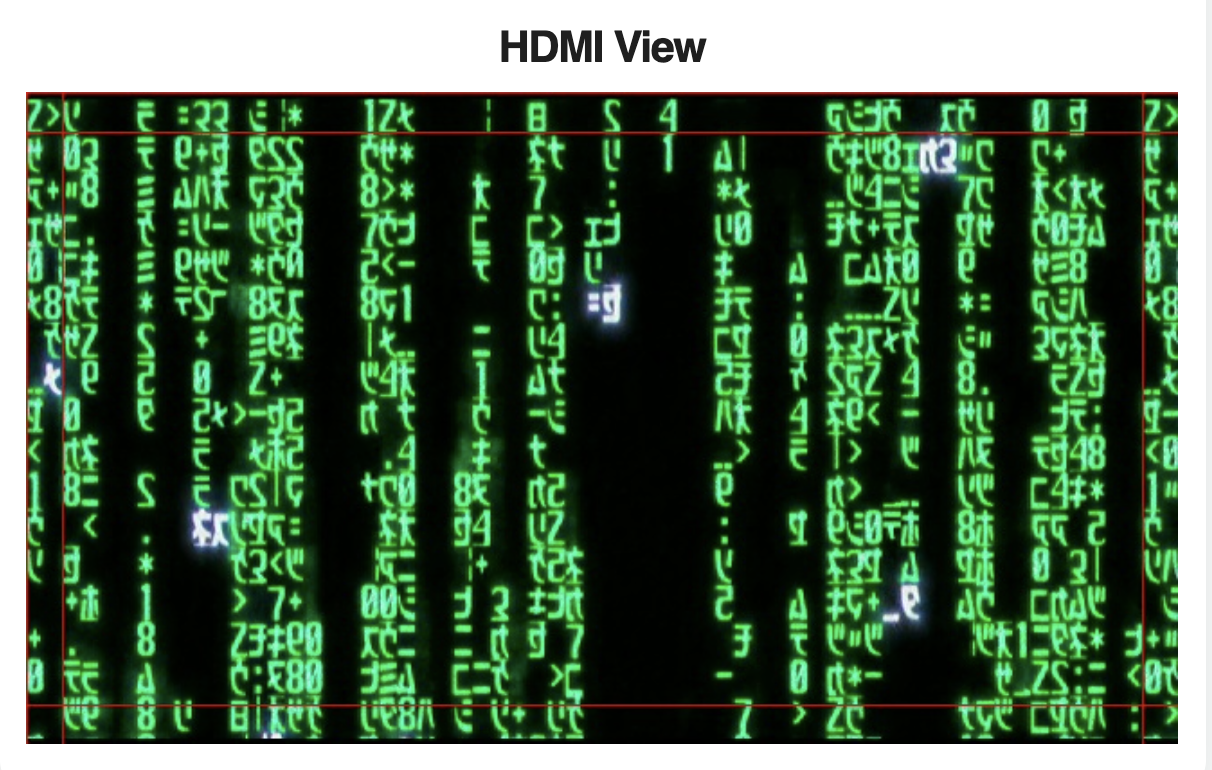
Autocropping the image also produced some interesting effects for when there was only a small image in the screen (like loading screens with logos or dark movies where its mostly black in the image). But finally I had something working that did everything I wanted to.
The last step here was that I put in something to check if either there was no signal or that the image was black and turn off the LEDs. This meant when I turned on the TV they came on and when I turned off the TV they were off, no more hassle of having to start something everytime.
Something others could use
I had a working project, and it did everything that I wanted for an ambient light project, it crushed the Hue setup I had got, but it wasn’t that easy to setup and use for people who hadnt made their entire apartment into a venue of tape and diodes. Some problems:
- Its kind of a pain to install, you needed all the libraries and copy all the files to get it running
- Config was manual, you needed to count the LEDs and set each side up
- I couldn’t switch between the autocrop and the manual mode easily (or any other modes!)
- I had to turn it on and off via running the python app
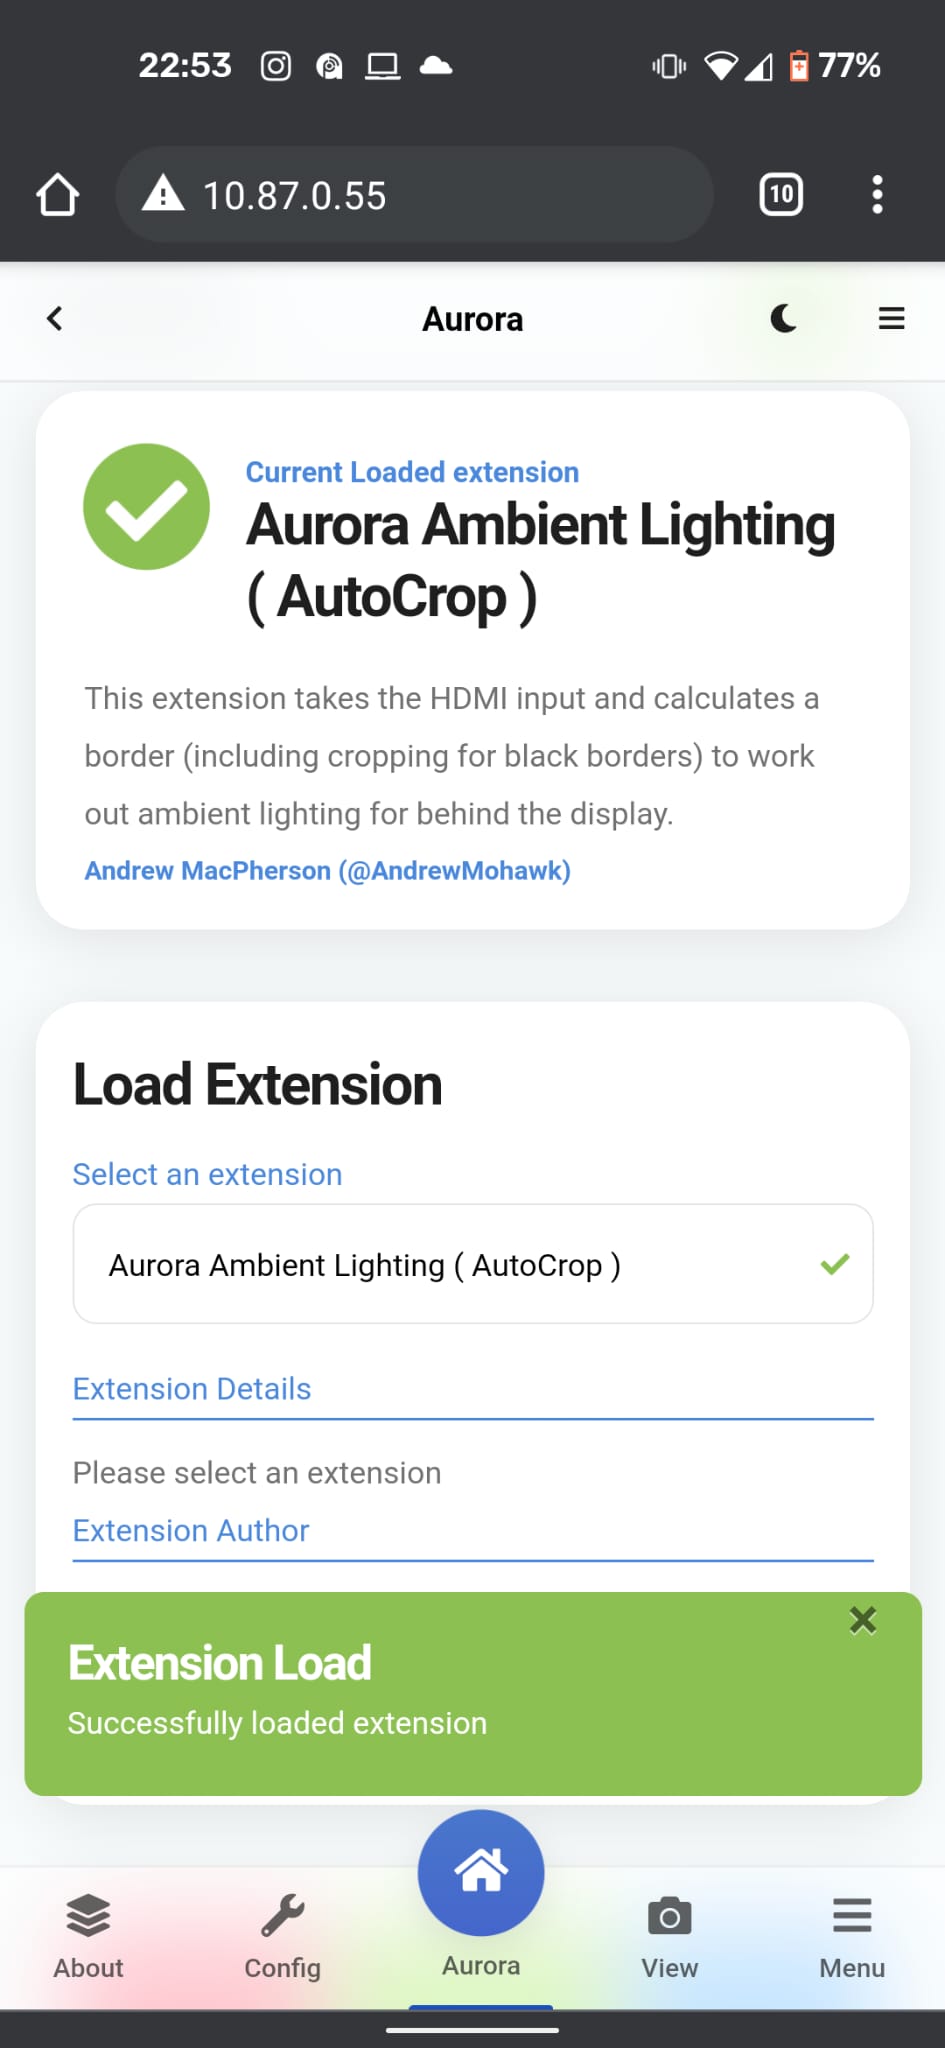
- I couldnt easily see what was going on via HDMI and the LEDs (although in the examples here I cheat and just copy from the web interface which was built later)
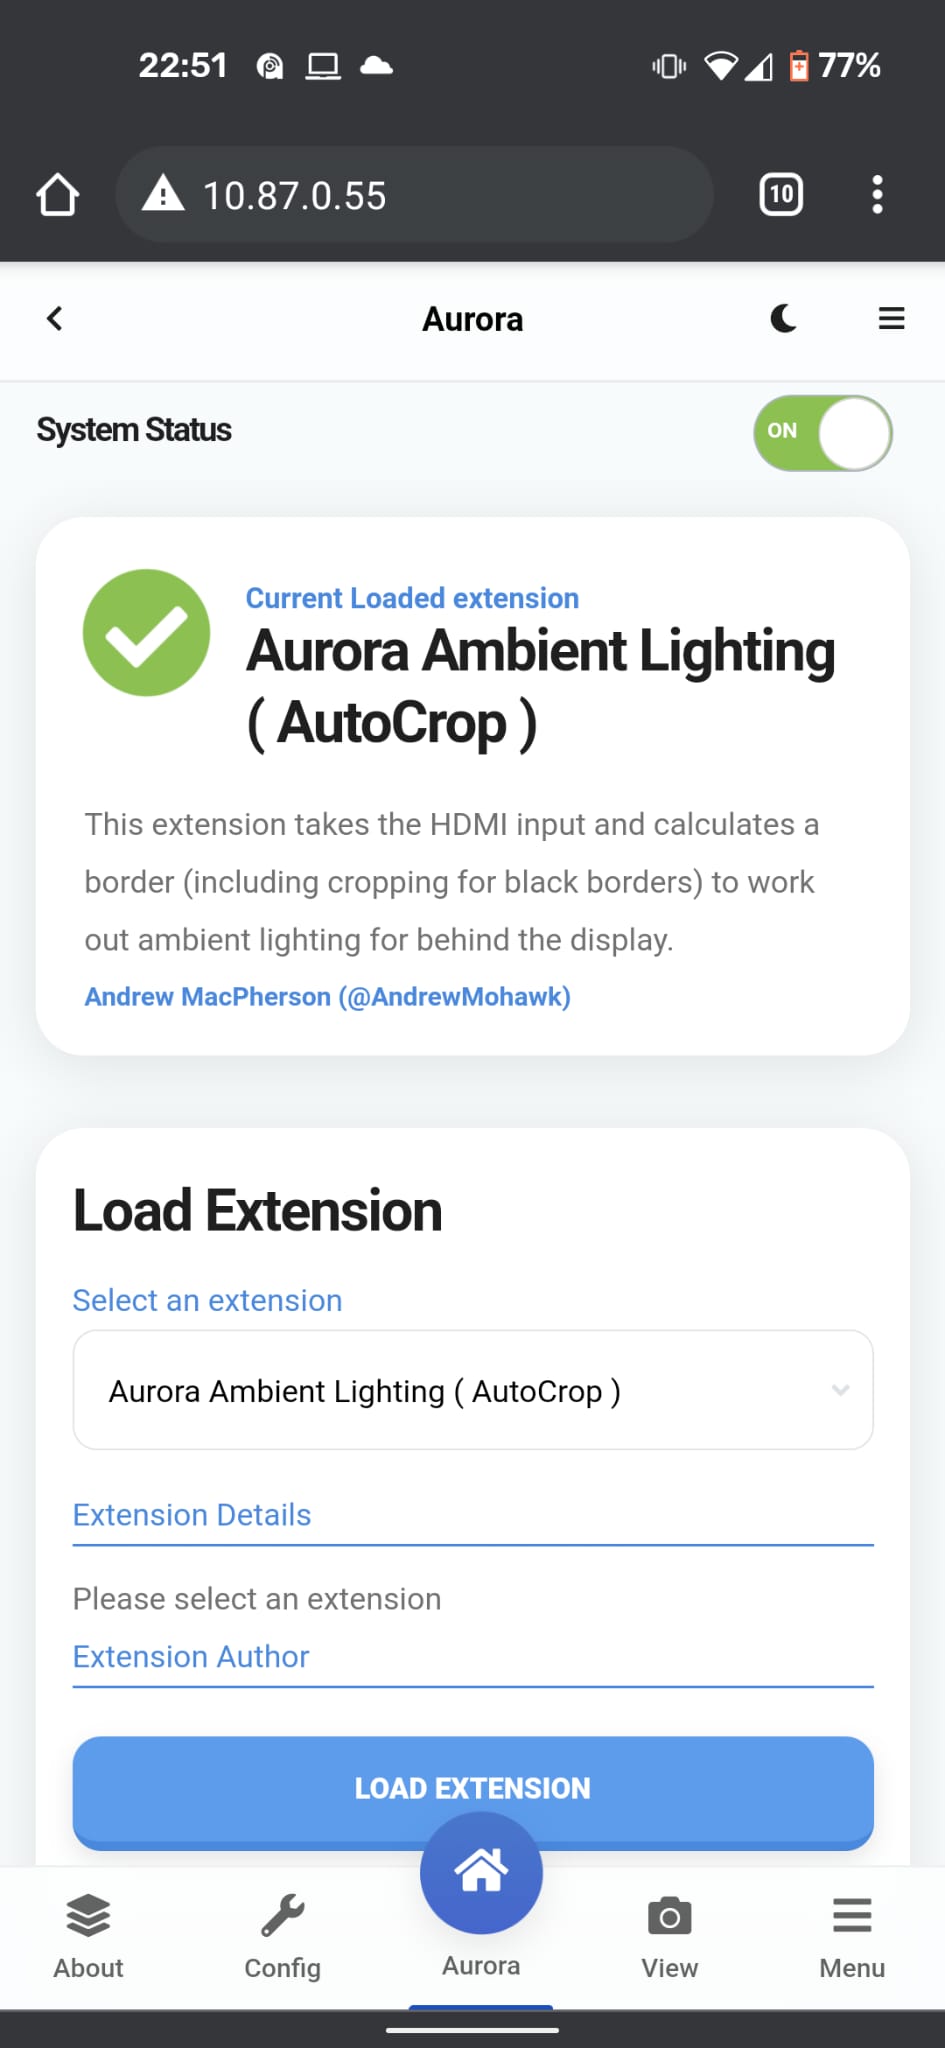
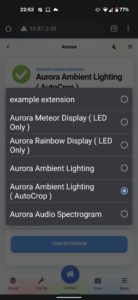
So I built a few things for it, that really don’t need that much of a deep dive (its in the code anyway). A web/mobile interface and service that automatically started (and restarted if something b0rked) and some threading to allow there to be somewhat of a control over whats being shown and have the ability to load it different visualizations into it (Like autocrop or no autocrop). Also I needed a screen to show what it was seeing and what it was outputting based on that, here are some of the screens. The first just the default screen, then me selecting what to load and it loading and finally the view of the HDMI as well as the pixels!
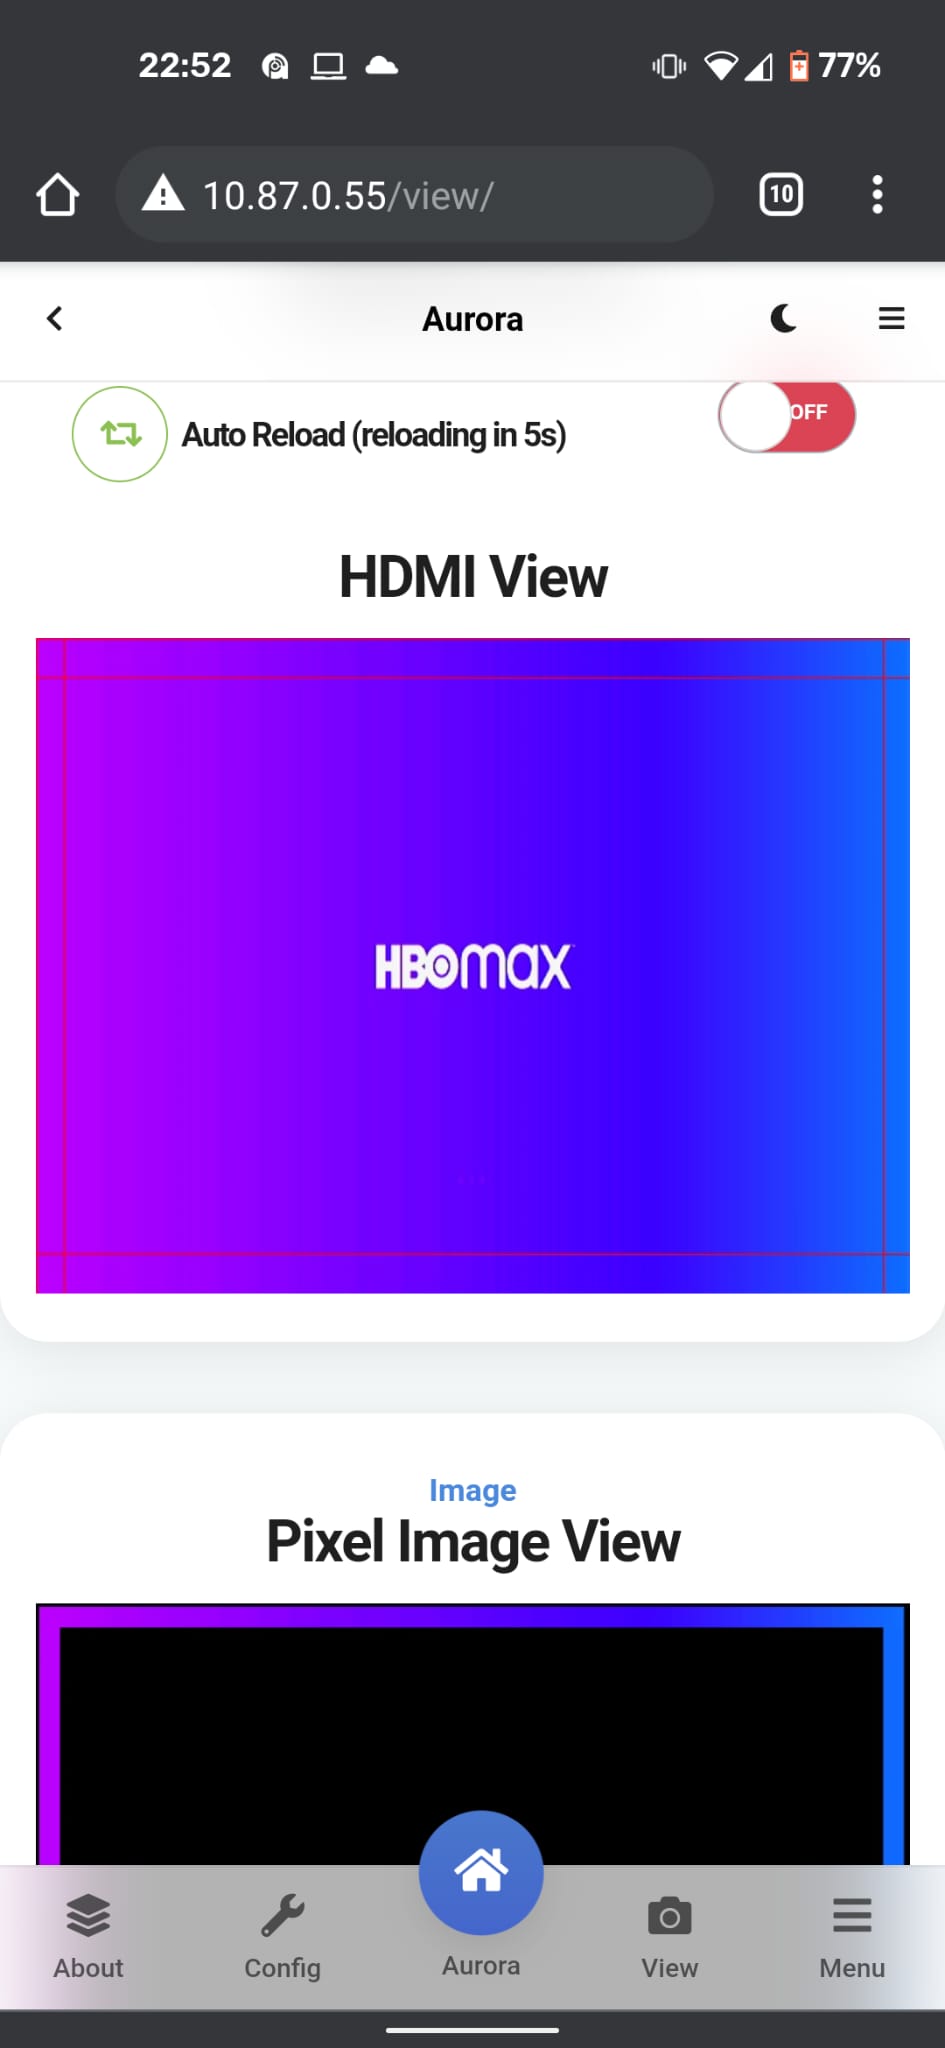
Configuring this, and many of the others that I had seen was a pain, because it meant you had to count the LEDs around the screen and if you are even slightly out you are gonna have a weird view where say something thats at the top might end up showing at the left or right of the TV. You still need to know the count on each side of the display so we know how many LEDs we are transposing the light source but there had to be an easier way. To do this I created a simply ‘config’ interface:
As soon as you load the config it would set each set of LEDs for the sides to a different colour – red on the left, green at the top, blue on the right and white at the bottom.
This is pretty nice because I could set everything up by either looking from the front of the TV and get it roughly right or look behind the TV and make sure it was set exactly. I could also do this on my phone and if it was out just click the + or – for each one and watch them change in real time. When I was happy with it I could just click save configuration and we were off to the races!
This rapidly improved the speed of setting it up. After that I created some simple install script that would basically pull from the git repo, install the pre-requisites and start the services so that once someone had their Pi and hardware setup they could just run an install script and have it running.
Getting cracking now meant:
- Run ./install.sh (or do it manually, I dont care!)
- Browse to the web interface, select configure and set your LEDs
- Go to the main screen and select the visualisation you want
It never ends!
I’ve had this setup and working at my apartment for about a year now (ooof ,without writing anything up), and still some things irk me, one problem I’ve had recently is that I watched Mortal Kombat (I know, I know), but it had a TON of colour, and somehow the ambient light just didnt make the colours right. I thought I could make it through this movie, but instead I ended up pausing it, taking everything apart and trying to figure out why. So what was going on?
Essentially it was because I was watching in 4K, Dolby ATMOS with the best colour and sound. So why wasn’t I seeing the colours come through right on the pi? Here is an example of what I was getting through the HDMI splitter vs what I was seeing on the screen:
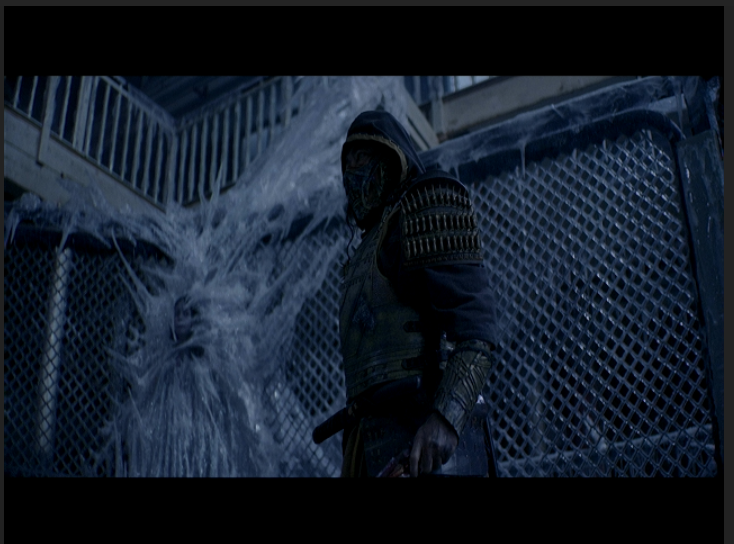
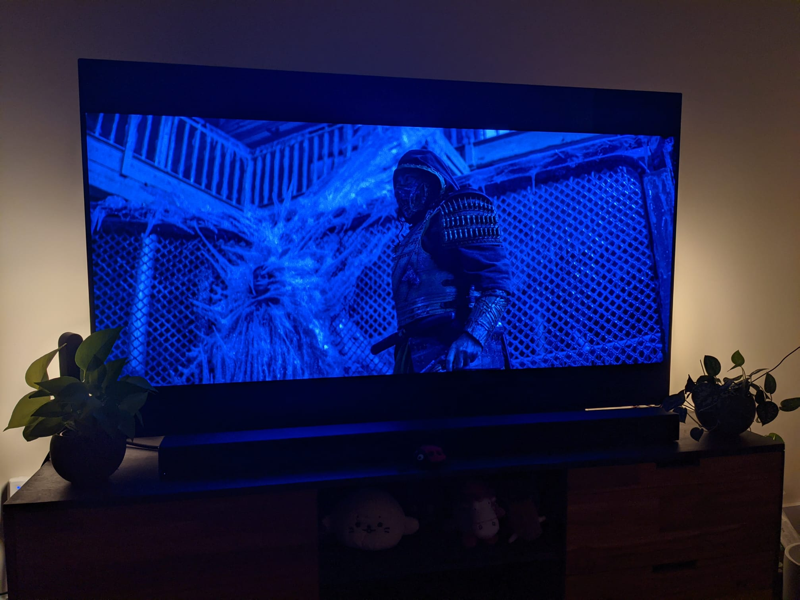
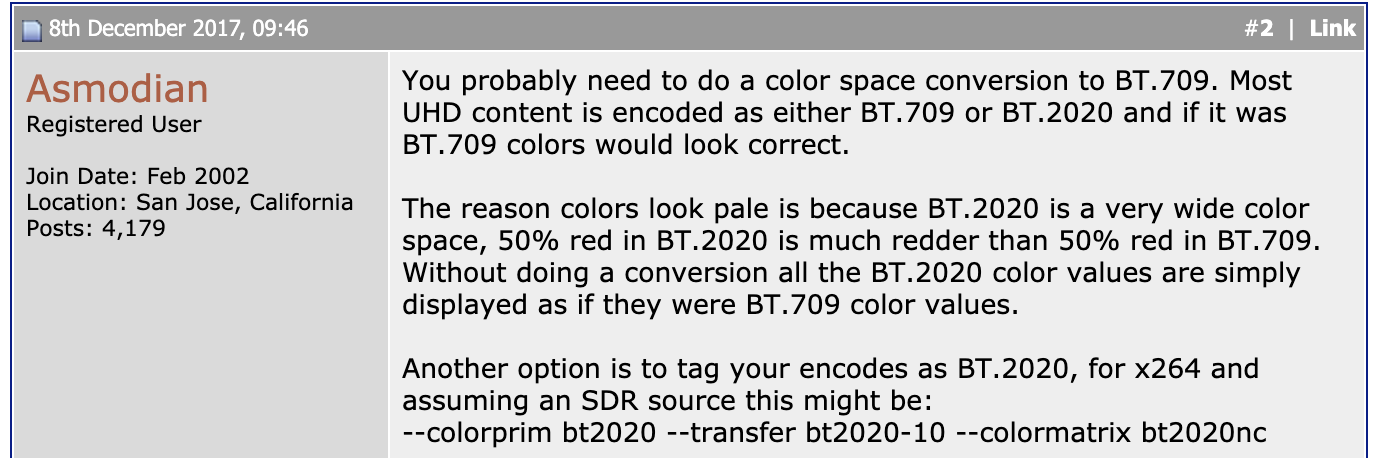
It turns out that when the HDMI splitter was downscaling it wasn’t taking into account the HDR (or in this case BT2020/rec2020 ).
A quick primer, I think (this gained from random Internets), SDR (Standard Dynamic Range) defines that there are 8-bits that can be used for the colour and HDR (high dynamic range) can be a few different specs (like HDR10, BT202, etc) and usually specifies there can be between 10-12 bits for the colour. Essentially it takes the SDR image and then adds that vibrance(tm) in the other bits! So when the HDMI splitter downscales its actually trying to fit all those 12 bits of colour into an 8 bit space and thats why we are getting it all washed out. One of the best clues I got came from this single blog post on a random doom9 forum from 2017:
So I reached out to easycoolav support (where I got the splitter from) to ask if they could fix the downscaling to get the colour space or if there was an update or anything else I could use. And wow was I impressed but they replied, heck they even offered some new firmware. Sure the firmware didn’t work on the one device I had and the other I cant get USB/Serial responding, but i’m optimistic that there might still be a path there. They have excellent support as you can see from this 38 email thread with them about this
![]()
In the meantime, there are some other options, I can adjust the brightness, contrast, saturation and hue to get where I need to be! Luckily linux has a great util called v4l2-ctl which lets me set all of these from the command line, so with a bit of harassing I got somewhere near where I wanted to be:

But wait there is more!
So I had this cool setup and really showing the coloured pinwheel always thrilled me, but maybe I didnt want to limit this to just have to work with what was coming off the HDMI, or maybe I wanted to something better than just cropping or not cropping and taking an edge.
I had already built some sort of a “extension” system for this, why not extend this even further. I already had HDMI so the first thing I built as another plugin was the Rainbow display, essentially just creating a slow moving pinwheel around, fun if I just want some cool ambient lighting. Next I also built a “Meteor” that would shoot around the edge of the screen and when it got to the bottom corner it would pick a random colour and start again. These were great and I figured if people use it, maybe they’d also want to build their own (like a pumpkin themed one for halloween or other holidays – even though Halloween is the best!). For this I built out the extension system a little more and created an example one that just did some random twinkly lights and hopefully other people can use it to.
These were kind of fun, but there was one thing that was missing, I was using the video from the HDMI, but doing nothing with the sound! It’s great to have in a movie but it would also be fun to have the lights work when I listened to music on spotify. I gave it a bit of thought and I really liked the coloured pinwheel so I built (and copied HEAVILY for this one) something that would do the following:
- Take the audio and cut out just the audible range
- Split this into buckets of different ranges and work out the ‘brightness’ by the amplitude of each bucket
- Take each bucket and transpose it onto a segment of LEDs (say 10 for each bucket)
- Profit
This meant that for a week or more I was basically living in a rave den in my apartment, the lights off, the music up and staring at the colours projected on the walls! After a LOT of tinkering to figure out how quickly to dim the lights after they pulsed that it still matched a beat but didnt give you a fit I have a semi working version that is also included, this was potato cam’d, but you can at least see it!
Conclusion
Good grief this was a long post and a lot of random work went into this project. I hope you enjoyed the process and tribulations and build your own to use. Thanks to everyone that I tormented with constant videos of this, questions about how things work and far too many months of just nonsense.
[…] Aurora: Ambient Lighting […]
Wow! That’s a fantastic trip down the rabbit hole!
I have an old Philips AmbiLight system running on my W10 PC via software hacks – it looks very weak compared to your set up!
This is great. I tried something similar myself, but got stuck trying to find a splitter that worked. My only concern here is that it’s HDMI 2.0 and not 2.1, and I believe that means it won’t do 4k above 60fps, nor will it auto switch the TV to low latency for game mode. Can you confirm?
Hey Craig,
Looking at the slightly more expensive splitter page it does say “It supports HDMI 2.0 specification features including data rates up to 4K@60Hz 4:4:4 8bit, HDR and HDCP2.2, Deep Color, 3D, Lip Sync, and HD lossless Audio/Video formats.”
It took me a little to figure out how to get this info on the screen, but I am playing a 4K 60fps youtube video with the lights working now, I dont know if it can go about that or how to actually test that on my c9. If you let me know I’ll be able to test for you.
Hi, I stumbled across your blog and thought it was an interesting read to hear your journey being unsatisfied with products like the Philips Sync Box etc. I did have a question however…I’ve got my own DIY TV lighting and use software called Hyperion (or a new fork called HyperHDR which attempts to tonemap SDR captures to HDR colours) and wondered if you’re aware of it, as it’s implemented a lot of the things you’ve discussed like cropping etc.
If you’ve looked at it before I’d be interested to understand how your software differs.
Thanks
Dan
Hey Dan,
Someone commented on hackaday about it too, actually I hadnt seen the project before and it looks very similar. Their setup and config is a bit more of a pain as well as building your own, but if they supported driving the LEDs directly from the Pi with the Adafruit-Neopixel library I don’t see why this wouldnt work just as well there.
Thanks for the comment!
Excuseme, sir. First of all, excellent job! I have a simple question. I have a 4k resolution TV (only 60hz). If i Build this I can just turn on the TV and use the apps inside my tv and my ps5 and this will work instantly? or this is using a mini pc as OS? Sorry for my bad english. Thanks a lot
This is using a Pi, so it will not work for built in TV apps, but will definitely work for anything connecting to the TV via HDMI (Like the PS5!)