TLDR; You can listen to all of the San Francisco CERS (Public Safety) Trunked system at https://openmhz.com/system/sfcers_am , this guide will show you how you can do the same for it or another trunked system!
I am uploading all of San Francisco CERS ( Public Safety ), including Police/EMS/Sheriff/Citywide/gov/etc to https://t.co/tJiKBRXhP4
Covers the area in the pic attached. Be safe out there. pic.twitter.com/OekAm3mbYY
— AndrewMohawkᴰʳᵉʷᵇᵃᶜᶜᵃ (@AndrewMohawk) June 11, 2020
One of the more common things to do with an RTLSDR (or any SDR for that matter) is to listen to what’s being transmitted. Naturally this often extends to networks of people with radios (sometimes called portables?) such as Police, Fire, EMS, Security services and so on. Generally you will be able to find the range they are in and see some sort of waterfall that looks like this with your radio:
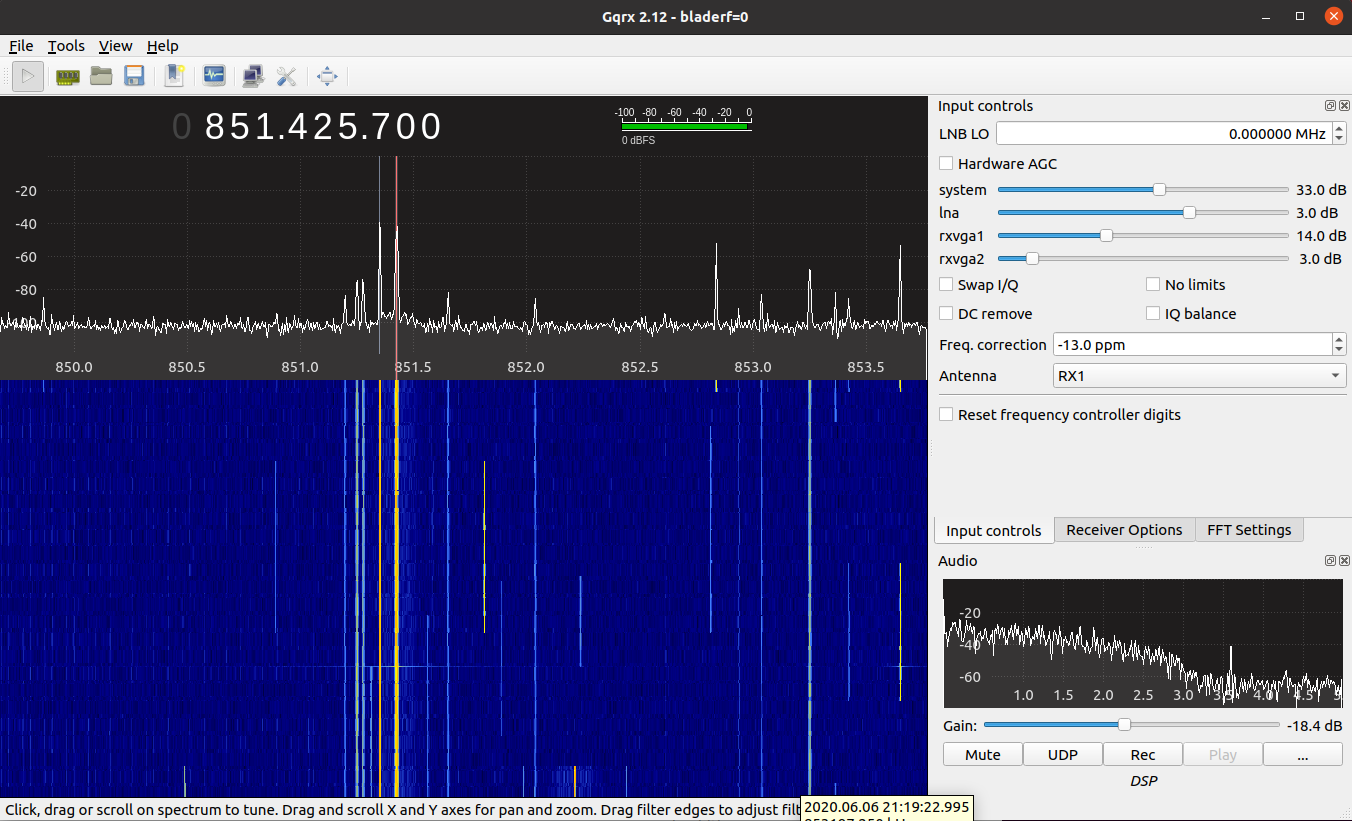
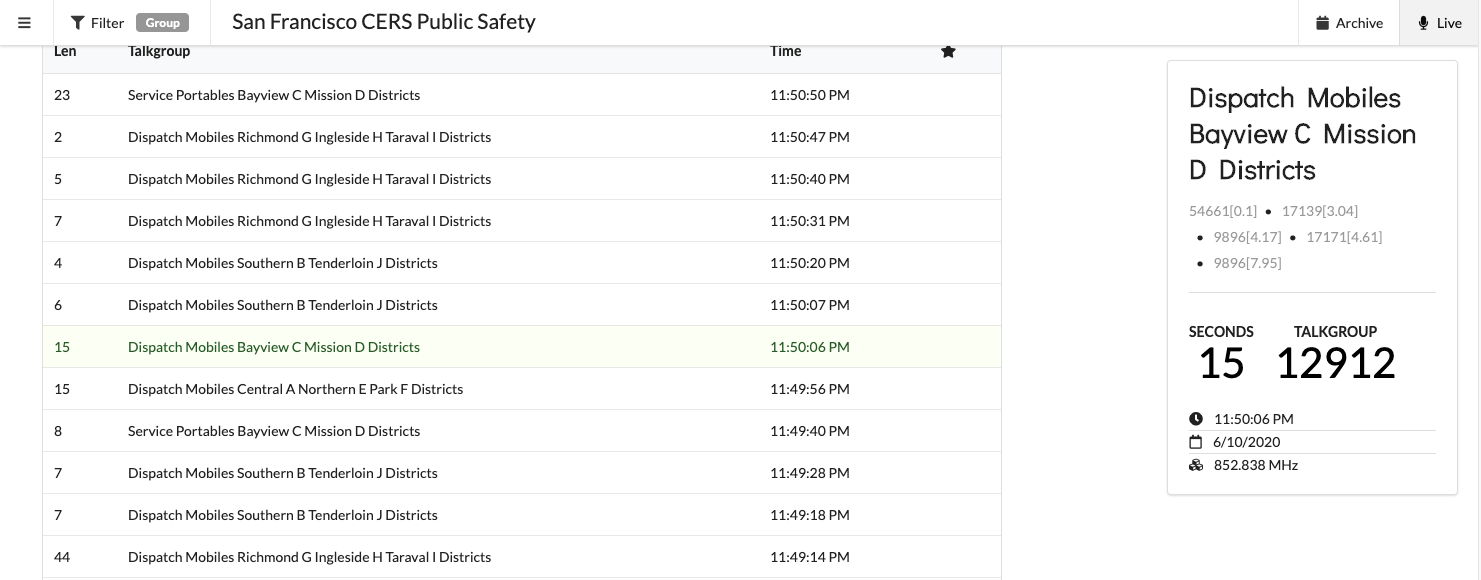
The thrill of randomly clicking on every spike that comes up and being able to hear the audio is amazing! However it quickly becomes tedious as they keep popping up all over the place and you have to try and chase them down. This is because it is a trunked radio system, there is a control channel that radios follow to figure out what frequency to ‘talk’ on. We are gonna go through setting up trunk-recorder as well as uploading all the calls to OpenMHz so that we can listen to all these calls! The end product looks something like this:
A brief overview
Firstly, I am not a radio person, so a lot of this is guess work and lies. Basically after having a look at some of the documentation this is the basic premise, and seems to fit for all trunked networks, from the older Motorola Smartnet systems to the newer P25 networks. In San Francisco the system used is Smartnet.
The essential gist of trunked networking is that it is a way to share a small amount of communications paths (bandwidth) over a large number of devices. A trunking system ensures different calls (talkin’ on the walkies’) can be made at the same time without any user interaction to change channels, unsquelch or perform any manual tasks to make and receive calls. If we didn’t have these systems people would be a mess trying to find each other on the same channels (frequencies) and talking over each other!
The majority of a trunked networks are handled by what is called a control channel, there are always one or more of these (usually 2 primary and 2 backup channels). These control channels are usually digital broadcasts that radios “listen” to while not in use. The control channel tells radios what frequencies they should tune to to listen to ongoing calls, where they should tune to make calls and other information that is needed for day to day usage.
Radios on trunked systems are divided up into what is called “Talk Groups” (TGs), which is simple a group of radios that all “talk” to each other. These talk groups are typically things like a group of people working in the same area where sharing all calls is relevant. An example would be one of the San Francisco groups for the police is called Dispatch Mobiles Southern B Tenderloin J Districts, which covers all police working in these areas.
Announcement Groups (or sometimes just Groups) are a larger category that hold various TGs that might be relevant to a certain department. For example if we look at the recordings below from the SF Fire Department:
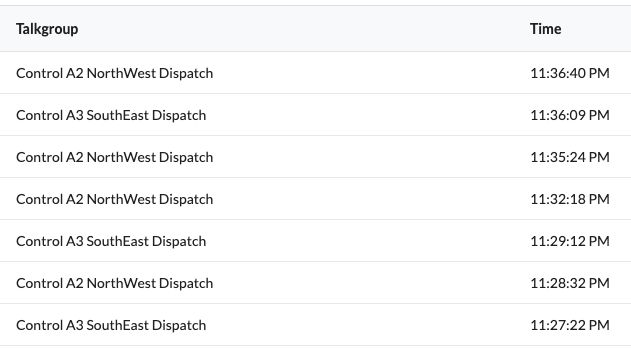
You can see in this brief snapshot there are Control groups A2 and A3 that are the Talk groups (collection of radios) and all of these radios are in the Announcement group for the Fire department.
There is a lot of coolness in trunked radio and how they works and a fantastic document can be found here: https://pdfslide.net/documents/motorola-trunking-concepts.html , I recommend anyone interested in finding out more about this take a read as it gets into the nuts and bolts of ISW, OSW, LSHS and more!
Sidenote: security?
These systems have historically been built without good authentication and authorisation in place as well as without the idea of a malicious actor on the network. As such there could be multiple vulnerabilities in systems like these where malicious individuals do things like:
- Create mass announcements
- Mass report radios as stolen (and possible soft-brick all of them)
- Force channels to remain open so radios cannot use them
- Force talk groups of radios to remain open so they cannot listen to other calls.
The access to systems like these to perform research is very limited by government bodies, regulations and getting hold of the devices to test.
Let’s find a trunked system!
The easiest way to find trunked systems in the United States is the radioreference website alternatively you can google or if you are really persistent scan the frequencies. In this case I am in San Francisco so we are going to look at the trunked network found there:
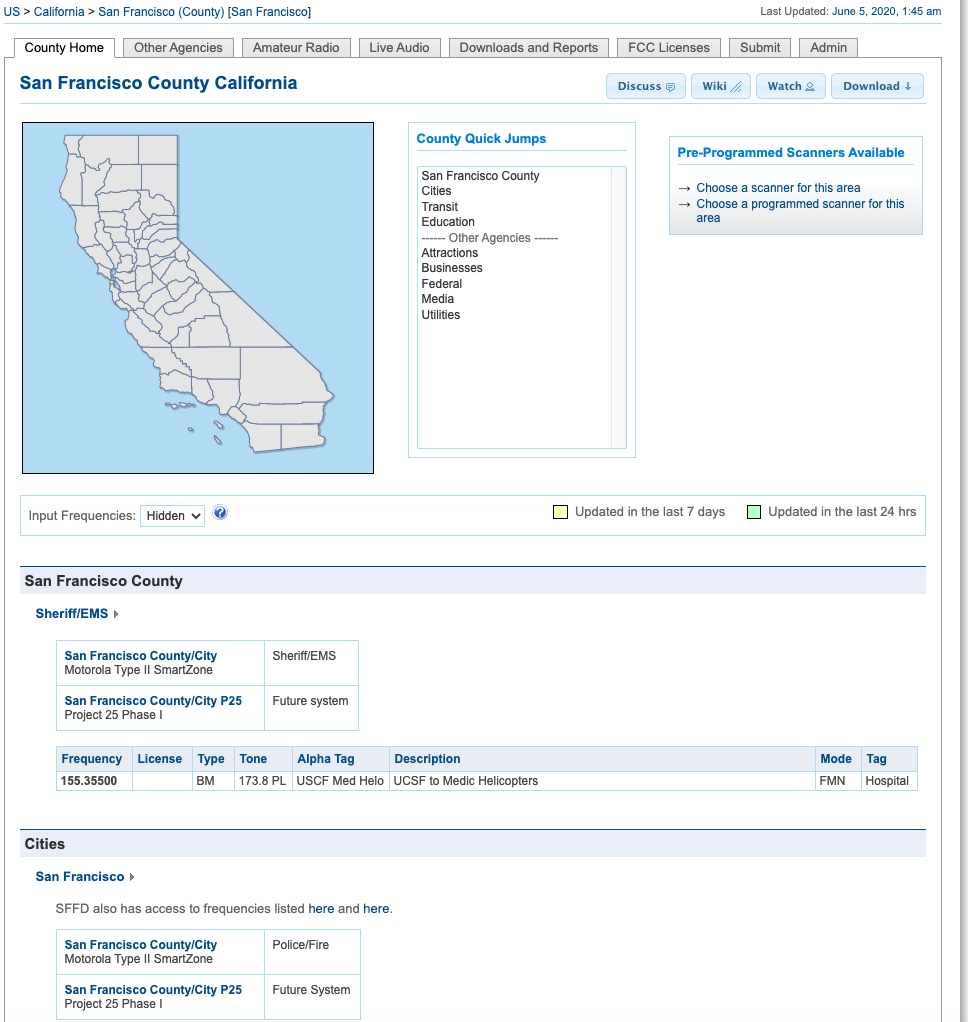
From here we can see that there is a P25 (digital) that is planned for the future and a current Motorola Type II SmartZone/Net system. Lets take a look at the SmartZone:
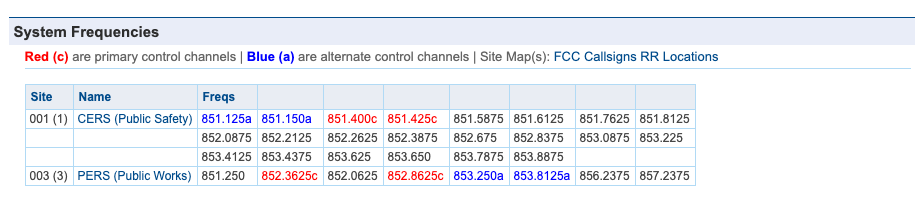
You can see from this that there are two systems, CERS (Public Safety) and PERS (Public Works) each with control channels in red and secondary ones in blue. The first step we want to take here is to make sure we can see these in whatever software we are using with our radio. Here I am using a RTLSDR with GQRX on mac, but this works on Linux as well and I use SDR# on windows (pick whatever you want). Here we can clearly see the two control channels (they sound digital if you tune to them). However the frequencies are not exactly what we expect:
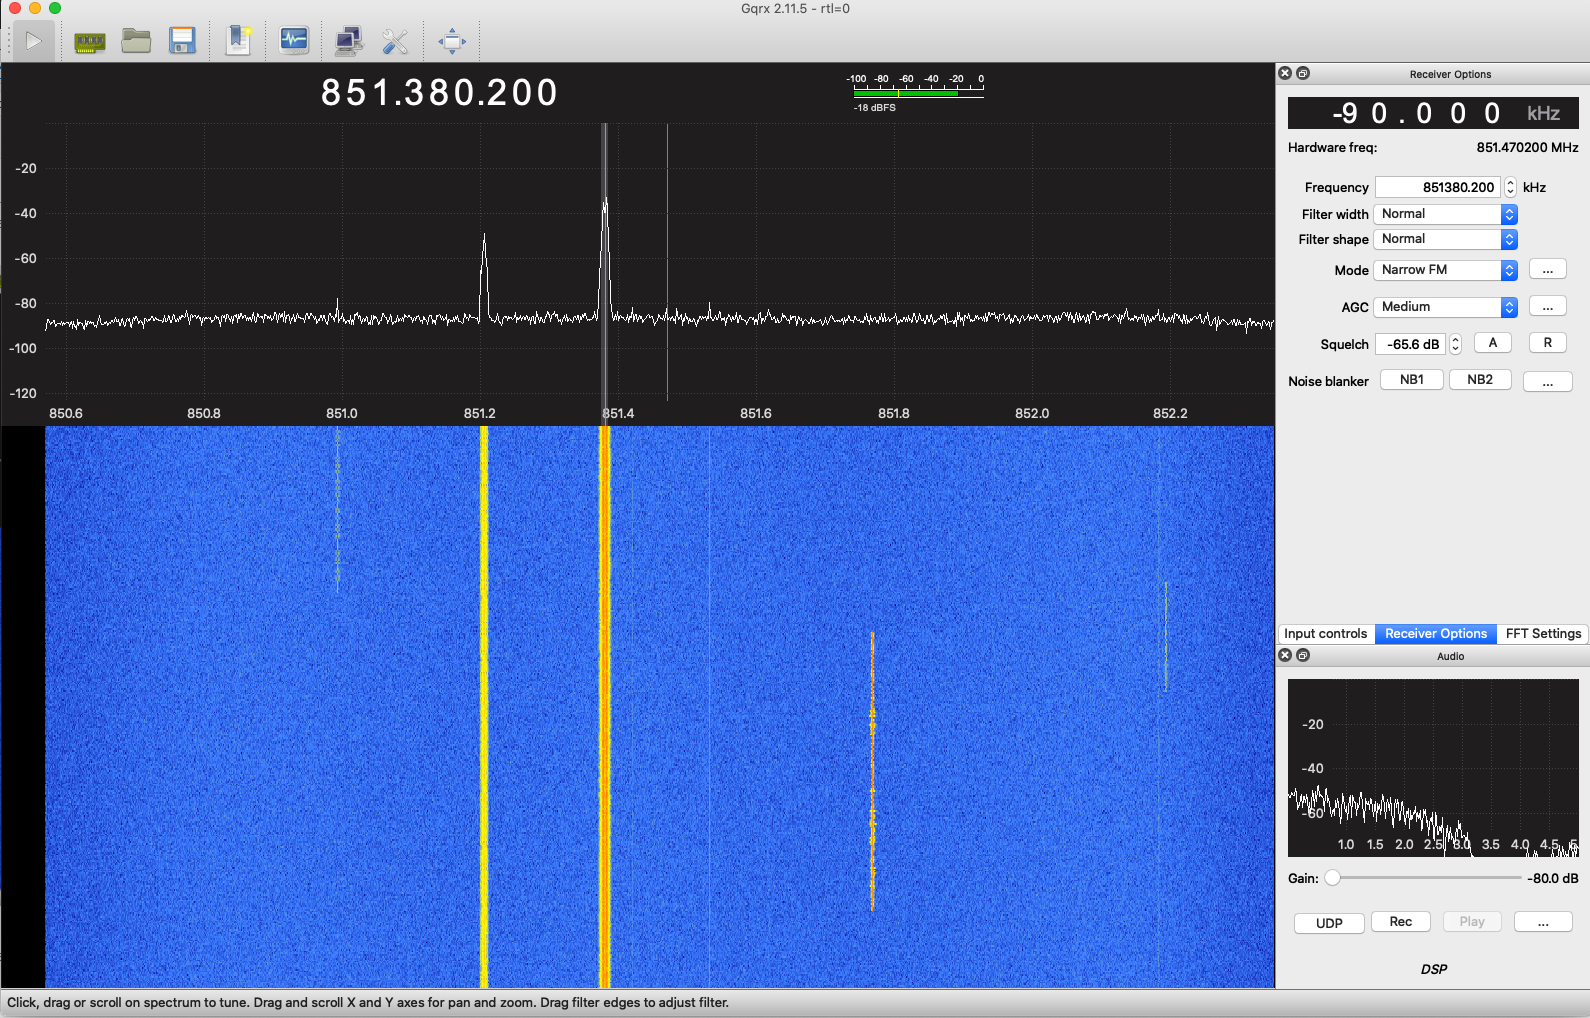
According to the spec this network has control channels at 851.125, 851.150, 851.400 and 851.450. However the two I can see are at 851.380 and 851.205? So whats going on? Well there are two aspects to this, the first is that the RTLSDR is probably not tuned precisely and will have an offset/error sometimes referred to as a PPM and the second is that the control channels might have changed. So first we want to fix the tuning on our device that so that later on when we are running the application it will be tuned to the right frequency. Remember the control channel is going to specify what frequencies to record on so we need to have it correct!
To figure out the PPM pick a signal that you know exists on a particular frequency, a really nice one is the NOAA weather radio:

Open GQRX or your SDR application of choice and tune to 162.4 or whichever is closest to you:
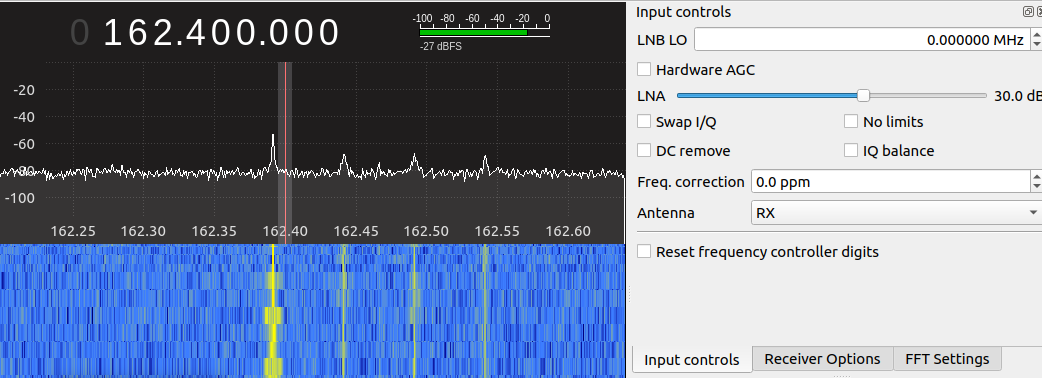
Here you can see mine is slightly out, so on the right hand window under “Input controls” I am going to adjust the ppm until it lands directly on that channel:
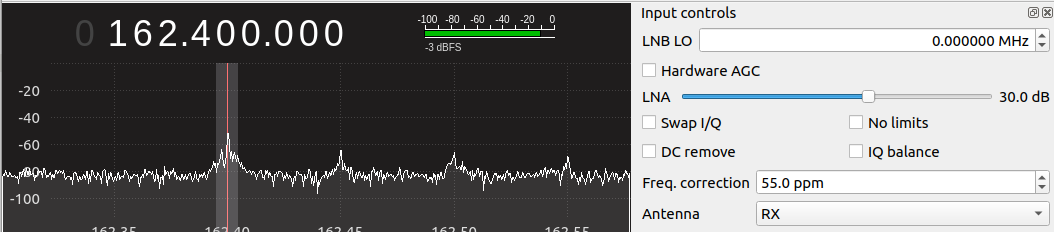
Here you can see I need an adjustment of 55.0ppm! We will need this later when configuring the devices!
Now we can go back to the control channel signals and get the correct control channels for our trunking project. You can find the control channels by looking at what is always broadcasting:
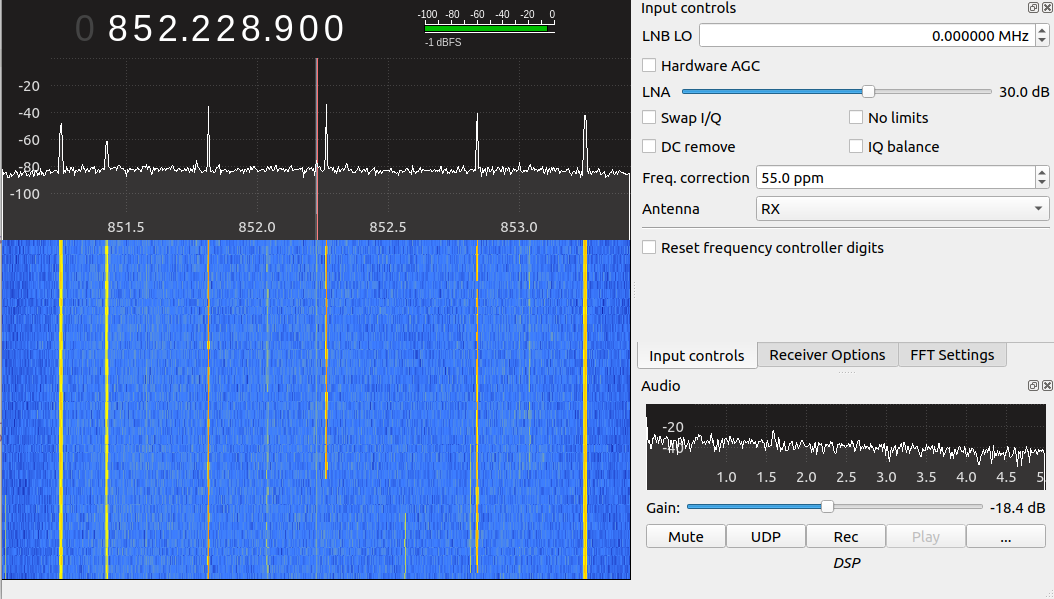
My control channels you can see for this example are two on the left and one on the right of my waterfall. When I zoom into them and get the frequency of the center of them I get the following:
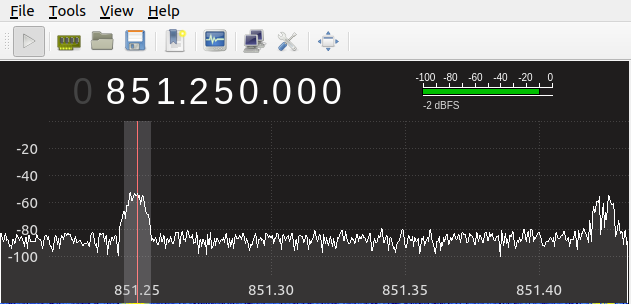
My control channels are 851.250, 851.450, and 853.250. However if I look back at the documentation I can see that 853.250 is for the PERS (public works) system rather than the CERS (public safety) system that I am interested.
Picking the right SDR
Okay great, we now have our RTL offset configured, we know the networks and we have the control channels. The last thing we need to do is figure out how we are going to cover all of the range of the system, if we look at the PERS system we are targeting we see it has the following channels:
| Site | Name | Freqs | |||||||
|---|---|---|---|---|---|---|---|---|---|
| 001 (1) | CERS (Public Safety) | 851.125a | 851.150a | 851.400c | 851.425c | 851.5875 | 851.6125 | 851.7625 | 851.8125 |
| 852.0875 | 852.2125 | 852.2625 | 852.3875 | 852.675 | 852.8375 | 853.0875 | 853.225 | ||
| 853.4125 | 853.4375 | 853.625 | 853.650 | 853.7875 | 853.8875 |
To cover the various channels (they are usually 12.5khz each), we need to pick and SDR or multiple SDR’s to cover it. A standard RTLSDR can cover 2.4Mhz of bandwidth at a time while something like a HackRF covers 20mhz and a BladeRF covers 28Mhz of bandwidth.
Note as /u/jquagga pointed out, some RTLSDRs (especially v3 from rtls-dr.com) only do 1.92mhz so you will need to use “1.92” instead of “2.4” on the web page below
For the system listed above we can see the lowest frequency is 851.125 and the highest being 853.8875, which means we need to cover 2.7625 Mhz in total. To do this we can either use multiple RTLSDRs or a single BladeRF/HackRF/Lime/etc (an SDR capable of more than the 2.4Mhz our RTLSDRs are).
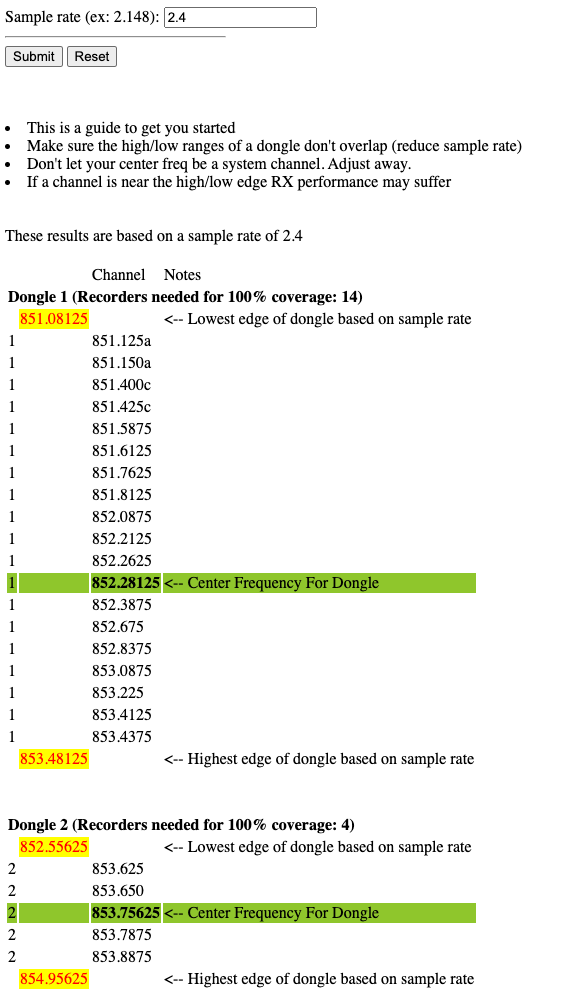
We also need to find the correct centre frequency for the device thats not on an audio channel (because of something called a DC offset). The centre frequency just means where the device is tuned to and will do half the bandwidth to the lower bound and half to the higher bound. If we had to calculate it for ours and we could cover all 2.7625mhz we can just do LowestFreq + (HighestFreq – LowestFreq / 2) and make sure its not directly on a channel, ours would be 851.125 + ((853.8875-851.125)/2) = 852.50625. If we have multiple devices however we will need to pick some overlaps to do this, luckily we dont need to calculate this by hand we can simply use this simple tool at http://garvas.org/trunk-recorder/.
To use it, select the frequencies from the system you are interested in and hit copy and them
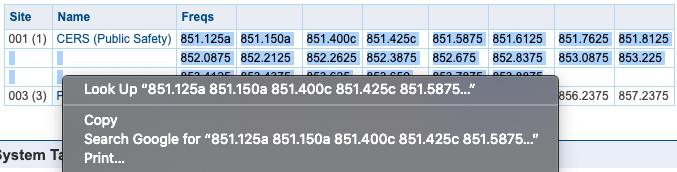
Then in the trunk recorder tool input the bandwidth you would like to use for your SDR, remember for RTLSDR’s thats a maximum of 2.4mhz, but if you had something else that could do more bandwidth you could specify you are only going to use say 5mhz:
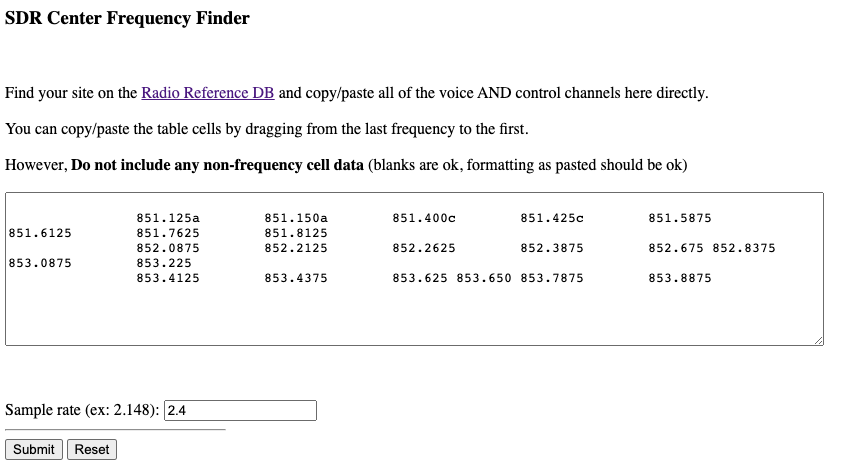
After that you will see the output, example here shows input with an RTLSDR (2.4mhz)
And here an example where I have an SDR that is capable of handling more traffic (so I use 5mhz)
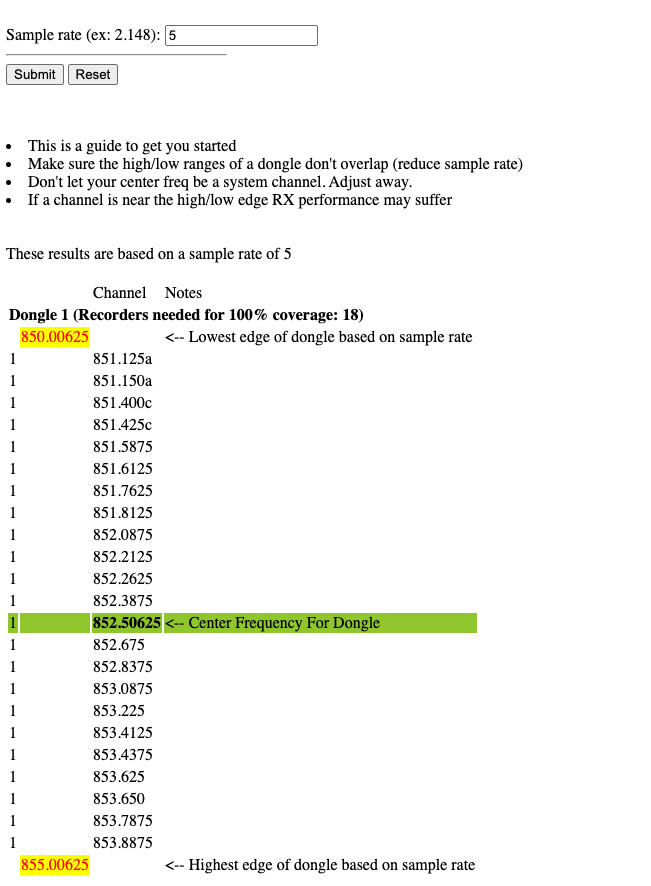
From this we can see that we either need two RTLSDRs or a single SDR that is capable of doing all of it!
Configure/Fetch Talk Groups
Now we have the target system we are looking at, picked the right SDRs for the job and we have the center frequencies we wish to go for, we can now configure everything for trunk-recorder.. well almost, we need to first get the configuration for the various “Talk Groups” so that when we see these we can label them as the correct devices in that group! You can view all the talk groups on the radioreference website:
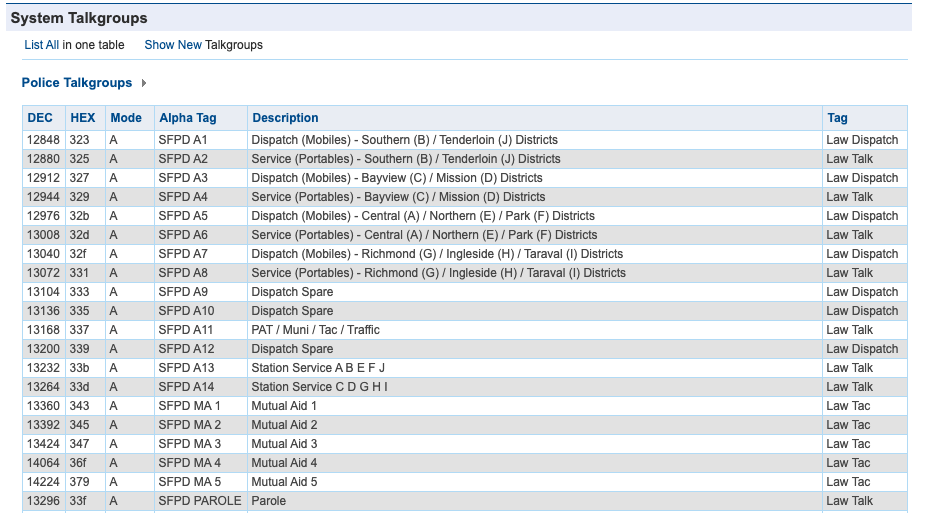
However we need these as a CSV file so trunk-recorder can process them as well as something that OpenMhz can use, the easiest way to do this is to browse on radioreference and hit the “Downloads and Reports” tab at the top and simply download the list of them. However this does require a paid subscription to radio reference, if you don’t want to pay you can create your own CSV from the tables listed on the page
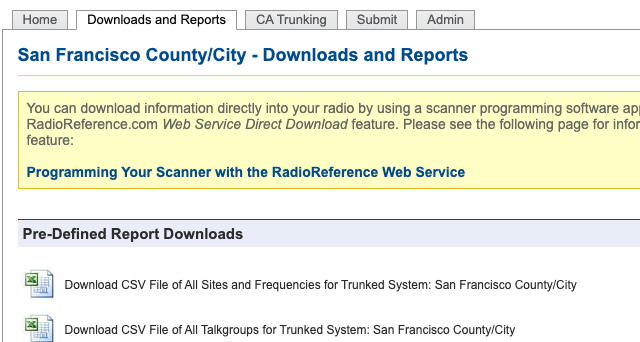
Your CSV will look as follows when you first download or create it:
Decimal,Hex,Alpha Tag,Mode,Description,Tag,Category
16,010,SFPD TAC 7,DE,Tactical 7,Law Tac,Police
48,030,SFPD TAC B14,DE,Tactical B14,Law Tac,Police
80,050,SFPD NARC 2,DE,Narcotics 2,Law Tac,Police
112,070,SFPD NARC 3,DE,Narcotics 3,Law Tac,Police
144,090,SFPD NARC 4,DE,Narcotics 4,Law Tac,Police
176,0b0,SFPD NARC 5,DE,Narcotics 5,Law Tac,Police
208,0d0,SFPD SID 2,DE,Special Investigations Division 2,Law Tac,Police
240,0f0,SFPD VICE 1,DE,Vice 1,Law Tac,Police
272,110,SFPD CMD 1,DE,Command 1,Law Talk,Police
304,130,SFPD CMD 2,DE,Command 2,Law Talk,Police
400,190,SFPD Encr 400,DE,Encrypted,Law Talk,Police
432,1b0,SFPD Encr 432,DE,Encrypted,Law Talk,Police
528,210,SFPD Encr 528,DE,Encrypted,Law Talk,Police
560,230,SFPD Encr 560,DE,Encrypted,Law Talk,Police
592,250,SFPD Encr 592,DE,Encrypted,Law Talk,Police
720,2d0,SFPD Encr 720,DE,Encrypted,Law Talk,Police
944,3b0,SFFD EMS1,DE,EMS 1  FDB13  MedicHospital  All Hospitals,Hospital,EMS
976,3d0,SFFD EMS2,DE,EMS 2  FDB14  MedicHospital  SFGH,Hospital,EMS
1008,3f0,SFFD B7,DE,Arson,Fire-Talk,Fire
12848,3230,SFPD A1,A,Dispatch Mobiles  Southern B  Tenderloin J Districts,Law Dispatch,Police
12880,3250,SFPD A2,A,Service Portables  Southern B  Tenderloin J Districts,Law Talk,Police
12912,3270,SFPD A3,A,Dispatch Mobiles  Bayview C  Mission D Districts,Law Dispatch,Police
12944,3290,SFPD A4,A,Service Portables  Bayview C  Mission D Districts,Law Talk,Police
12976,32b0,SFPD A5,A,Dispatch Mobiles  Central A  Northern E  Park F Districts,Law Dispatch,Police
13008,32d0,SFPD A6,A,Service Portables  Central A  Northern E  Park F Districts,Law Talk,Police
13040,32f0,SFPD A7,A,Dispatch Mobiles  Richmond G  Ingleside H  Taraval I Districts,Law Dispatch,Police
13072,3310,SFPD A8,A,Service Portables  Richmond G  Ingleside H  Taraval I Districts,Law Talk,Police
13104,3330,SFPD A9,A,Dispatch Spare,Law Dispatch,Police
13136,3350,SFPD A10,A,Dispatch Spare,Law Dispatch,Police
13168,3370,SFPD A11,A,PAT  Muni  Tac  Traffic,Law Talk,Police
13200,3390,SFPD A12,A,Dispatch Spare,Law Dispatch,Police
13232,33b0,SFPD A13,A,Station Service A B E F J,Law Talk,Police
13264,33d0,SFPD A14,A,Station Service C D G H I,Law Talk,Police
And is generally in the format of Decimal,Hex,Alpha Tag,Mode,Description,Tag,Category
TAKE NOTE: This format does not work out the box with EITHER openmhz or trunk recorder and needs some changes, this stumped me for a long time!
Trunk Recorder Format:
The Trunk recorder format needs to be Decimal,Alpha Tag,Hex,Mode,Description,Tag,Category , where the two fields (Alpha Tag and Hex) have been swapped, you can either do this yourself or you can just use a tool like https://onlinecsvtools.com/swap-csv-columns to swap the Alpha Tag and Hex columns
Example for Trunk recorder output:
Decimal,Mode,Alpha Tag,Description,Tag,Category
16,DE,SFPD TAC 7,Tactical 7,Law Tac,Police
48,DE,SFPD TAC B14,Tactical B14,Law Tac,Police
80,DE,SFPD NARC 2,Narcotics 2,Law Tac,Police
112,DE,SFPD NARC 3,Narcotics 3,Law Tac,Police
OpenMHZ format:
Open MHz however requires that the format be Decimal,Mode,Alpha Tag,Description,Tag,Group,Priority and it requires all of these fields, to do this you need to remove the HEX col from the trunk recorder format (I used https://onlinecsvtools.com/delete-csv-columns )and then add a priority to each line, a simple one liner to add just the priority after you have deleted the hex column:
awk '$0=$0",100"' trunkrecorder_talkgroups.csv > openmhz_talkgroups.csv
Example for OpenMHZ output:
16,DE,SFPD TAC 7,Tactical 7,Law Tac,Police,100
48,DE,SFPD TAC B14,Tactical B14,Law Tac,Police,100
80,DE,SFPD NARC 2,Narcotics 2,Law Tac,Police,100
112,DE,SFPD NARC 3,Narcotics 3,Law Tac,Police,100
OpenMHz
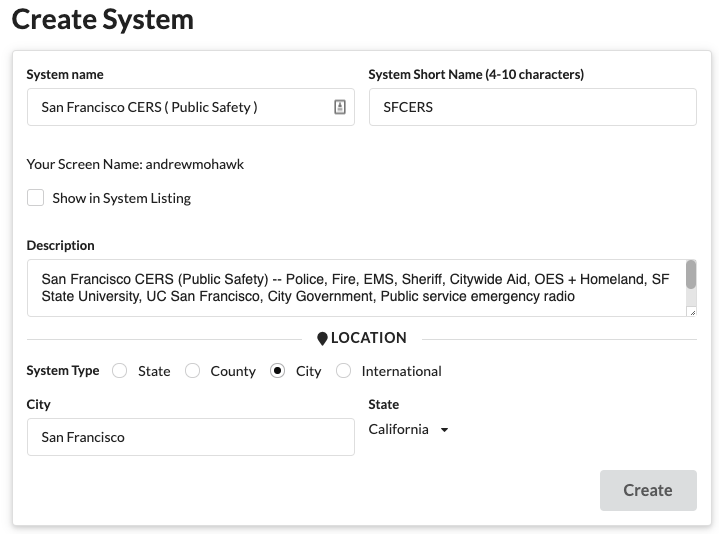
Now we have all the things we need to get our project going we need to setup our OpenMHZ project, this step is pretty simple, go to https://admin.openmhz.com/ and register an account, then hit the create system button:
Once you have created it you can head over to talk groups and select “Import Talk group” and upload your openmhz formatted file, if you do not get a response back, it is likely something is wrong with your upload, but you can go ahead and look at at the network traffic in your browser devtools (cmd+alt+j on mac) and see what the response looks like. The responses aren’t overly verbose so you might need to keep checking your file to look for things like extra quotes or empty lines or the wrong number of columns.
Once you have added it browse to the config screen where you will need to copy the example config, something like:
{
    "systems": [
        {
            "shortName": "sfcers",
            "apiKey": "your_api_key_will_go_here"
        }
    ],
    "uploadServer": "https://api.openmhz.com"
}
The last step for setting up the OpenMHz is to add the groups, this is under the “groups” tag, and unfortunately at the time of writing this a very manual process and you will have to manually group them.
If you are feeling a little braver, I have included a script to help you automatically upload all the groups.
You can pull the git repo from here: https://github.com/AndrewMohawk/trunkrecorder-helpers ( open a terminal and type git clone https://github.com/AndrewMohawk/trunkrecorder-helpers.git )once you have done that edit the file savegroups.py to change these three lines:
email = "email"
password = "password"
shortname = "shortname"
Then you can run the file to upload all of the groups from your OpenMHz file format and you should see the following
$ python3 saveGroups.py example-working-configs/talkgroups-SF-CERS-openmhz-format.csv
Adding the following groups to the system with shortname andrewtst:
Uploaded group: 'Police' successfully
Uploaded group: 'EMS' successfully
Uploaded group: 'Fire' successfully
Uploaded group: 'CitywideMutual Aid' successfully
Uploaded group: 'Public Service Emergency Radio System' successfully
Uploaded group: 'City Government' successfully
Uploaded group: 'Sheriff' successfully
Uploaded group: 'OES  Homeland Security' successfully
Uploaded group: 'San Francisco State University' successfully
Uploaded group: 'UC San Francisco' successfully
Trunk-Recorder setup
Now we have all the things we need to broadcast a trunking system:
- The trunking system control channels
- SDRs that we will use as well as the properties for them
- Our Talk group config in trunk recorder format
- OpenMhz API key and system shortname
Configuring trunk recorder
We need to tell trunk recorder what kind of config we are looking at (what the frequencies are, what our devices are, all information we have had before), so to do that we need two files, our talk group config in trunk recorder format and a config file. The talk group file we already figured out earlier, just remember to keep the right format, from here on out we are using it in trunk recorder format. The other file is the config consisting of two main parts, one is the sources, which tell trunk recorder what the SDRs that you have are and how they should be configured, and the other is the systems that we are connecting to.
Sources
For each source we have a block that will likely have these components:
{
    "center": 852000000.0,
    "rate": 2400000,
    "ppm": 0.0,
    "lnaGain": 30,
    "squelch": -40,
    "analogRecorders": 16,
    "analogLevels": 8,
    "digitalRecorders": 8,
    "digitalLevels": 8,
    "modulation": "fsk4",
    "driver": "osmosdr",
    "device": "rtl=0,buflen=65536"
}
These are our main entries that we will need and there are TONS OF OTHER OPTIONS over on the trunk recorder page, but I will just cover these that will get most peoples systems working.
center – This is our center frequency we calculated in the picking the right SDR section
rate – This is the amount of bandwidth we can get from the SDR, also what we used in the “picking the right SDR” section. For the RTLSDR we picked 2.4mhz so we need to set this to 2400000.
ppm – The PPM is pretty important because if your RTL or other SDR is slightly mistuned (ie, when you tune to 66.72 mhz it says its there but actually at 66.78mhz), when the control channel tells it what frequency a call is being made on it will be slightly off and the audio will sound terrible / wont be audible at all.
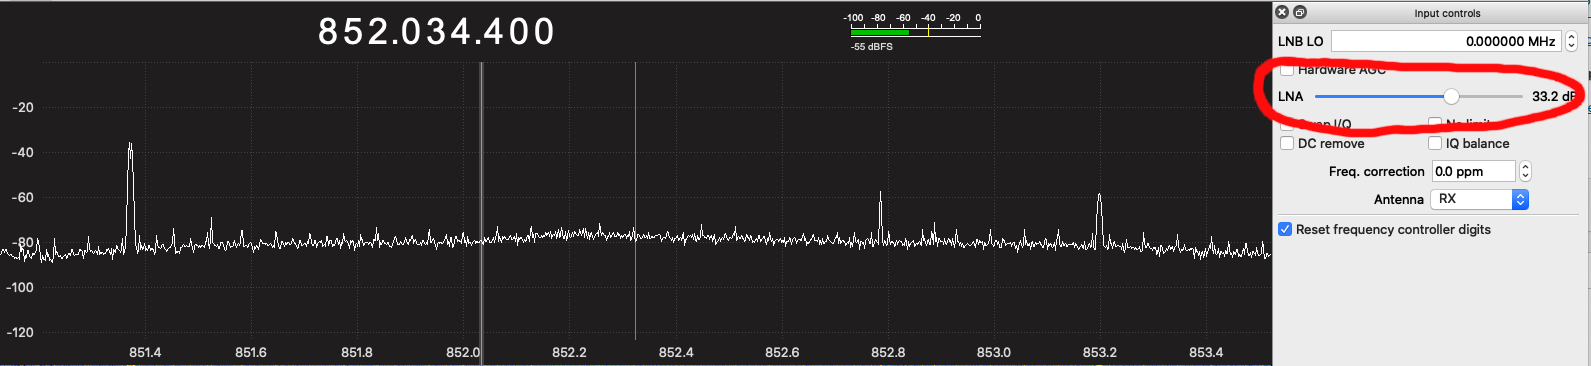
lnaGain – When we used GQRX earlier to figure out the PPM and frequencies for our sources we also also probably set the gain, this should be adjusted for each device, one nice way to do this is to tune to one of the audio “spikes” when someone is talking and play with the gain to get the best audio out.
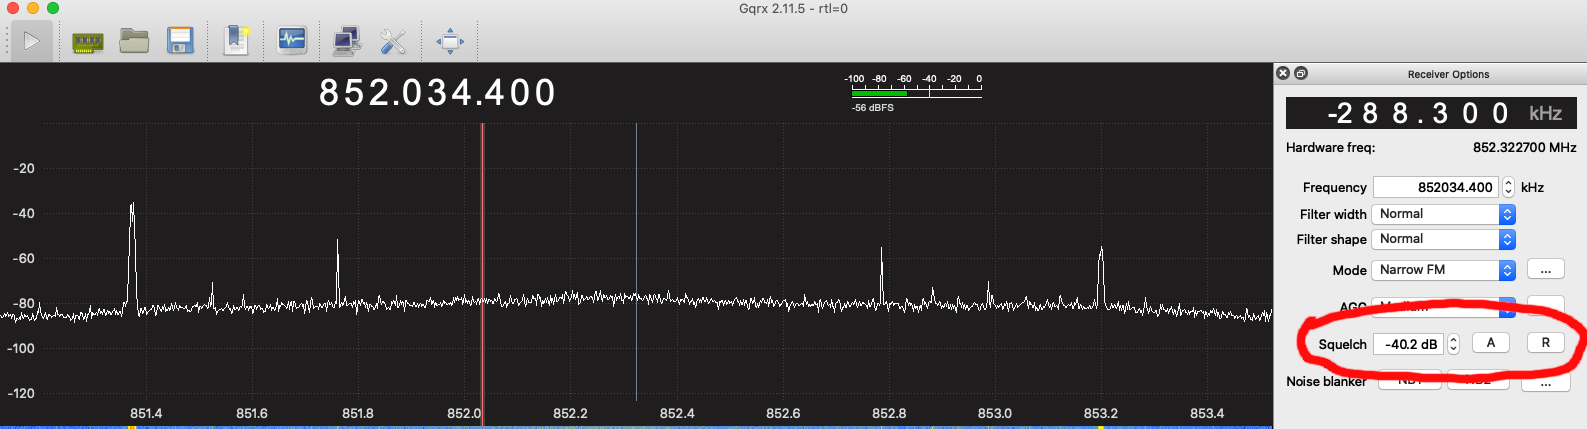
squelch – When doing the above, the squelch is also what you would set in GQRX so that you can “squelch” the static noise that you’d otherwise normally hear, we definitely want to do the same for our audio! If your recordings end up being *very* quiet you probably set this too low and if there is static without anyone talking its too high!
Analog and Digital Recorders – These are the number of recorders you will have for your setup, a recorder determines how many recordings can happen at one time. So if there are 10 calls at a time you will need 10 recorders, however these do add overhead to your resource usage. Depending on if your system is analog or digital you will have to adjust this
Analog and Digital Levels – This is a level from 0-32 that you can set for how much amplification the audio will go through, if your audio is too soft, try putting these up.
Systems
The system also has a ton of options and these will depend largely on what system you are trying to listen to, however a common format will look like this:
{
    "control_channels": [
        851425000,
        851250000
    ],
    "type": "smartnet",
    "talkgroupsFile": "talkgroup-trunkrecorder-format.csv",
    "bandplan": "800_rebrand",
    "recordUnknown": "true",
    "apiKey": "APIKEYHERE",
    "shortName": "SHORTNAMEHERE"
}
The main thing to change is the control_channels, that we discovered earlier, and then to set your apiKey and shortname from OpenMHz.
The type will depend on what type of system it is, the options are smartnet, p25, conventional & conventionalP25 you will need to review the radioreference page or google to figure this out.

Bandplan is something that is unique to smartnet systems, and you will see the above message listed that tells me I need to use this type, for options for other settings refer to the trunk-recoder documentation near the bottom of this page. But as this is a super common setting I have kept this in. Options for bandplan are 800_standard, 800_reband, 800_splinter, and 400_custom. 800_standard is the default.
Once we have this we can put this all together in our config file to get something like this:
{
    "sources": [
        {
            "center": 852000000.0,
            "rate": 2400000,
            "ppm": 0,
            "lnaGain": 30,
            "squelch": -40,
            "analogRecorders": 16,
            "analogLevels": 8,
            "digitalRecorders": 8,
            "digitalLevels": 8,
            "modulation": "fsk4",
            "driver": "osmosdr",
            "device": "rtl=0,buflen=65536"
        }
    ],
    "systems": [
        {
            "control_channels": [
                851450000,
                851250000
            ],
            "type": "smartnet",
            "talkgroupsFile": "talkgroup-trunkrecorder-format.csv",
            "apiKey": "APIKEYHERE",
            "shortName": "SHORTNAMEHERE"
        }
    ],
    "uploadServer": "https://api.openmhz.com",
    "captureDir": "/app/media"
}
(Note that there are also two extra fields for uploadserver and capturedir which are probably okay left as is)
Now all we have left is to install our application and setup the config for it. You have the options of running this natively, within a virtual machine or on docker (linux only). I would recommend a virtual machine if this is your first time setting it up and especially ubuntu desktop since you can see what is going on with gqrx when you want to setup the config file and to check any options. Or you can use docker under linux if you are going to be running this in a permanent setting. (I am, it rules!)
Virtual Machine:
Create a new virtual machine and install ubuntu 20.x (this is the latest, I cant be arsed to write an install for another version!). If you want to use GQRX make sure you are using ubuntu desktop, you can grab the iso’s from https://ubuntu.com/download/desktop and https://ubuntu.com/download/server
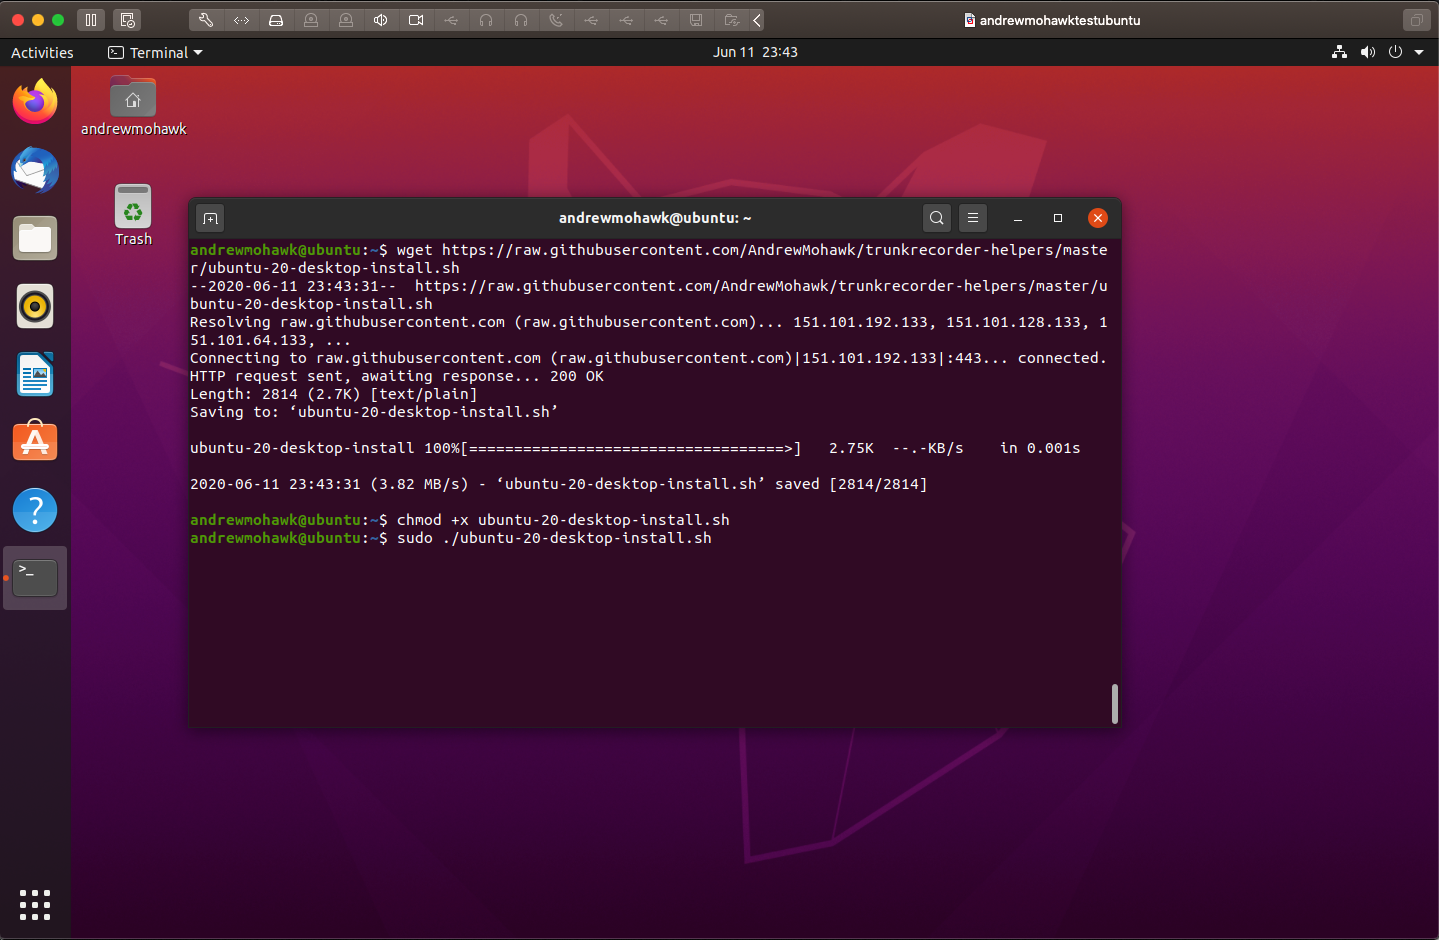
I won’t be covering installing it, so use vmware / virtualbox / whatever to create your vm. Remember to attach your SDR to the virtual machine! I’ve given mine 4 cores and 4gb of memory, and once its up and running i’ve gone and opened up a terminal (activity->terminal). In the terminal window you can run the following commands:
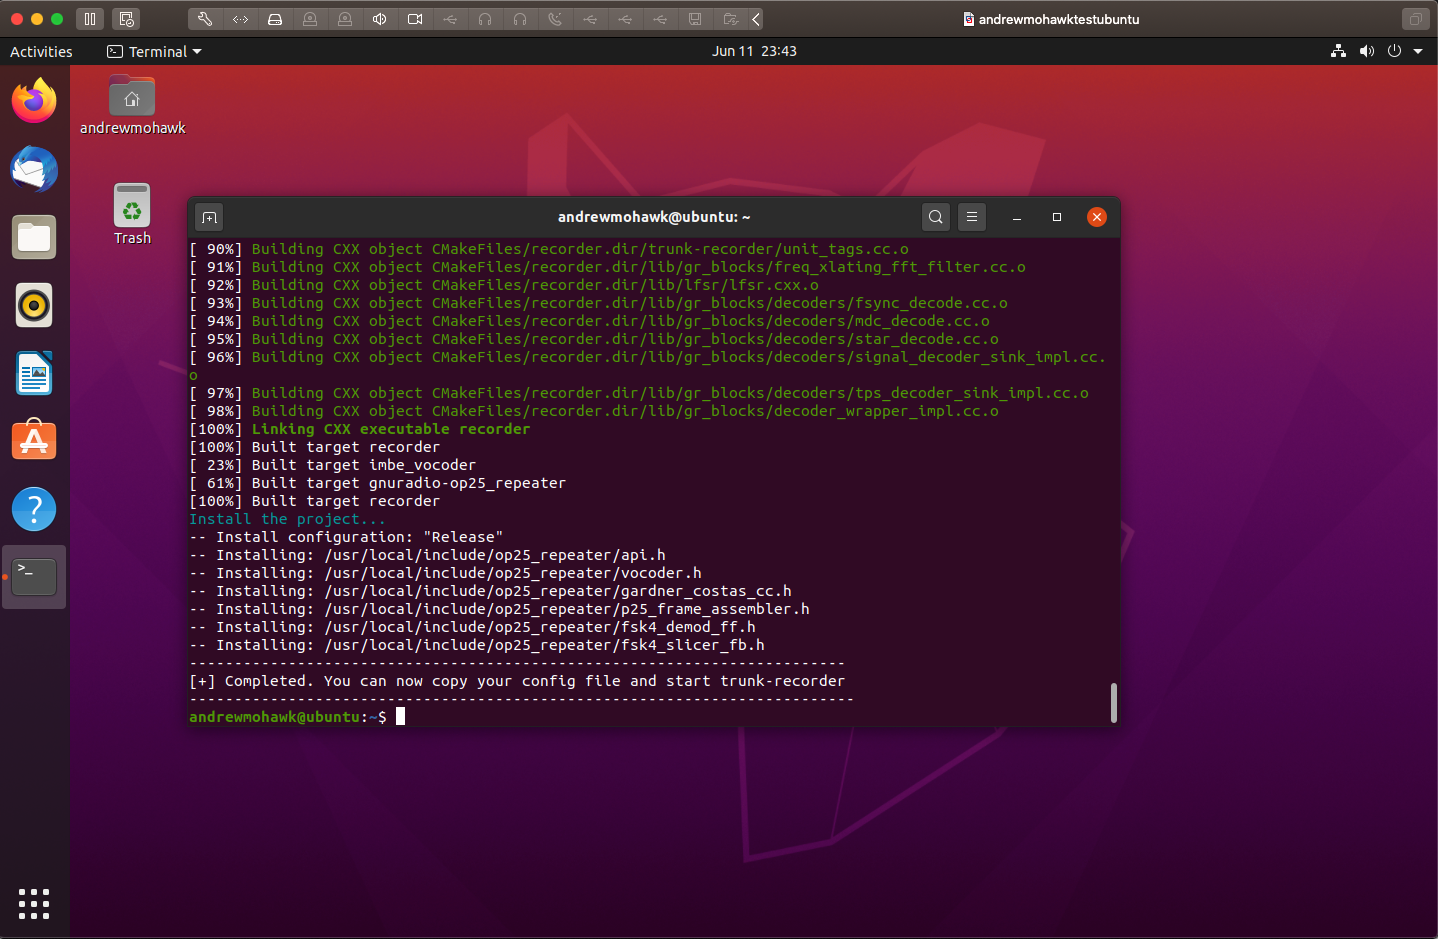
wget https://raw.githubusercontent.com/AndrewMohawk/trunkrecorder-helpers/master/ubuntu-20-desktop-install.sh
chmod +x ubuntu-20-desktop-install.sh
sudo ./ubuntu-20-desktop-install.sh
The installer will kickoff and before long you should see the message that it has been completed.
 |
 |
Once this has been installed you can open the config file located in /app/config/config.json to edit it as well as the talkgroups file in /app/talkgroup-trunkrecorder-format.csv. Under the ubuntu VM I opened the file manager “files”, clicked “other locations”, “this computer”, “app” and “config”, there I just opened the file with the default text editor.
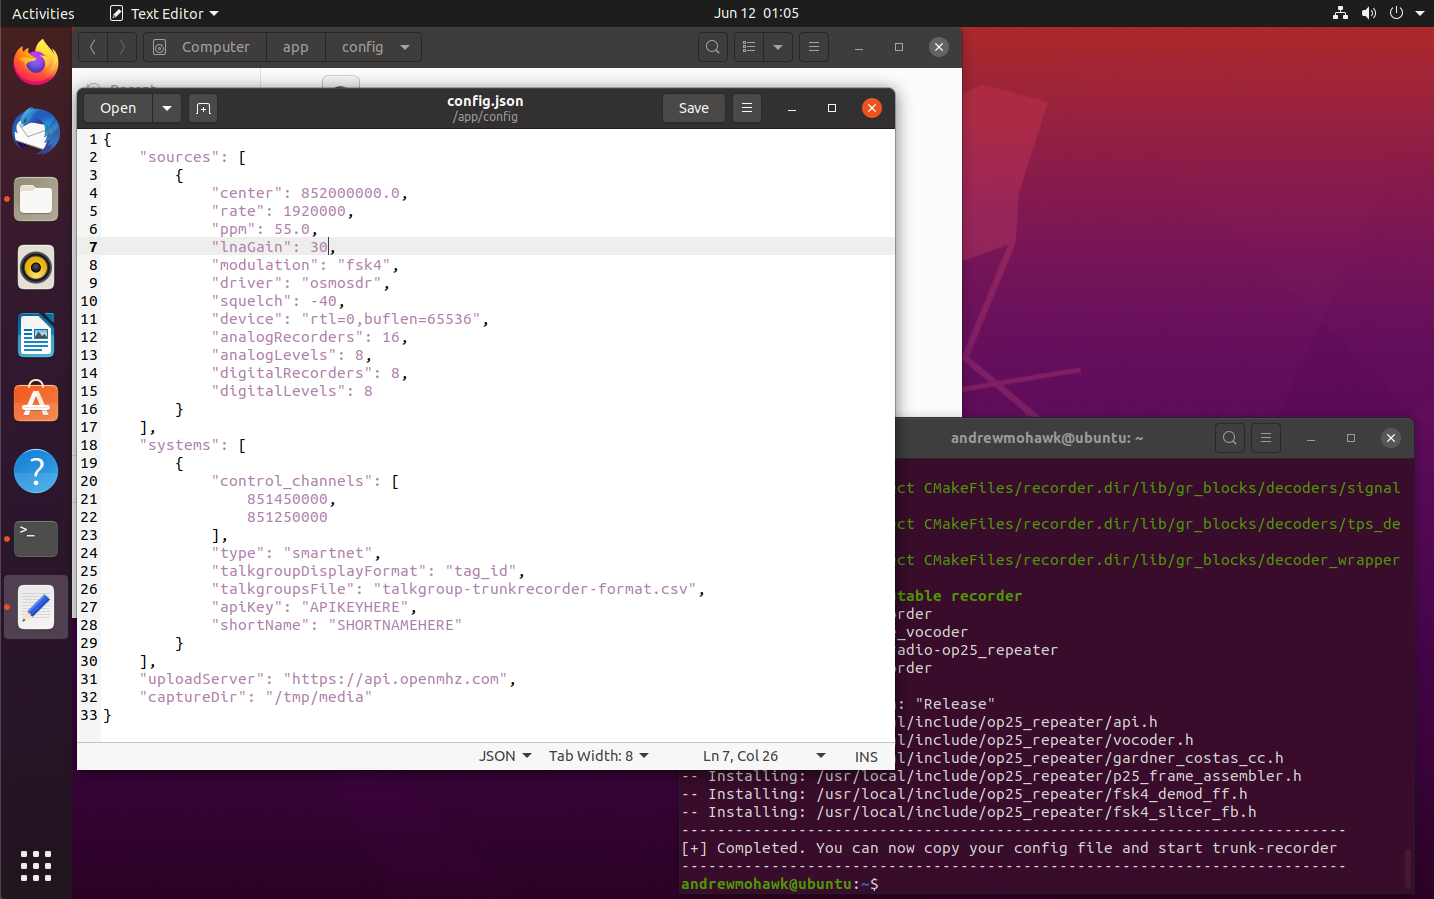
Once completed you can run the following to start trunk recorder:
cd /app/
sudo ./trunk-recorder --config=/app/config/config.json
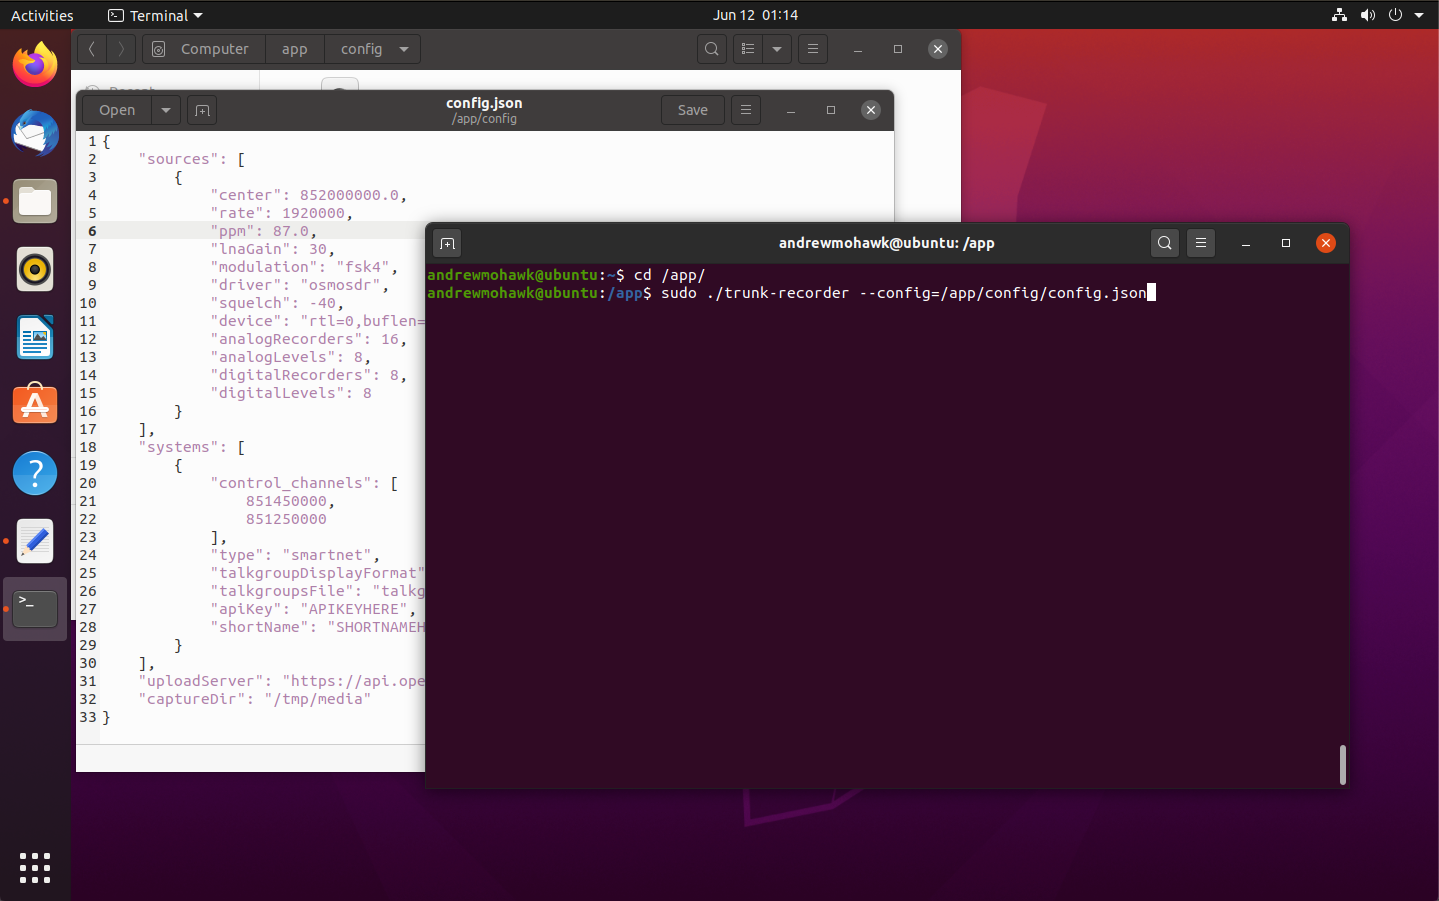
The output should look something like this:
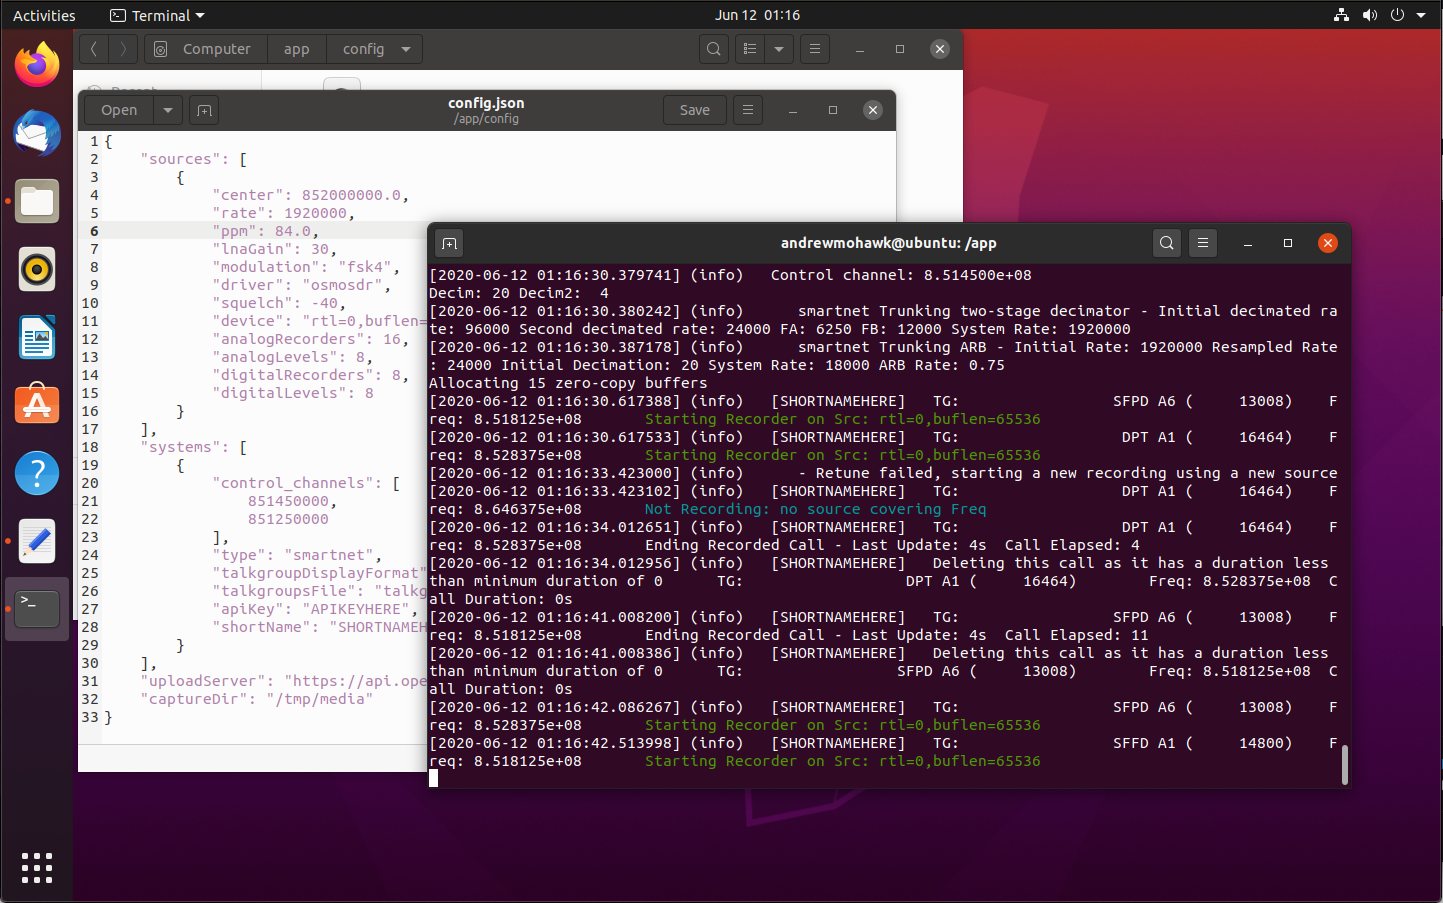
If you do not see something similar or see it continually saying “Retuning to Control Channel:” double check the settings in your config file. If you have set your API Key and Shortname correctly it will also say it is uploading.
Docker Container
First you need to clone the helper repo and build the docker image by doing the following:
git clone https://github.com/AndrewMohawk/trunkrecorder-helpers.git
cd trunkrecorder-helpers
sudo docker-compose build
This will then prepare and build the image for you, and may take some time, but we only need to do it once! The configuration files are also within this repo within the config/ directory, namely config.json and talkgroup-trunkrecorder-format.csv
Once you have edited these files and are ready to roll you can run the following
sudo docker-compose up
This will interactively run the docker container and you should see the same output as the virtual image. If there are any errors or you want to change the config you can stop this with ctrl+c, make the changes to the file and then run it again.
Once you are happy with how it runs you may want to run it in detached mode (in the background) with the following
sudo docker-compose up -d
of if you don’t want to run this with docker-compose you can use:
sudo docker run -d --restart always --privileged -v /dev/bus/usb:/dev/bus/usb -v /DIRECTORYYOUINSTALLEDTO/trunkrecorder-helpers/config:/app/config -v /DIRECTORYYOUINSTALLEDTO/trunkrecorder-helpers/media:/app/media andrewmohawk/trunkrecorder:latest
You can inspect the container by doing
sudo docker ps
sudo docker logs -f <containerid>
As seen here:

Fin
It was really awesome to see this working, definitely something to make me think about radio again and I think it has a lot of appeal for us radio noobs. The “trunk-recorder” project is awesome and recently the openmhz side was also put on github. I could definitely see further work being done here to do even more awesome things like speach-to-text to notify if any keywords are heard, trying to track the radios within the talk groups and what times they are used and maybe even some enhancements on the openmhz side!
The “ppm” is the receive error, measured in “parts per million”.
[…] For those starting to wade into radio as a hobby, one of the first real technical challenges is understanding trunked radio systems. On the surface, it seems straightforward: A control channel allows users to share a section of bandwidth rather than take up one complete channel, allowing for greater usage of the frequency range. In practice though it can be difficult to follow along, but now it’s slightly easier thanks to software defined radio. […]
[…] For those starting to wade into radio as a hobby, one of the first real technical challenges is understanding trunked radio systems. On the surface, it seems straightforward: A control channel allows users to share a section of bandwidth rather than take up one complete channel, allowing for greater usage of the frequency range. In practice though it can be difficult to follow along, but now it’s slightly easier thanks to software defined radio. […]
[…] For those starting to wade into radio as a hobby, one of the first real technical challenges is understanding trunked radio systems. On the surface, it seems straightforward: A control channel allows users to share a section of bandwidth rather than take up one complete channel, allowing for greater usage of the frequency range. In practice though it can be difficult to follow along, but now it’s slightly easier thanks to software defined radio. […]
This is a pretty extensive guide. Thank you for putting this together. Have you tried using the software called Unitrunker? I use it to monitor local comms here in Vacaville and even gave a presentation of in at our local ham radio club on Ham Radio TV on youtube.
I did try unitrunker, but I found it pretty unintuitive to use initially, I also wanted to have the calls available for other people to listen so I needed the saving/uploading that trunk-recorder offered. Someone also suggested I look at SDRTrunk again which I should do!
Thank you for this write-up. It is extremely informative and I’m ready to dive in and try building a system to try to receive my statewide (Montana) trunked system. I know in years past, it was a requirement to have one SDR listening to the control channel and a second one tuning to the talkgroup conversations. Is this still a requirement or best practice? And what specific SDR models would you recommend?
Thanks for the kind words! With regards to the amount of SDRs it depends on the system, but many of the systems have the control channel very close to the usable channels for the radios and as such a single RTLSDR can cover a large portion of the space. It will look at the entire 2.4Mhz width and pick the control channel as well as the TG conversations out of it. As for recommendations, I really am enjoying this combo: https://www.nooelec.com/store/sdr/sdr-receivers/nesdr-smart.html , especially for people just starting out (I got one of these for one of my friends!)
[…] on his blog Andrew Nohawk has uploaded an excellent guide that explains trunked radio, how it works, how to use radioreference to look up trunked radio frequencies in your area, and how […]
[…] on his blog Andrew Nohawk has uploaded an excellent guide that explains trunked radio, how it works, how to use radioreference to look up trunked radio frequencies in your area, and how […]
[…] on his blog Andrew Nohawk has uploaded an excellent guide that explains trunked radio, how it works, how to use radioreference to look up trunked radio frequencies in your area, and how […]
[…] https://www.andrewmohawk.com/2020/06/12/trunked-radio-a-guide/ […]
Andrew…. Great write up! Thank you for doing this!
Thanks Bill! I appreciate the comment :)
I laughed at the comment about being stumped on the talk group list csv since I HAD THE EXACT SAME PROBLEM when setting up trunk recorder a year ago. I ended up posting an issue on github but was able to figure it out before getting a response. Now I’m back in SF (and on top of Cathedral Hill!), setting everything up from scratch in a new VM, and I come across your guide while setting up the csv! I guess it’s a small world :)
I had some issues with the HackRF drifting due to environmental temperature changes, and was planning on buying a GPS clock for reference, but it seemed overly temperamental. Did you run into any issues with frequency drift causing Trunk Recorder to start looking for the control channel, and eventually just getting lost?
Some other fun things to look at in case you haven’t…
SDRSharp w/audio out to DSD – good for signal hunting
UniTrunker – Follow control channels and multiple talk groups using VCO’s